Frequently Asked Questions (FAQ)
How to Сonfigure the Hardware Tab Settings?
Select the hardware type:
- Select the CPU hardware type to run the analytics processing on the central processor.
- Select the GPU hardware type to run the analytics processing on the graphics processor.
Select the decoding type. Depending on the type of decoding, the video is processed on different devices:
- CPU selection provides video decoding on the central processor.
- Intel selection provides video decoding on the Intel Integrated Graphics Processor (Intel HD Graphics).
- NVDEC selection provides video decoding on the NVIDIA graphics processor.
The FPS mode allows to set the number of frames per second processed by the analytics:
- A higher frame rate gives a better result if the video contains dynamic objects (e.g. the people flow in a shopping center or the vehicle traffic on the road).
- A lower frame rate is sufficient if the video contains static objects (e.g. vehicles in a parking lot).
The Key Frame mode selects only keyframes from the video stream. Keyframes have the lowest compression ratio, which saves resources for decoding and processing the video stream by the analytics.
The Once Every X Seconds mode processes 1 frame after a set period of time, while the remaining frames are skipped.
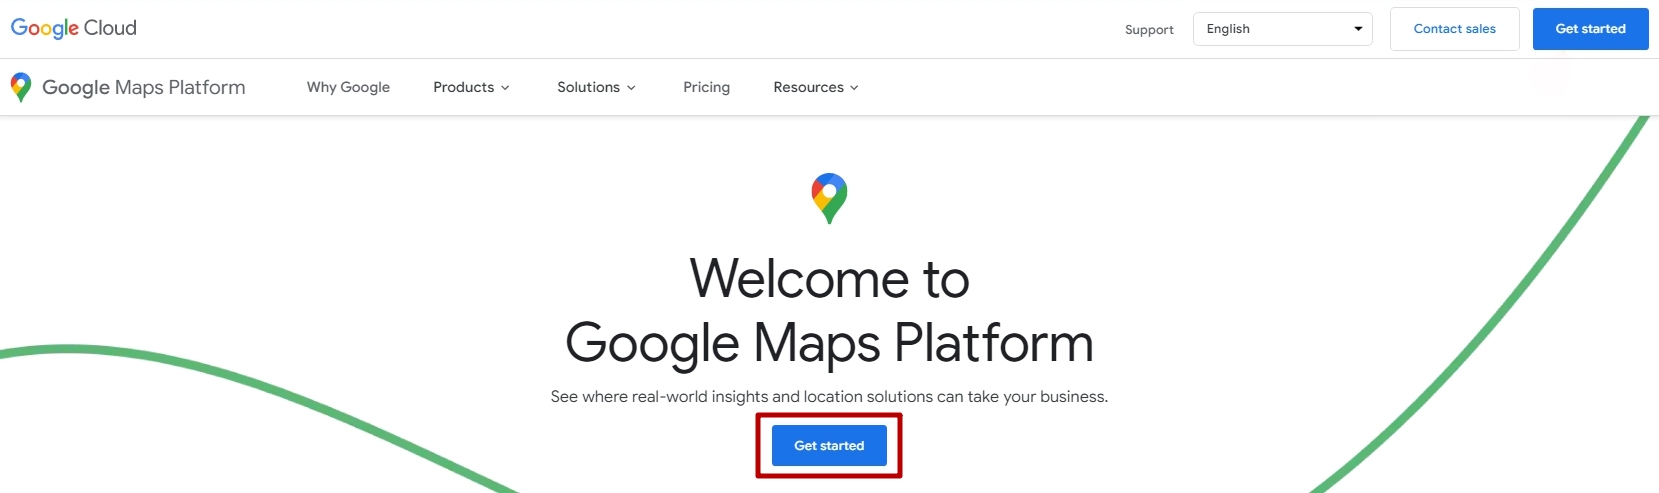
How to Get Google Maps API Key?
To get the Google Maps API key, open the Google Maps Platform by the link and click the Get Started button:
Once signed in, verify the Google billing account.
Step 1:
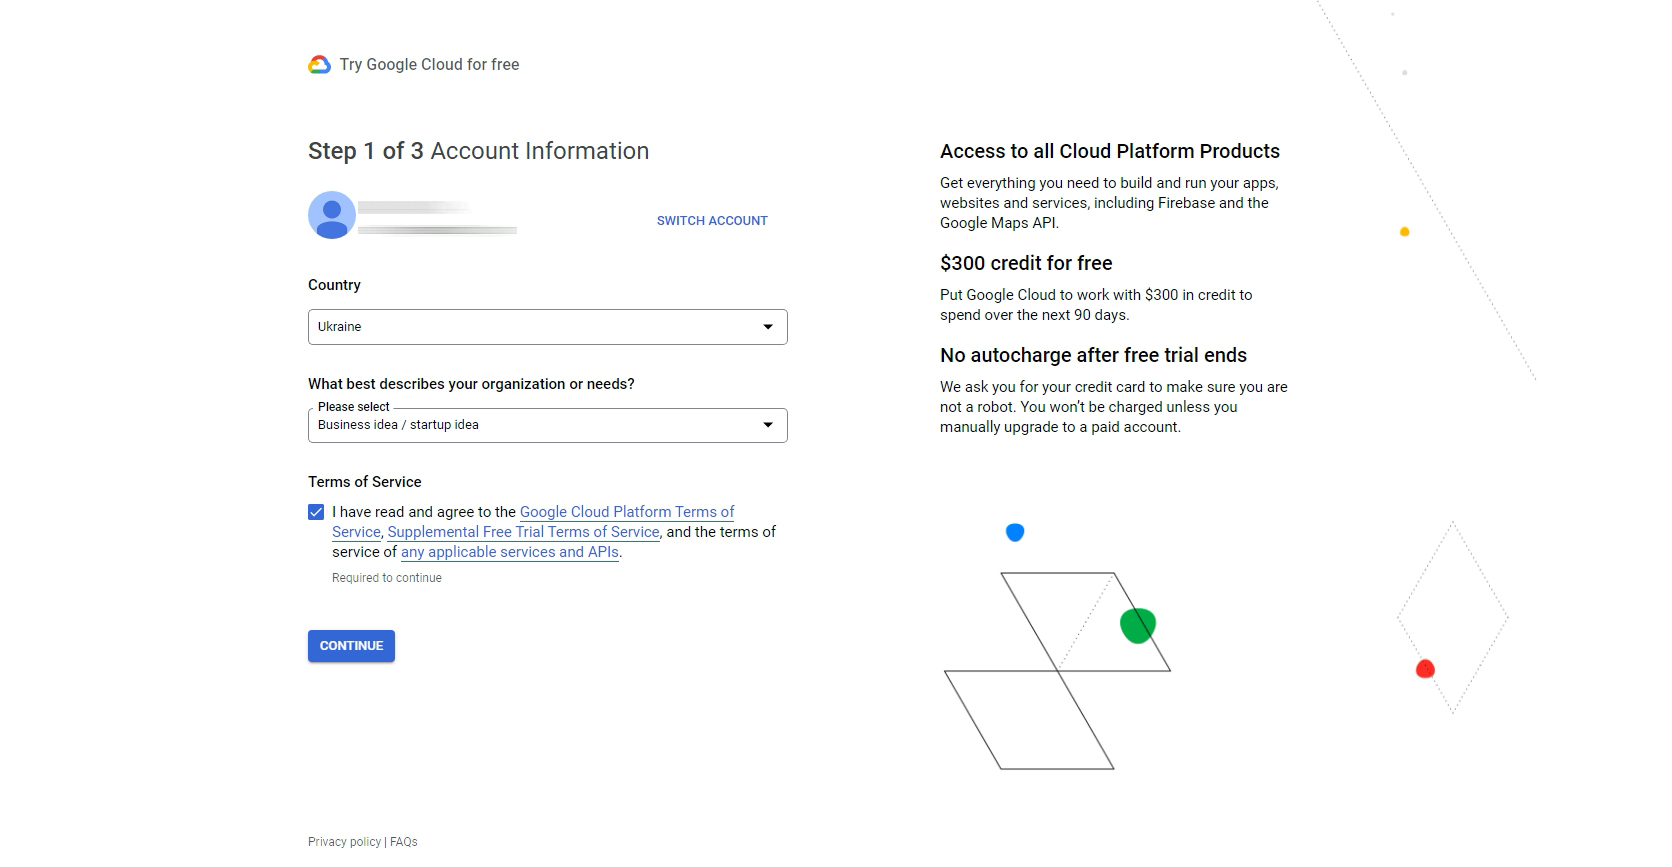
- Select the appropriate answers from the drop-down lists
- Carefully read the Terms of Service and check the box to agree
- Click the Continue button
Step 2:
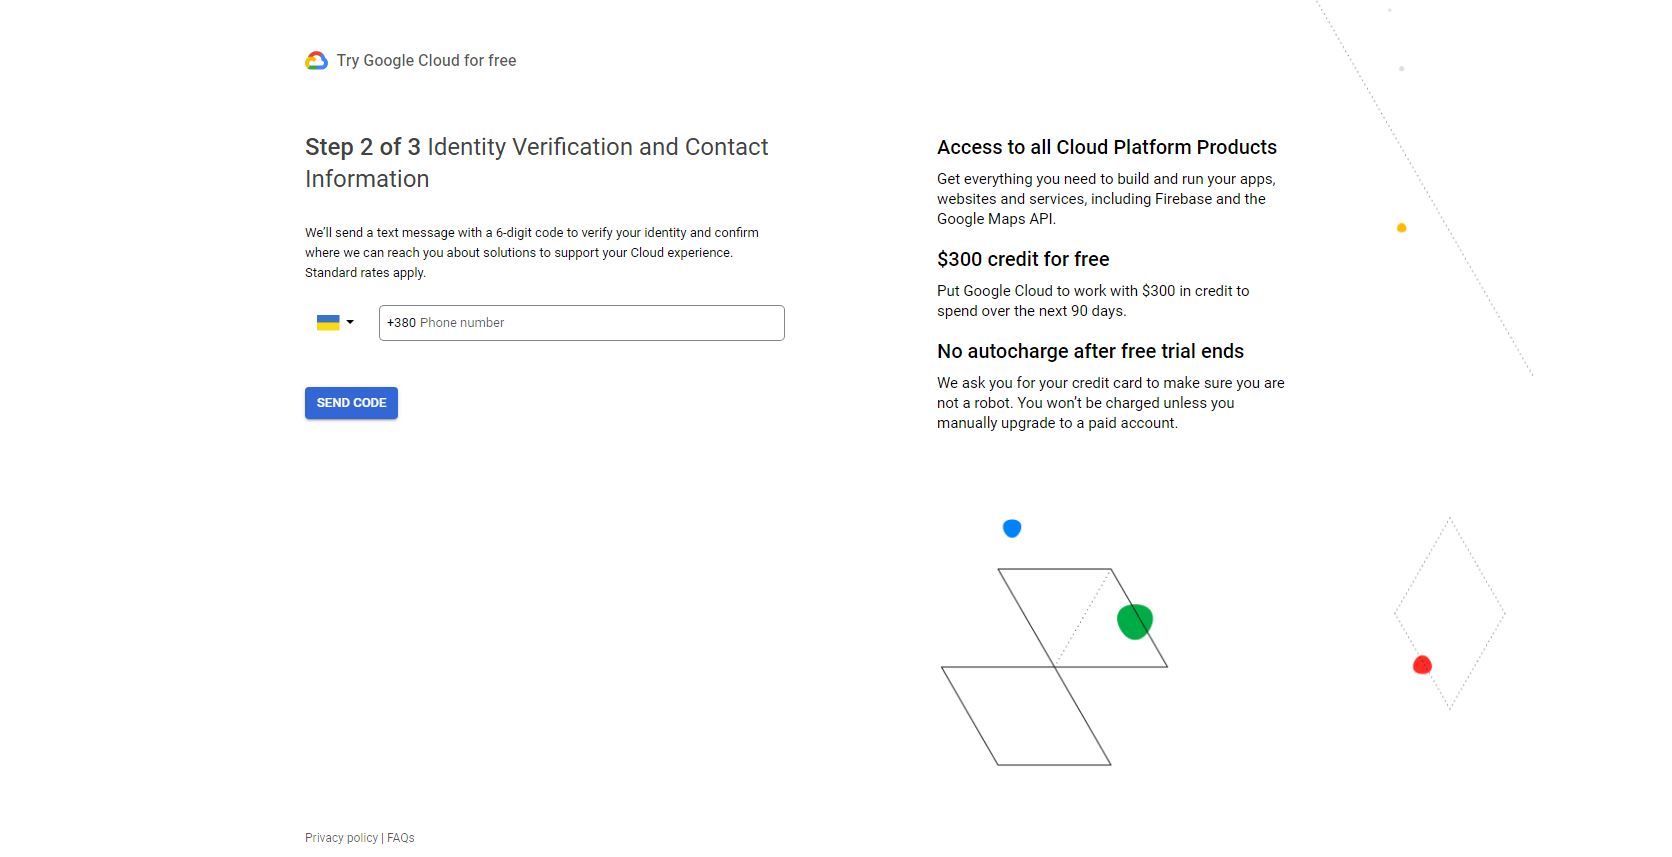
- Enter the phone number
- Click the Send Code button
Once the verification code is obtained by SMS:
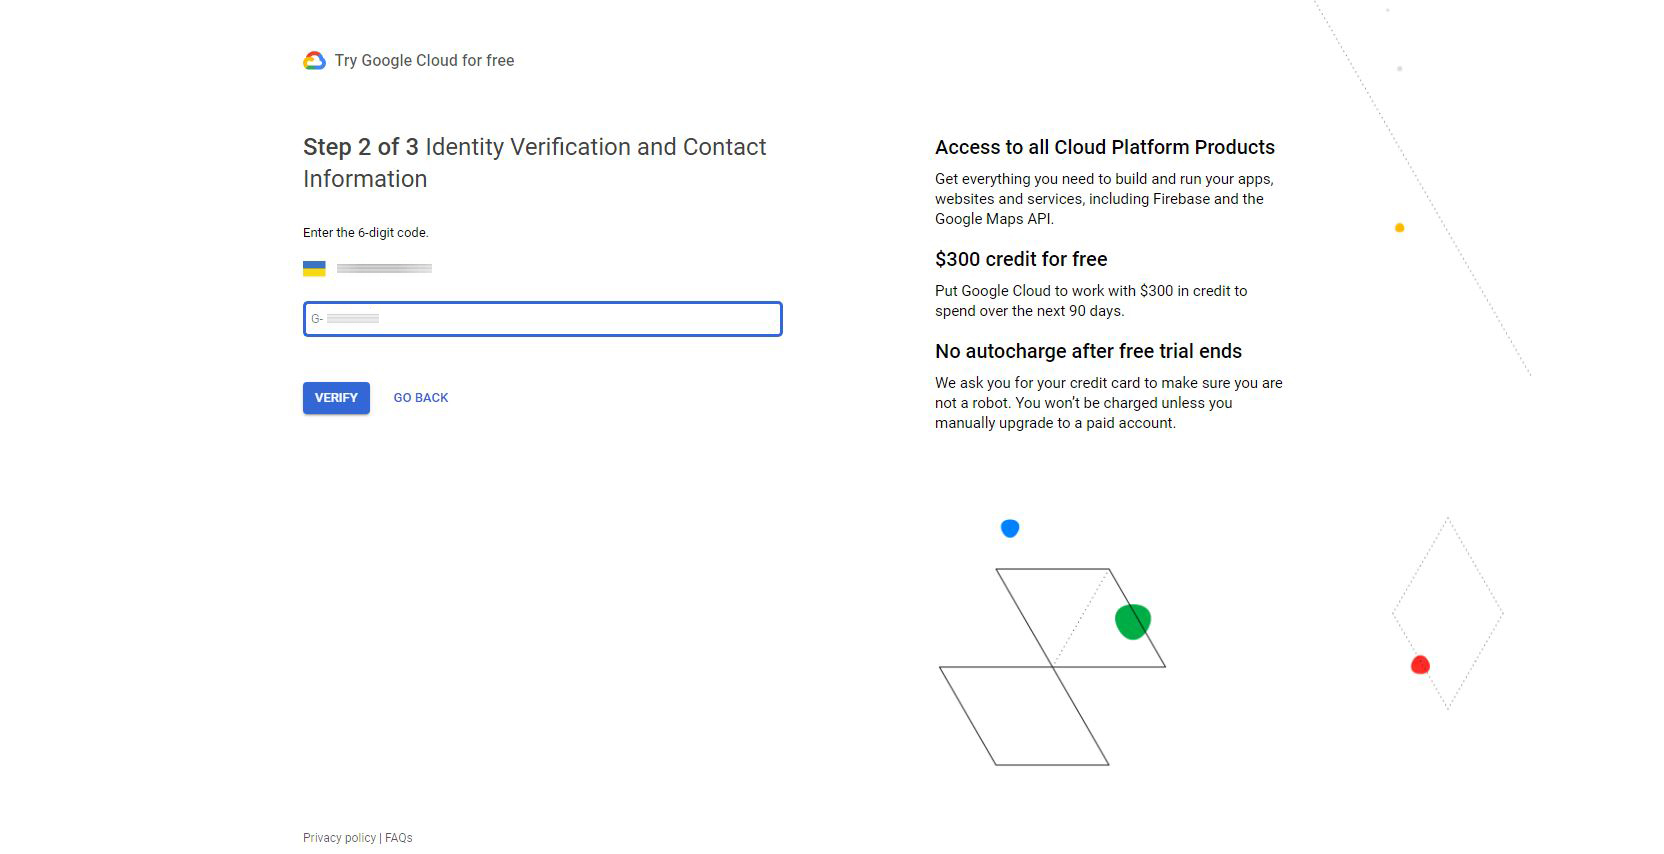
- Fill in the required field with the obtained verification code
- Click the Verify button
Step 3:

- Fill in the required fields
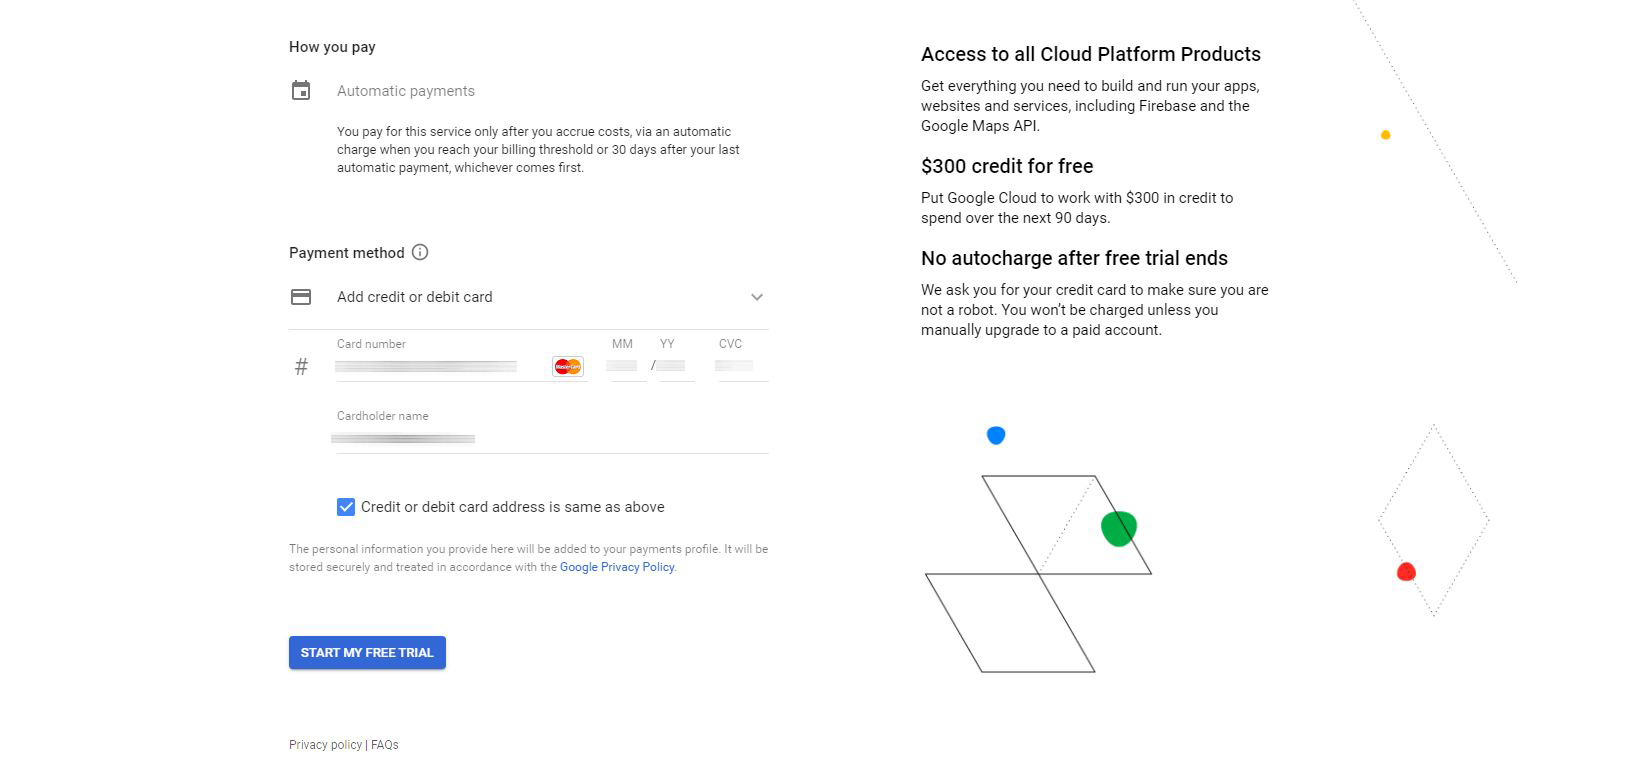
- Click the Start My Free Trial button
Once the billing account is verified:
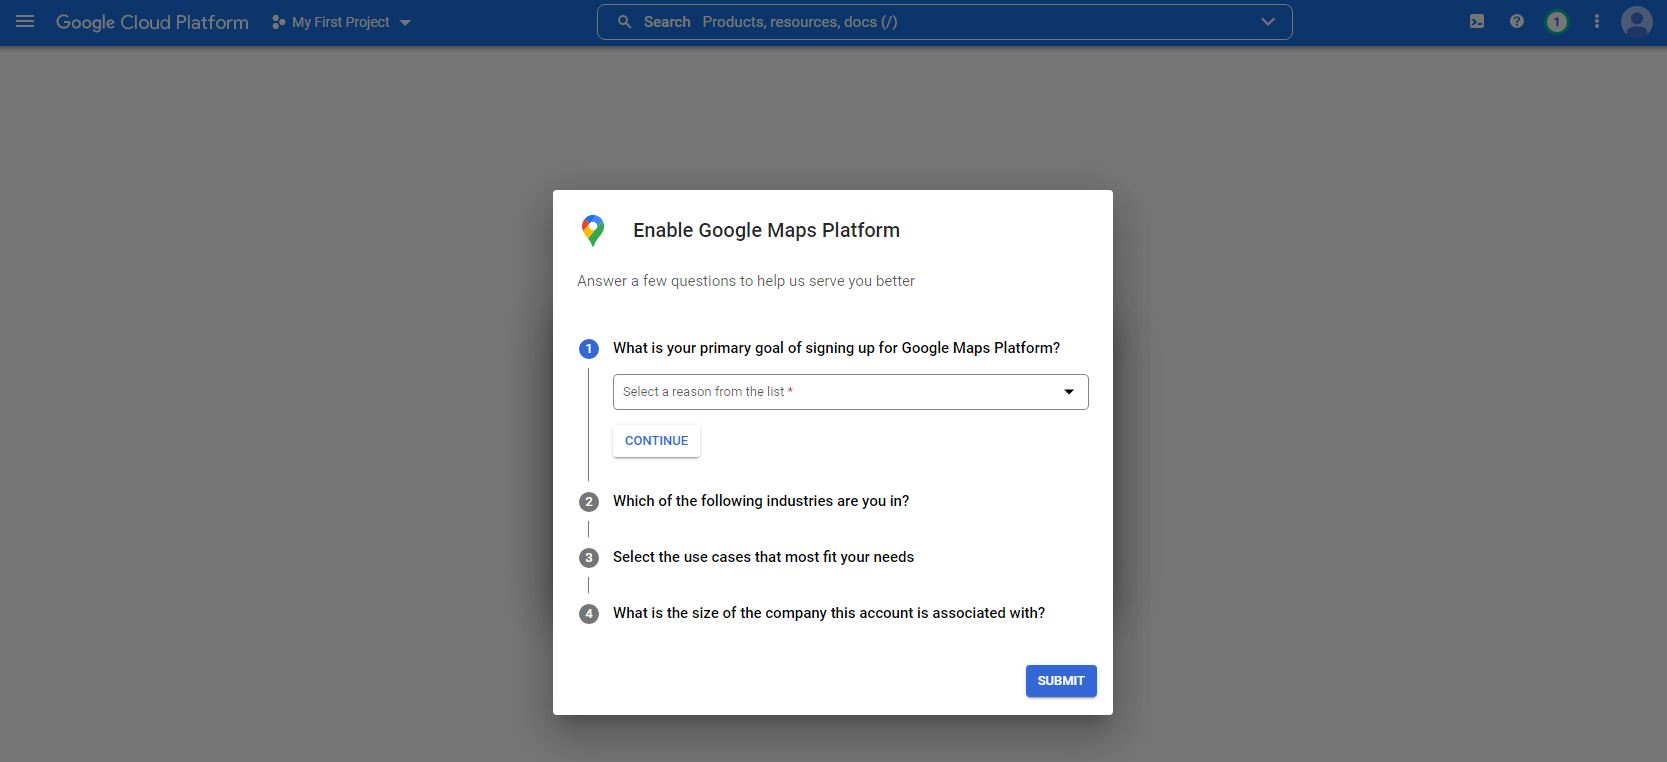
- Answer a few questions
- Click the Submit button
After the submission, a new window with the generated API key opens:
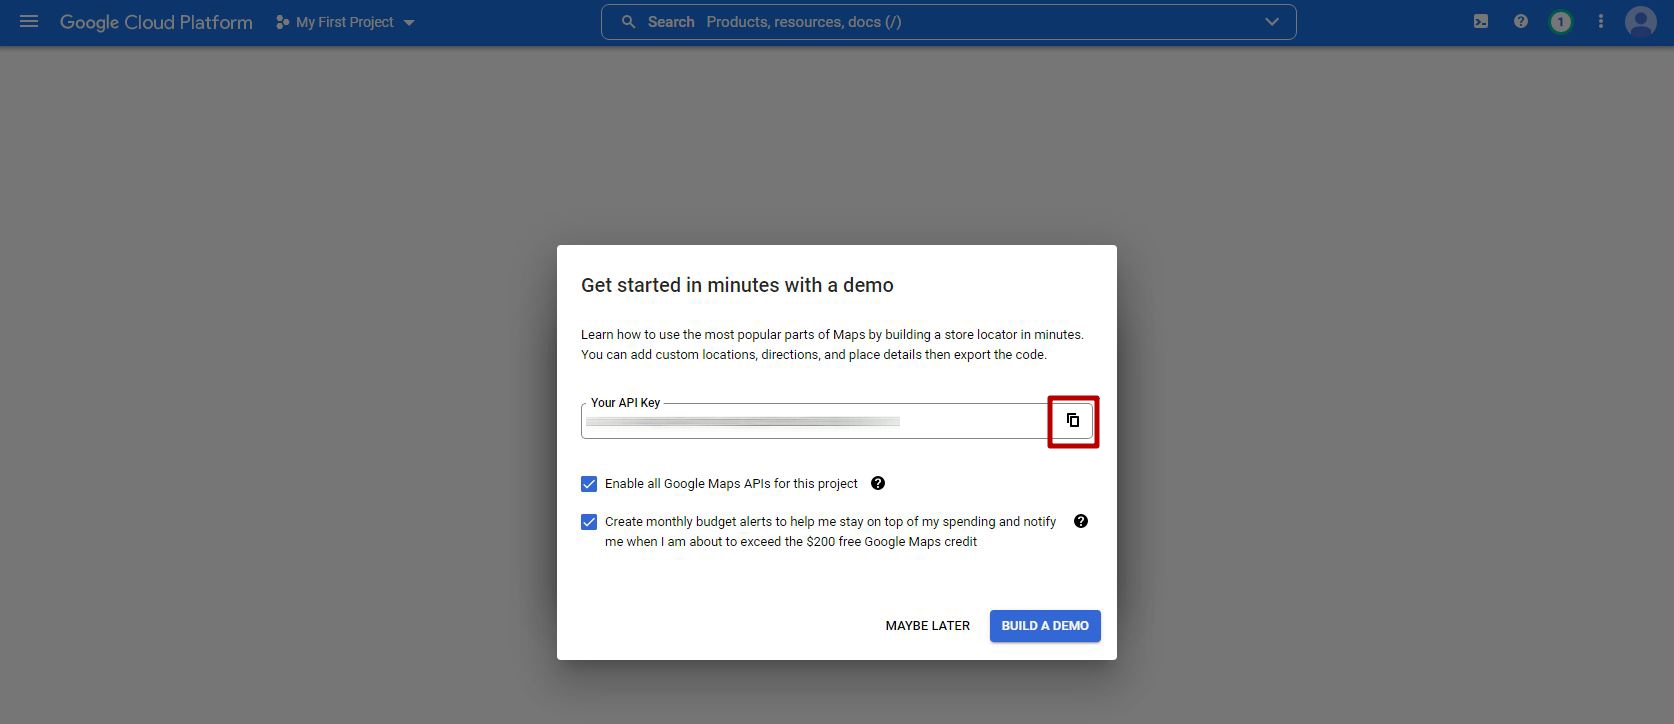
- Copy the API key to the clipboard
- Click the Maybe Later button
After redirecting to the control console, select the APIs item:
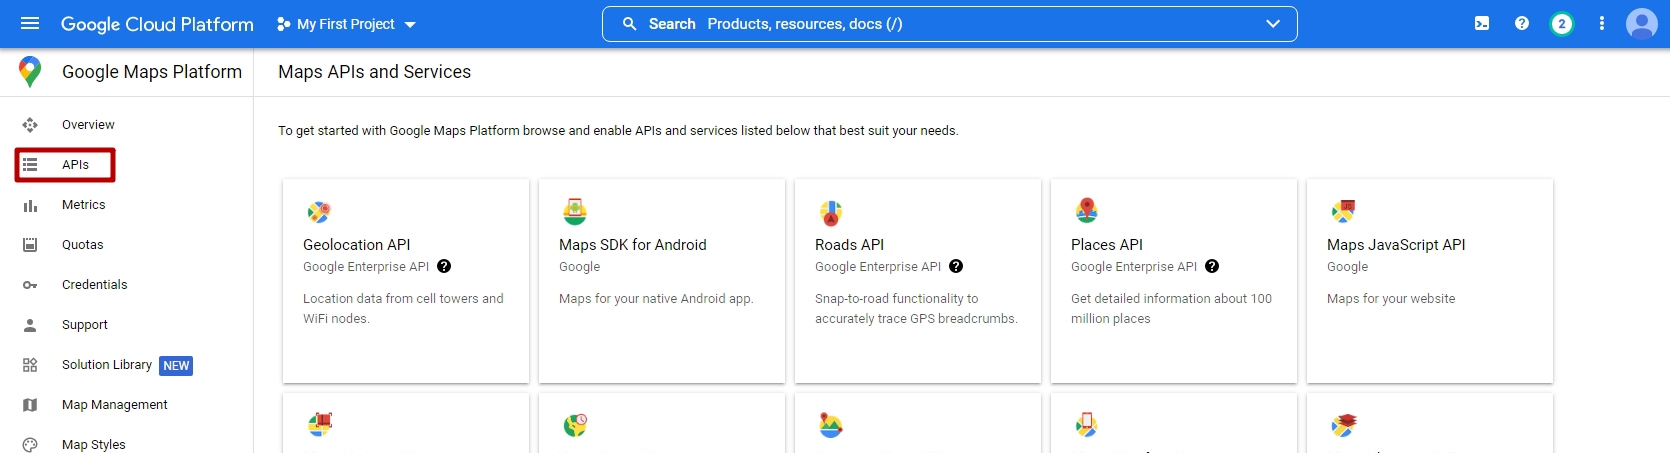
In the APIs item, make sure the following APIs are enabled:
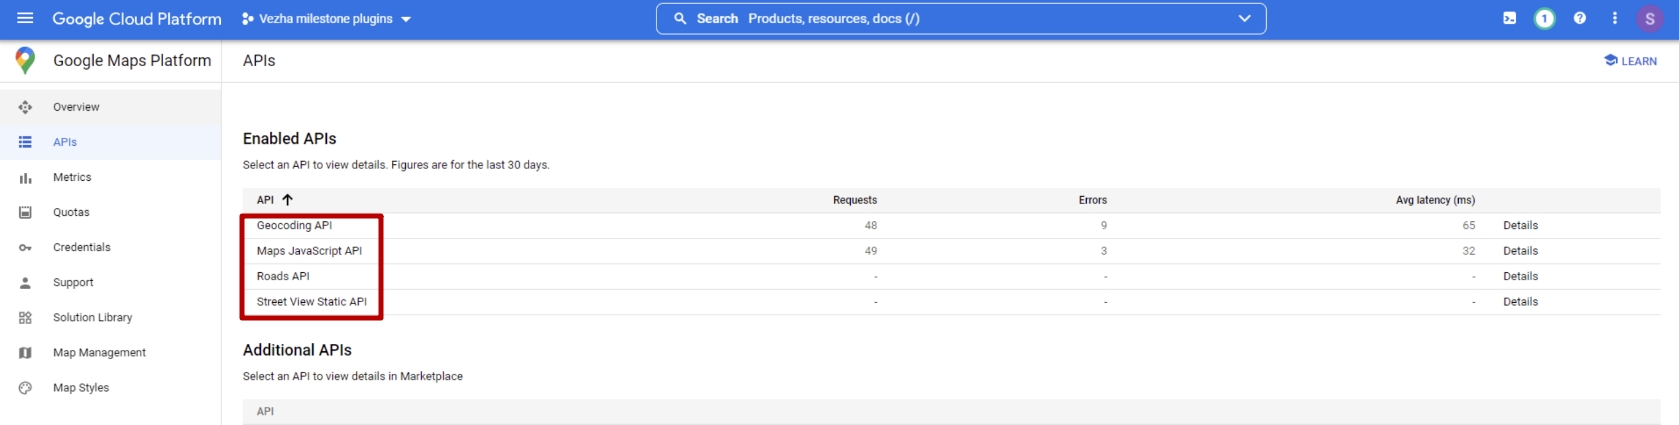
- Geocoding API
- Maps JavaScript API
- Roads API
- Street View Static API
How to Access API Documentation?
To access the API documentation (Swagger), use one of the following methods.
Access API Documentation through the Settings section:

- Navigate to the Settings section
- Open the General item
- Click the View API Documentation button within the API Token tab
Access API Documentation via URL:
- Copy the following URL: http://your-server-ip-address/settings/plugin_docs
- Paste the URL into the address bar of your browser
- Replace "your-server-ip-address" in the URL with the IP address of your server
How to Create a Cyclic RTSP Video Stream from a Video File?
To create a cycled RTSP video stream from a video file, proceed with the following instructions.
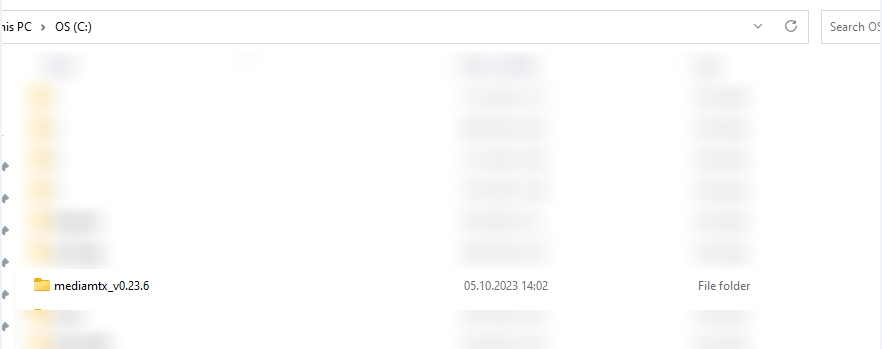
Download the ZIP archive with the MediaMTX software at the following link: Download MediaMTX. Extract the downloaded archive in the root folder of your Drive C:

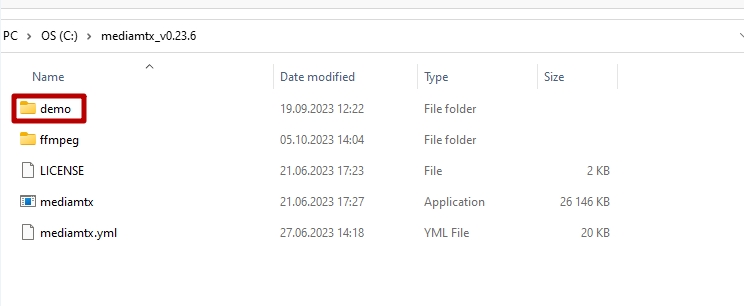
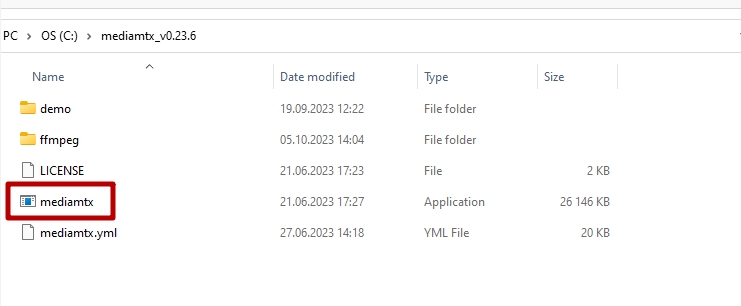
Open the "mediamtx_v0.23.6" folder on Drive C:
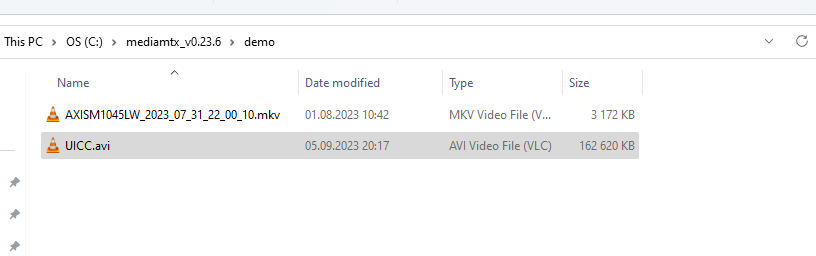
Copy the video files intended for conversion into an RTSP video stream into the "demo" folder:
The example of video files inserted in the "demo" folder:
Execute the "mediamtx.exe" file:
Allow firewall access:
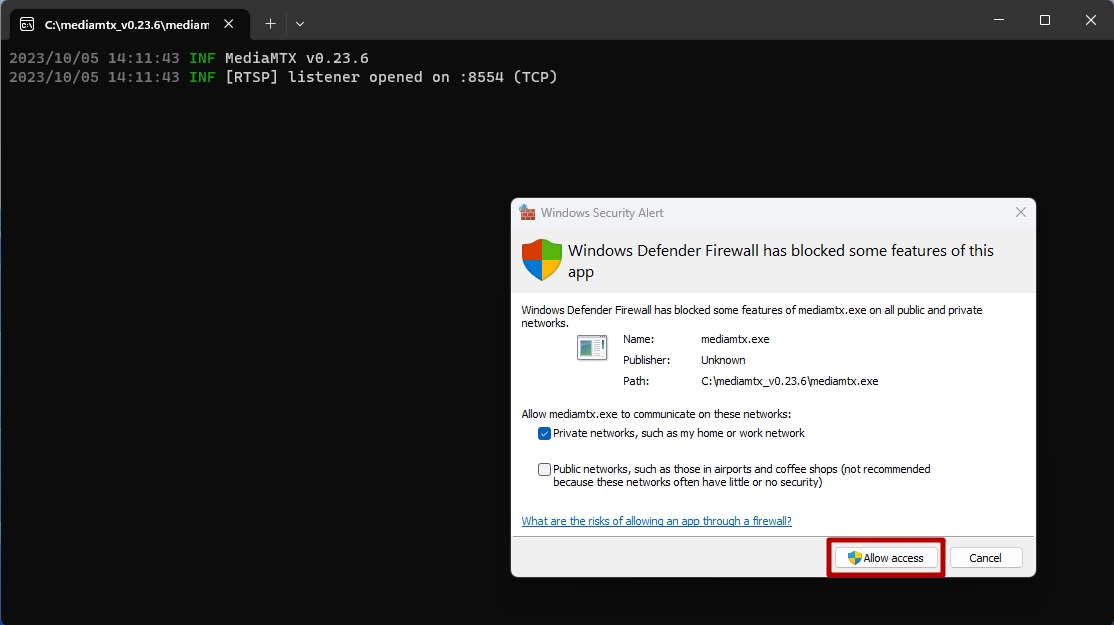
- Ensure that TCP Port 8554 is available when launching the MediaMTX program.
- You can add new video files to the "demo" folder without exiting the MediaMTX program.
- For proper video stream operation, the MediaMTX program must be continuously running.
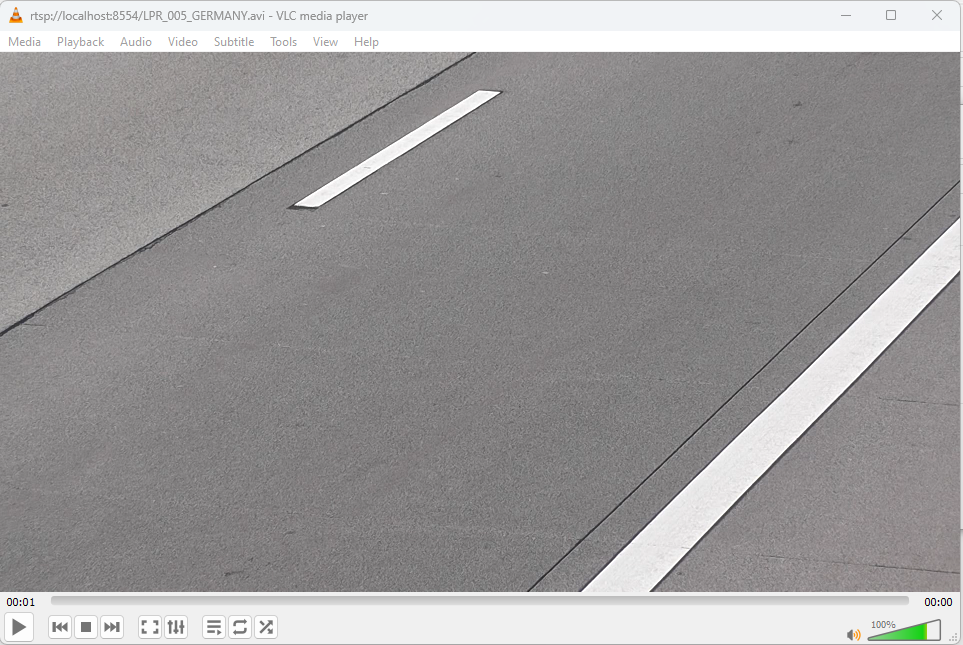
Check in the VLC Player that the video stream opens and plays:

- Enter the address as follows: rtsp://localhost:8554/LPR_005_GERMANY.avi
- Click the Play button
After following these steps, the video stream should open and play, as shown in the example:
Add the video stream obtained from the video file to the system. Configure the mandatory parameters following these steps:
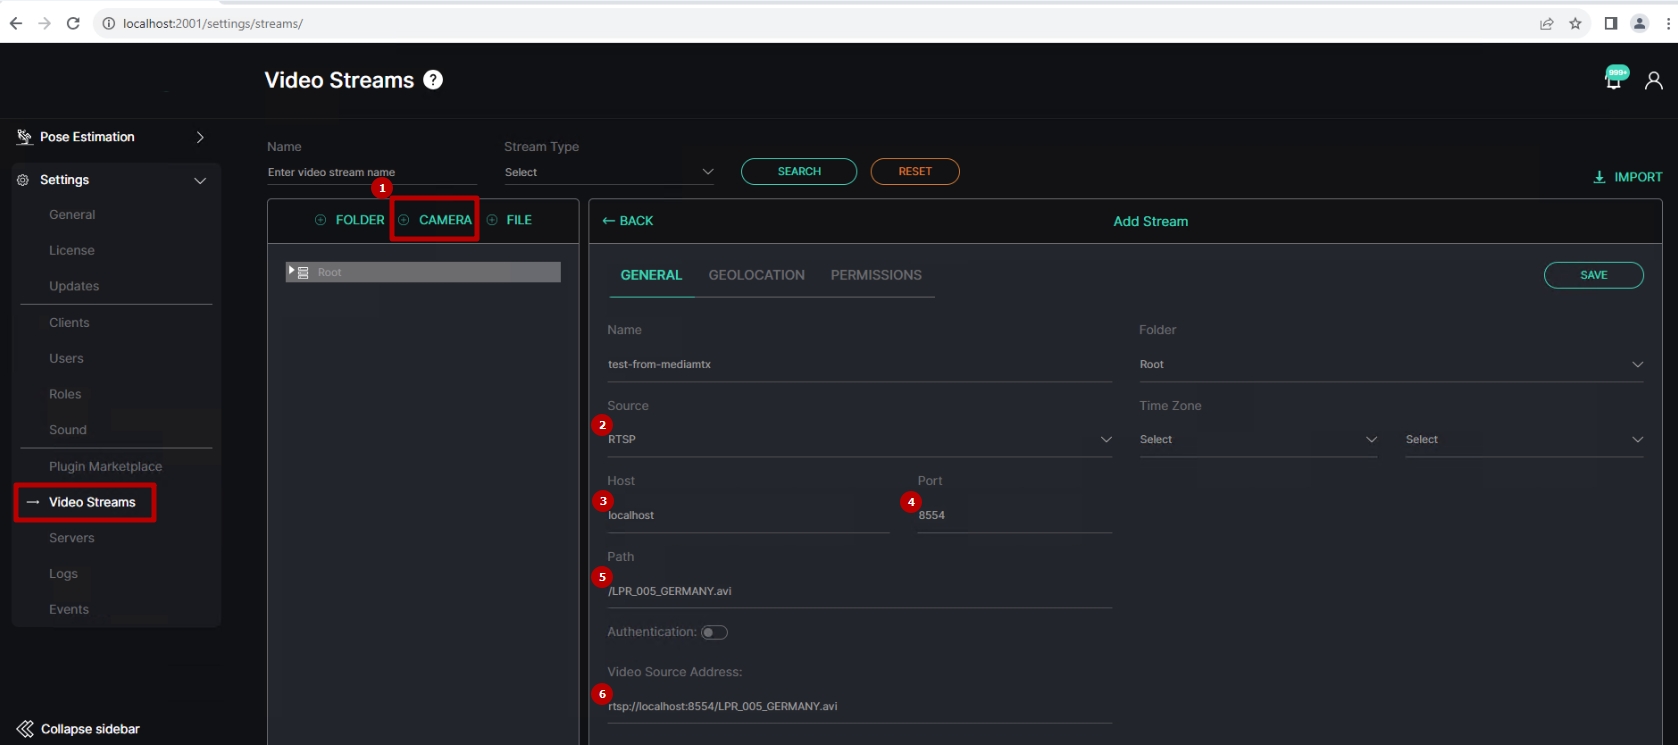
- Select the Camera button in the Video Streams section
- Choose RTSP as the stream type
- Enter the server address in the Host field
- Enter 8554 in the Port field
- Specify the /video_file_name in the Path field, as shown in the example: /LPR_005_GERMANY.avi
- Provide the complete stream address in the Video Source Address field, as shown in the example: rtsp://localhost:8554/LPR_005_GERMANY.avi
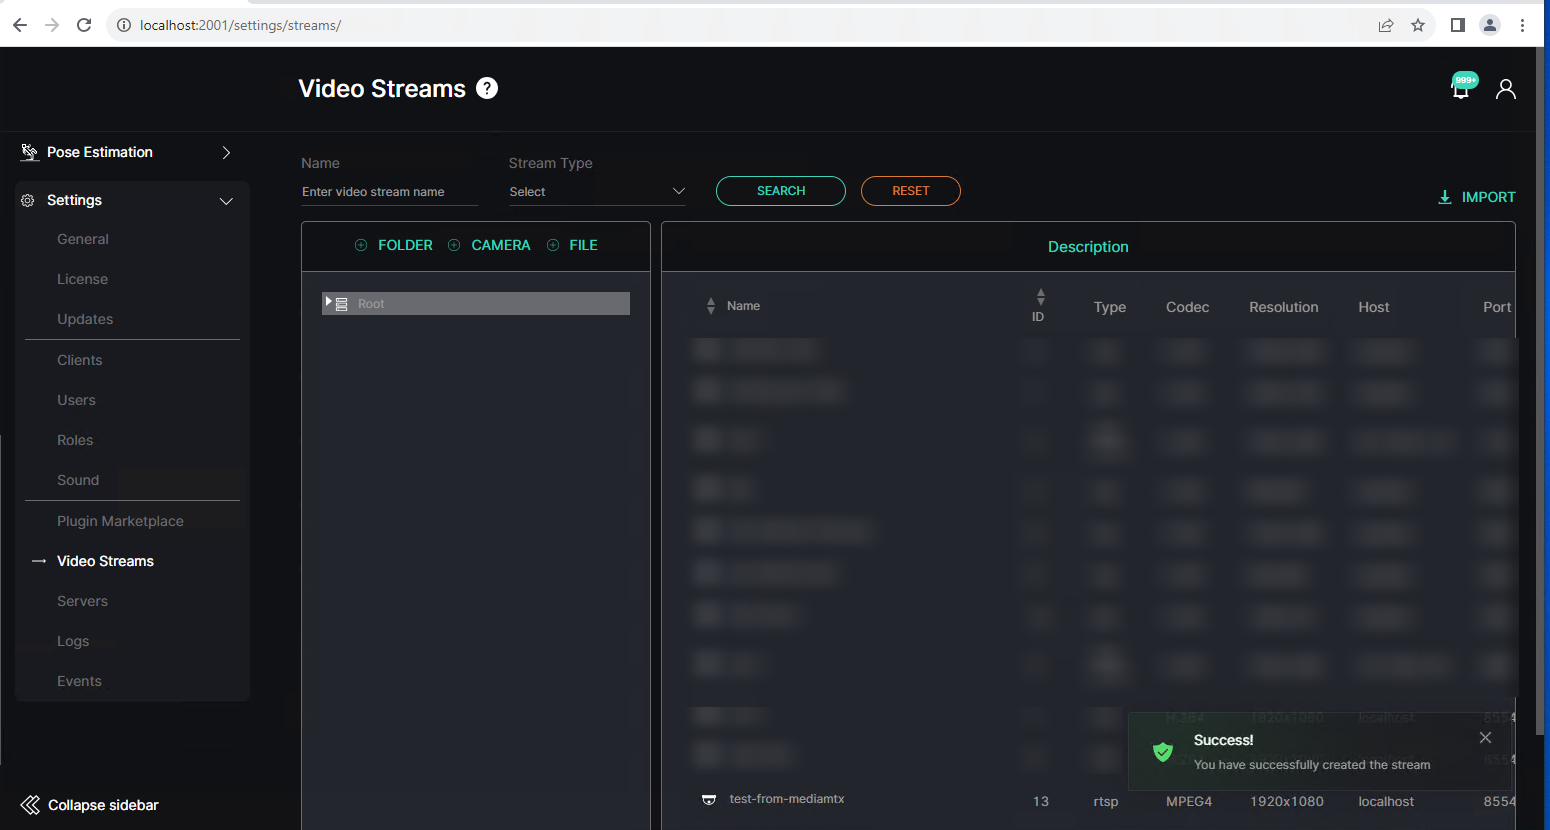
Once the video stream is saved, the Success Notification identifies, that the video stream was successfully created and can be used for video analytics:
Check the video stream grabs the frame:
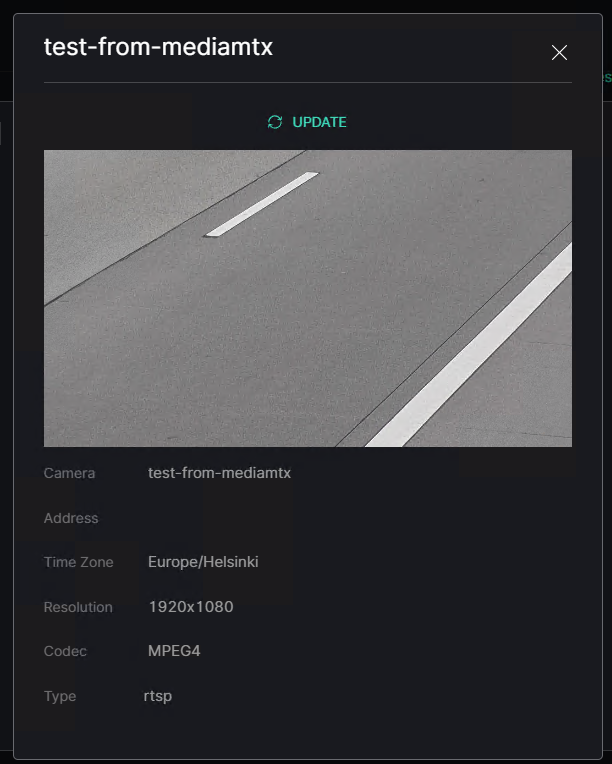
- Find the desired video stream in the Description block
- Hover the mouse over the Settings icon to open the drop-down menu
- Select the View Camera information option
- Click the Update button in the pop-up window
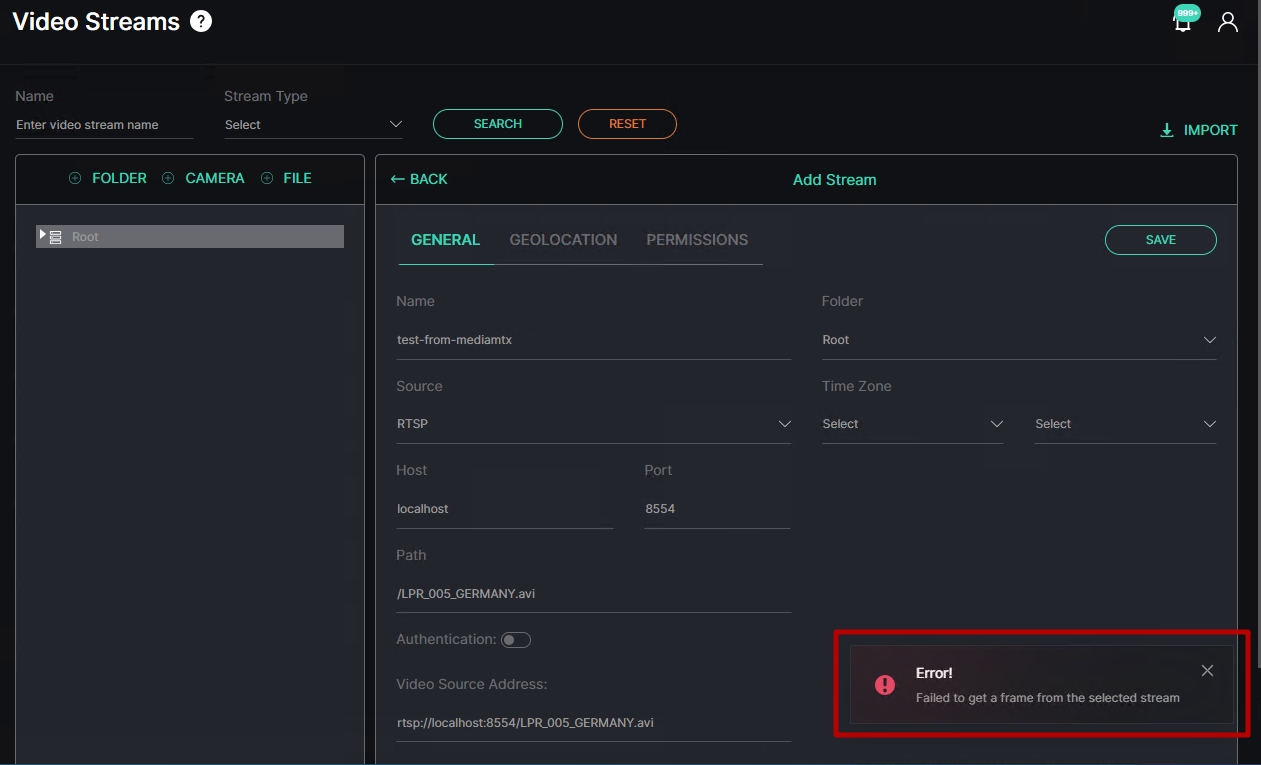
If you are not receiving an image, please ensure that you have correctly specified the following:
- IP address is entered correctly in the Host field
- File name is specified correctly in the Path field
- MediaMTX program is continuously running
If everything has been done correctly, then the issue is with the video content, resulting in an error, which indicates that the frame can not be grabbed from the video stream:
How to Change the Region for LPR Analytics Without Reinstalling the System?
To modify the region for License Plate Recognition (LPR) analytics, proceed with the following steps.
Navigate to the "alpr.properties" file, which is, by default, located at:
C:\ProgramData\Incoresoft\process-runner\alpr.properties
Edit the "alpr.properties" file.
Open the alpr.properties file in a text editor and locate the following section:
{
"motion": "false",
"model": "EUROPE"
}
To change the LPR model for the desired region, update the value for the "model" parameter to one of the following options:
- "EUROPE"
- "ARABIC"
- "AUSTRALIA"
- "USA"
For the "USA" model, also add the "submodel_id" parameter, and set its value to "1":
{
"motion": "true",
"submodel_id": "1",
"model": "USA"
}
Save the modified "alpr.properties" file, ensuring that the JSON structure remains valid, and all values are enclosed in quotes.
After editing the "alpr.properties" file, restart the IncoreSoft ProcessRunner service to apply the changes.
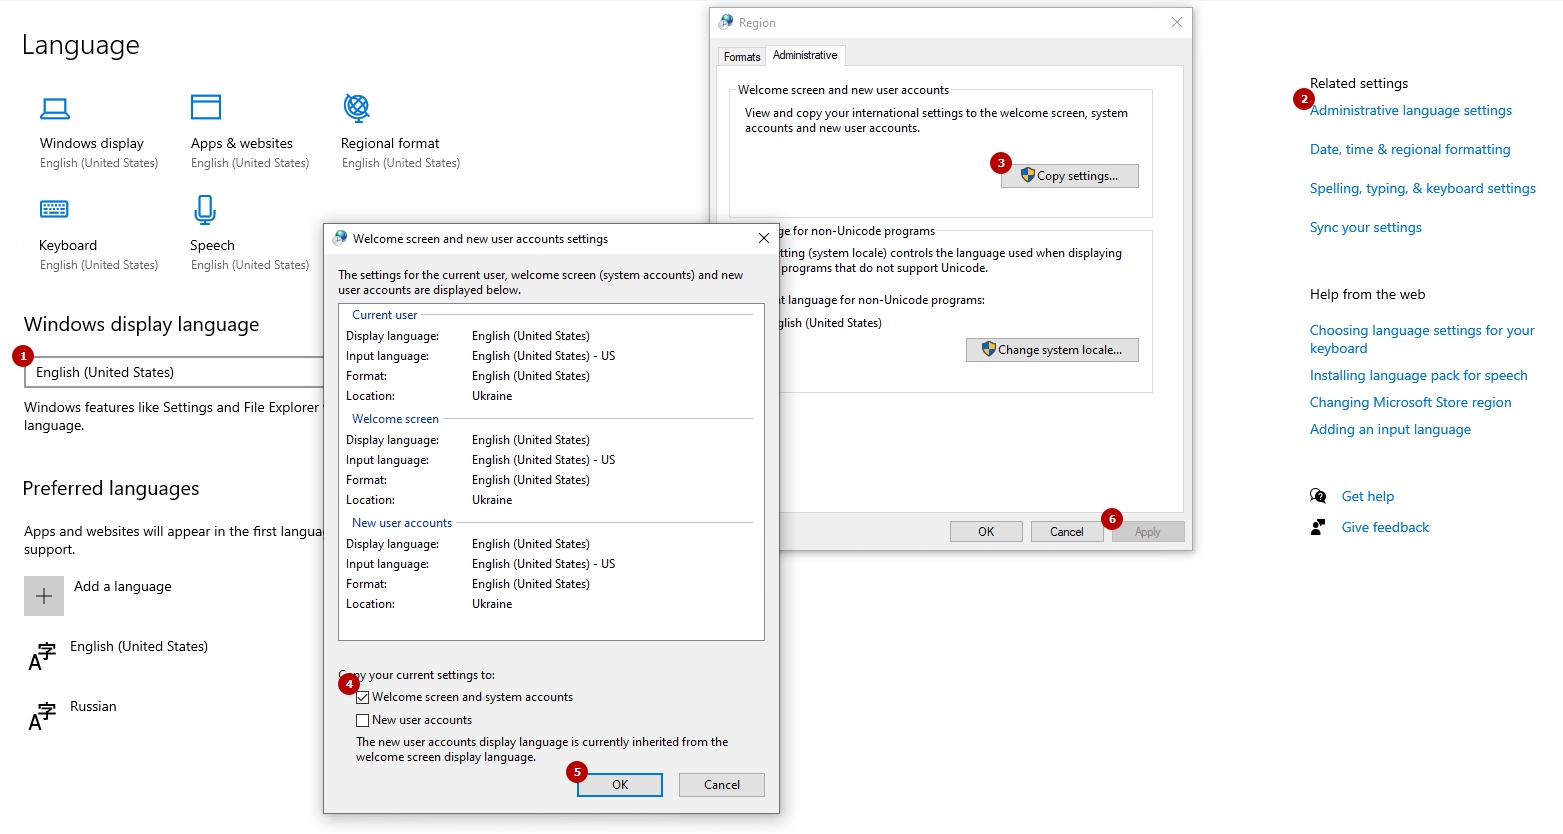
For the "ARABIC" model, additionally enable UTF-8 support. In the Windows OS open the Start menu, select the Control Panel, and choose Regional Standards. In the Region window, follow these steps:
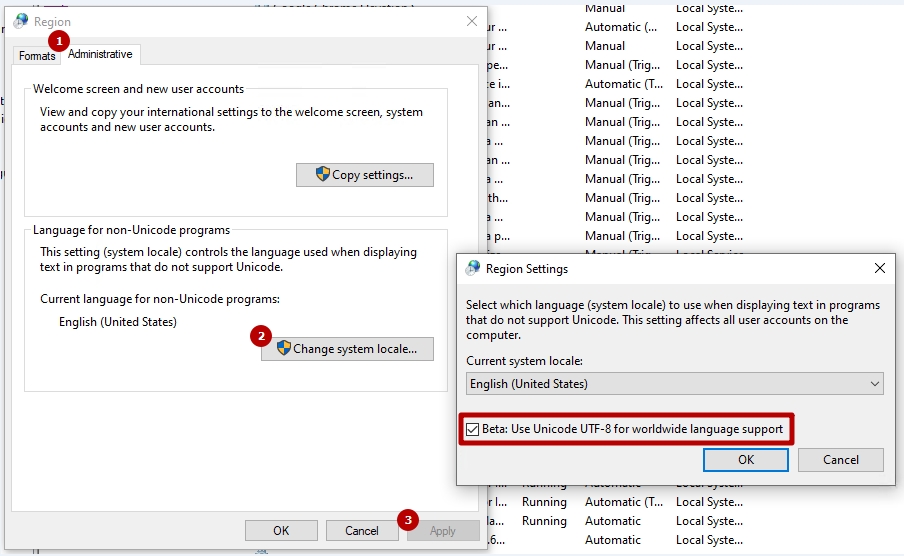
- Navigate to the Administrative tab
- Click the Change System Locale button. In the Region Settings pop-up window:
- Check the box for Beta: Use Unicode UTF-8 for Worldwide Language Support
- Click the Ok button
- Click the Apply button to save the changes
How to Enable Video Stream Display in the Analytics Live View?
If the analytics is functioning correctly and producing results, but the video stream is not displaying in the live mode, and you see the message "Failed to load the video in MJPEG format. Please try to update the video stream" or "Reconnecting to the video stream. Please wait...", follow these steps:
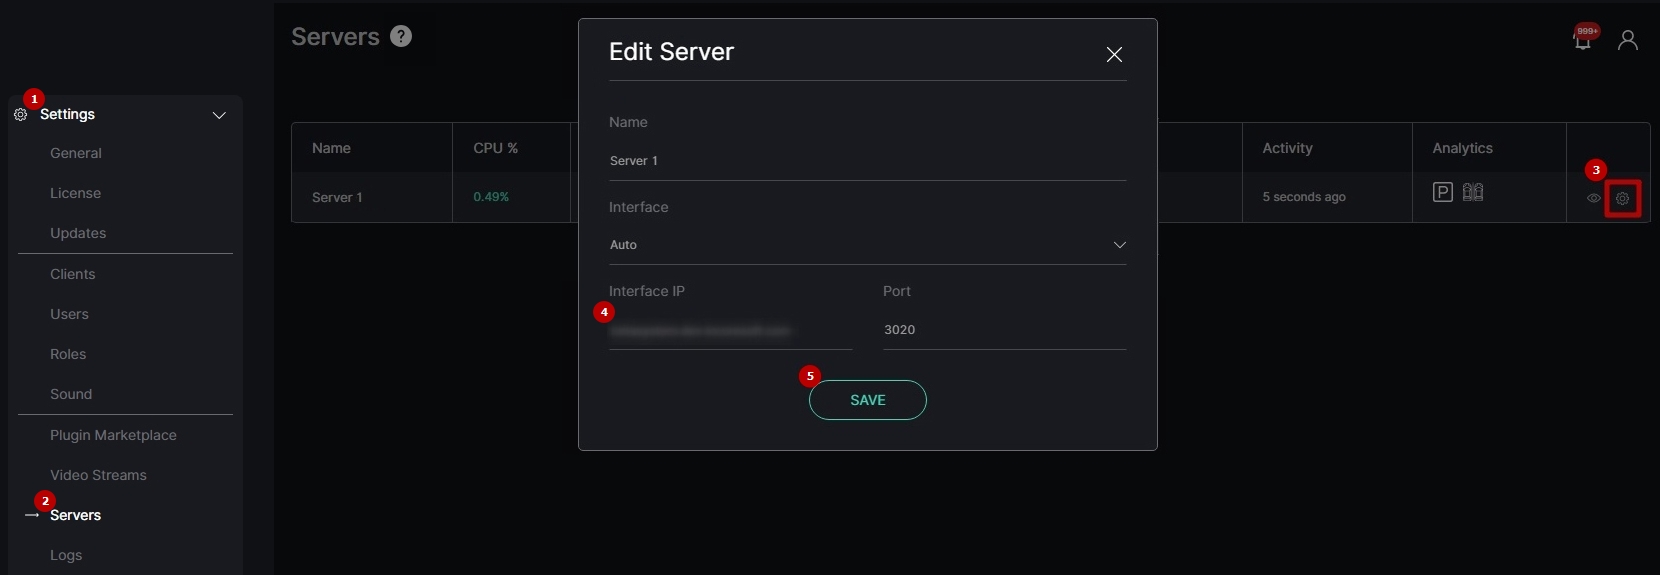
- Open the Settings section
- Navigate to the Servers item
- Click the Settings icon on the toolbox for the required server
- Specify the IP address of the analytic server responsible for broadcasting real-time analytics in the Interface IP field
- Click the Save button to save the changes
If you changed the Port, after saving the settings it is necessary to restart the analytical services:
- For Windows:
- Press the Win + X keys and select the Computer Management option in the context menu
- Navigate to the Services and Applications tab
- Select the Services option
- Select Incoresoft ProcessRunner Service from the list and click the Restart button to restart the service
- For Linux: sudo systemctl restart incoresoft-process-runner.service
How to Change the System User Language in Windows?
Changing the system user language in Windows can be beneficial when encountering issues such as difficulty with initial system login, license activation, adding a video stream to the system, or creating analytics. This is particularly relevant when the "Request processing error" system message appears, often associated with the system user language set to Turkish or Korean.
To change the system user language in Windows, follow these steps:
- Open the Start Menu
- Navigate to Settings
- Select the Time & Language settings block
- Click the Language section in the left menu
Proceed with the following steps:
- Choose English for the Windows Display Language setting
- Go to Administrative Language Settings
- Click the Copy Settings... button
- Check the box for Welcome Screen and System Accounts
- Click the Ok button in the Welcome Screen and New User Accounts Settings pop-up window
- Click the Apply button in the Region pop-up window to save changes
After applying these settings, restart the PC for the changes to take effect.
How to Display Analytics Broadcasting in a Browser for Ubuntu with GUI?
If you wish to stream live analytics in your browser on Ubuntu with GUI, regardless of the location of the analytics broadcasting server - whether it's on the same machine or another computer running Windows or Linux - you need to additionally install ffmpeg. Use the following command:
sudo apt-get install ffmpeg
How to Send Events to External Software's API via Event Manager?
To send analytics events data to an external software's API via Event Manager, proceed with the following steps.
Step 1: Create an event in the Events item of the Settings section and configure it in the Event Manager Constructor.
In the Event Manager Constructor:
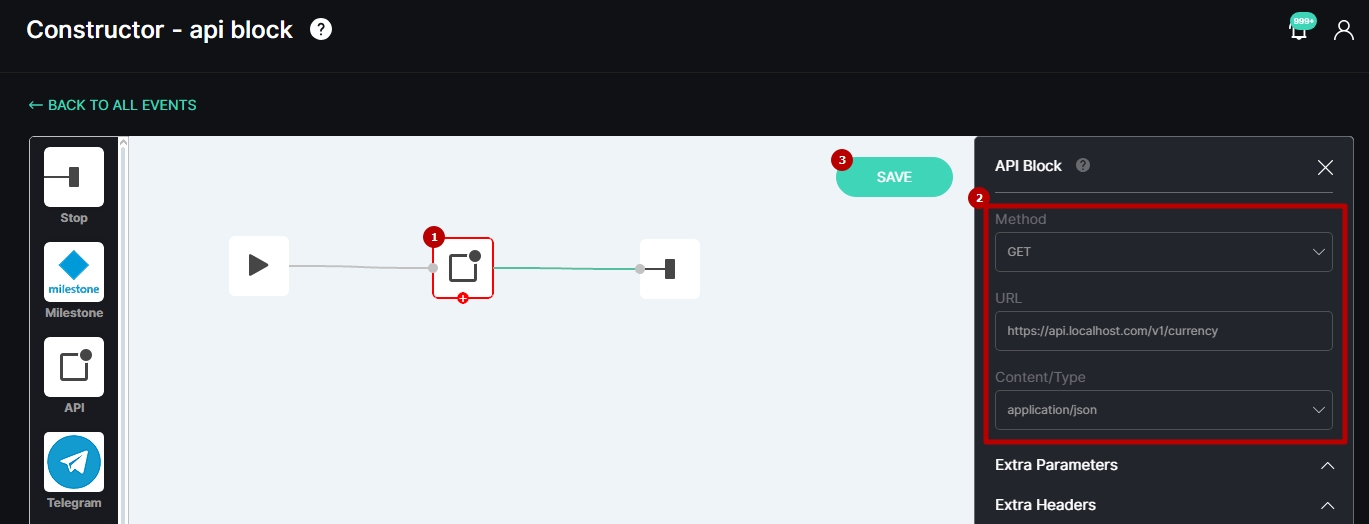
- Insert the API Block in the event chain and click the block to open its parameters
- Fill in the fields in the API block:
- Select the request method from the drop-down list:
- Get
- Post
- Enter the API URL of your external system where the data packages will be sent
- Select the Content/Type from the drop-down list:
- application/json
- application/x-www-form-urlencoded
- application/xml
- Select the request method from the drop-down list:
- Save the event by clicking the Save button
Step 2: Depending on the source from which you want to receive event data, configure analytics, list, rule, or off-the-list notification settings.
To configure the analytics settings, open the analytics editor:
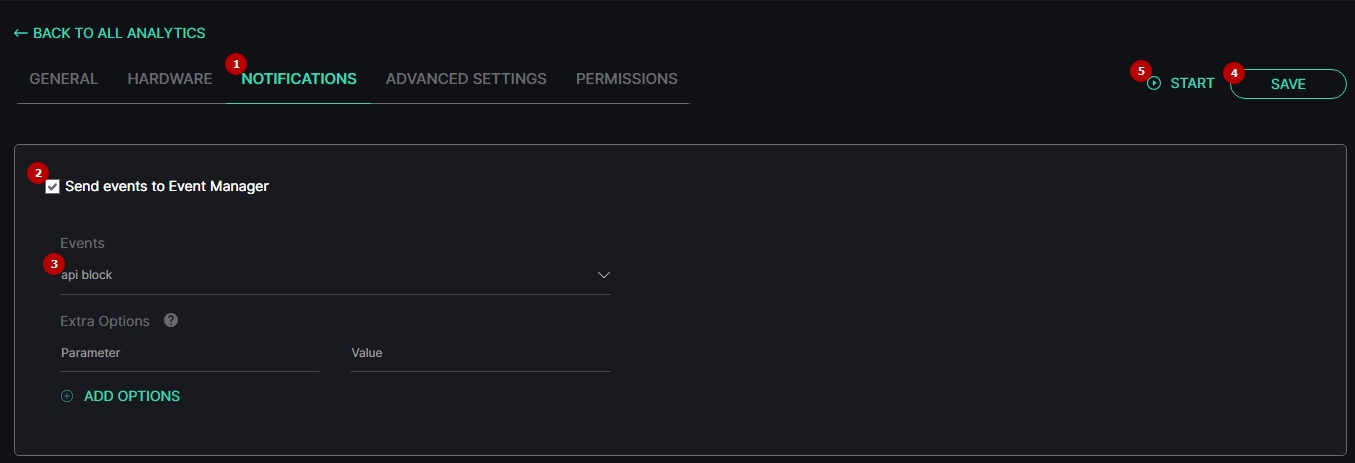
- Navigate to the Notifications tab
- Select the Send Events to Event Manager checkbox
- Choose the created event from the Events drop-down list
- Save the analytics settings
- Start the analytics and wait for detection
Upon each detection, the event will be sent through the API block to your external software as a data package.
To configure the list settings, open the list editor:
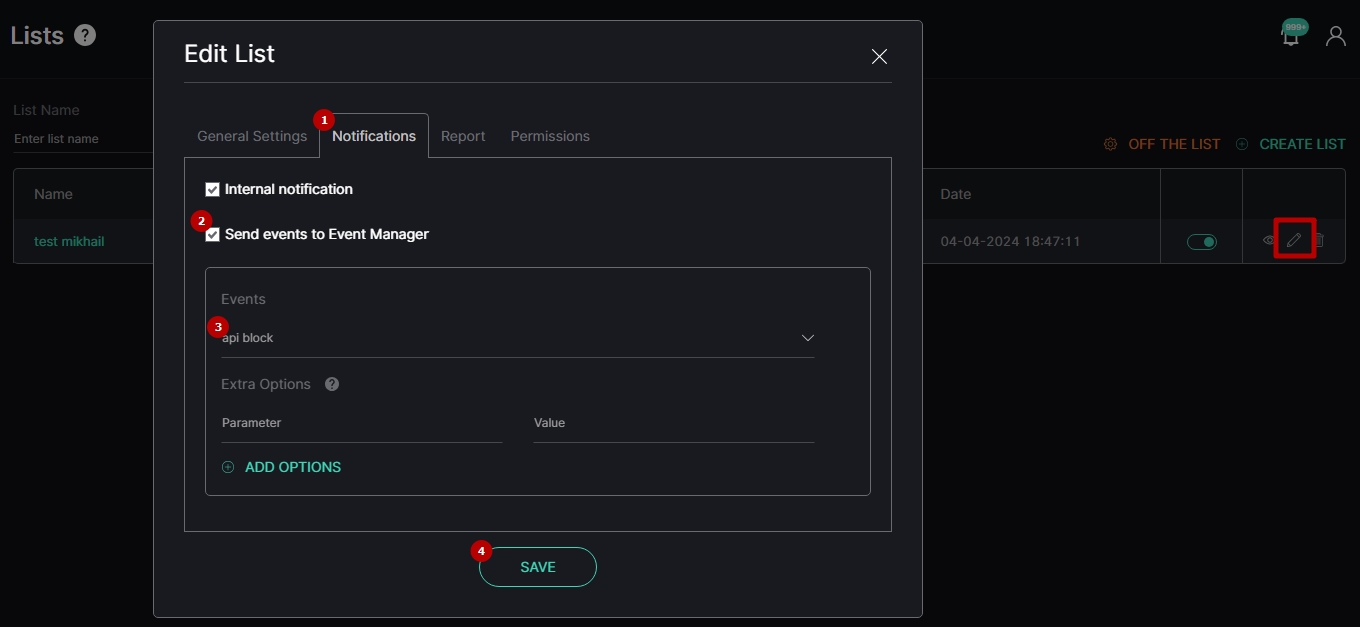
- Navigate to the Notifications tab
- Select the Send Events to Event Manager checkbox
- Choose the created event from the Events drop-down list
- Save the list settings
Afterward, start the analytics included in the list and wait for recognition. Upon each recognition, the event will be sent through the API block to your external software as a data package.
- Lists are available for Face Recognition and LPR plugins only.
- To learn more about list management in the Face Recognition plugin, refer to Face Recognition: Lists documentation.
- To learn more about list management in the LPR plugin, refer to LPR: Lists documentation.
To configure off-the-list notifications, open the Off List Notification Settings:

- Select the Send Events to Event Manager checkbox
- Choose the created event from the Events drop-down list
- Save the off-the-list settings
Afterward, start the analytics included in the off-the-list notification settings and wait for detection. Upon each detection, the event will be sent through the API block to your external software as a data package.
- Off-the-list notification settings are available exclusively for Face Recognition and LPR plugins.
- To learn more about setting parameters for off-the-list notifications in the Face Recognition plugin, refer to Off List Notification Settings documentation.
- To learn more about setting parameters for off-the-list notifications in the LPR plugin, refer to Off List Notification Settings documentation.
To configure the Speed Control rule settings, open the rule editor:
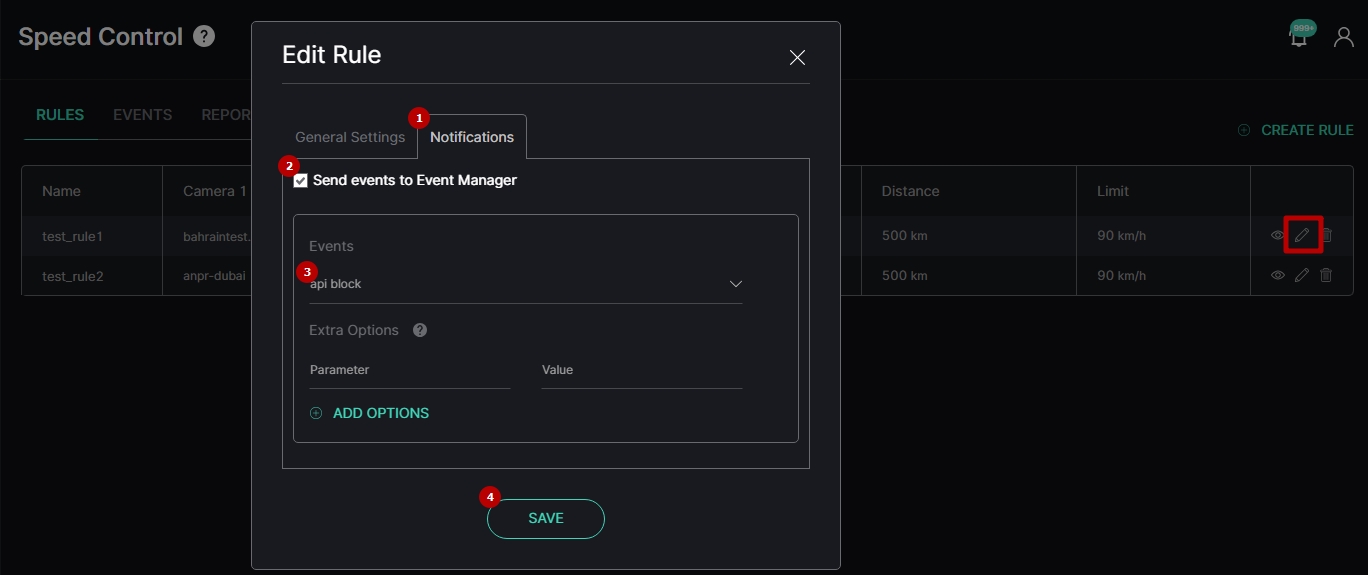
- Navigate to the Notifications tab
- Select the Send Events to Event Manager checkbox
- Choose the created event from the Events drop-down list
- Save the rule settings
Afterward, start both analytics included in the Speed Control rule and wait for detection. Upon each detection, the event will be sent through the API block to your external software as a data package.
- Speed Control rules are available exclusively for the LPR plugin.
- To learn more about Speed Control rules, refer to Speed Control: Rules documentation.
To configure the Smart Parking rule settings, open the rule editor:
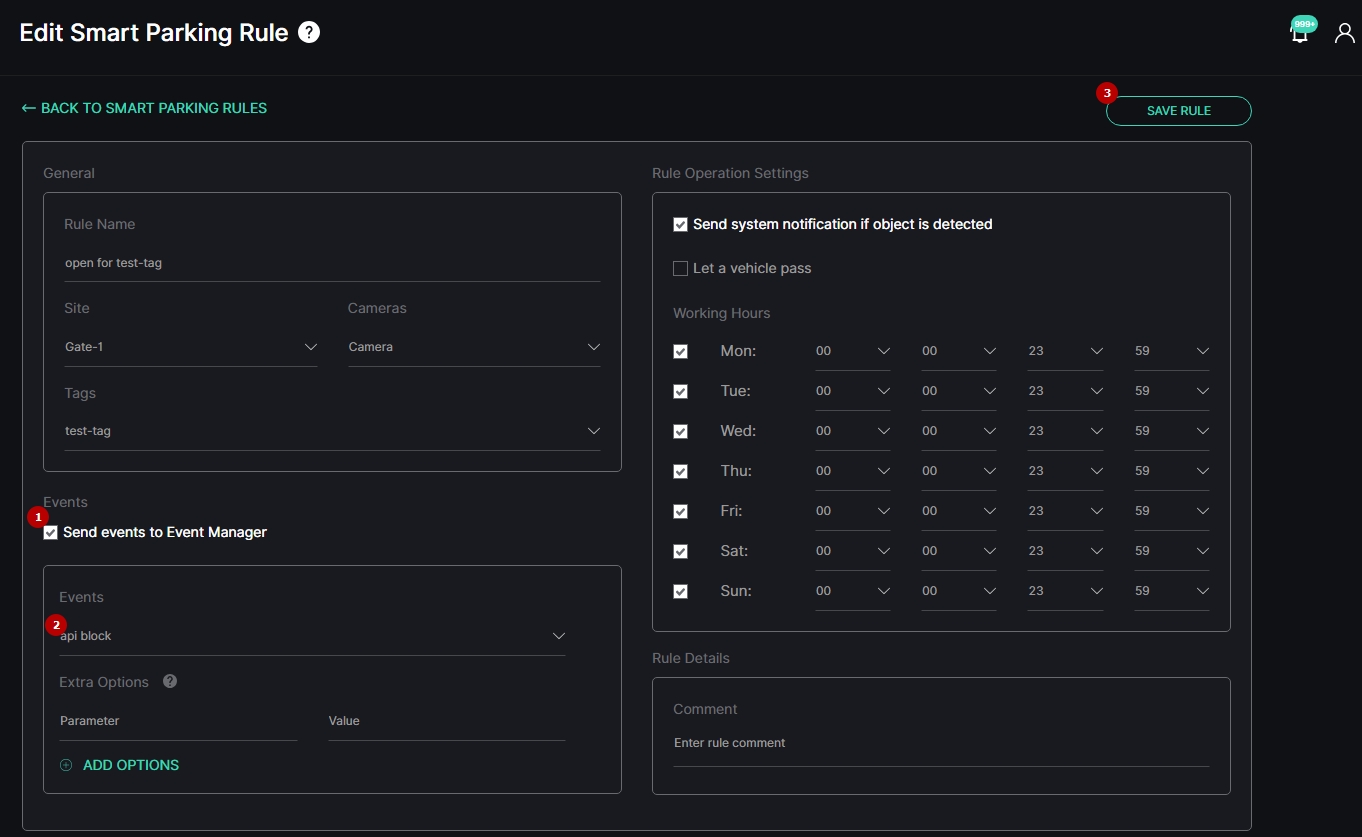
- Select the Send Events to Event Manager checkbox
- Choose the created event from the Events drop-down list
- Save the rule settings
Afterward, start analytics included in the Smart Parking rule and wait for detection. Upon each detection, the event will be sent through the API block to your external software as a data package.
- Smart Parking rules are available exclusively for the Smart Parking plugin.
- To learn more about Smart Parking rules, refer to Settings: Rules documentation.
- These are general guidelines aimed at providing a basic understanding of how to send event data to external systems via API in the Event Manager.
- For detailed examples of creating events and sending event data (including API blocks and examples of data packages you might receive) from analytics or lists via API to external systems, please refer to our Event Manager: Examples of Use documentation.
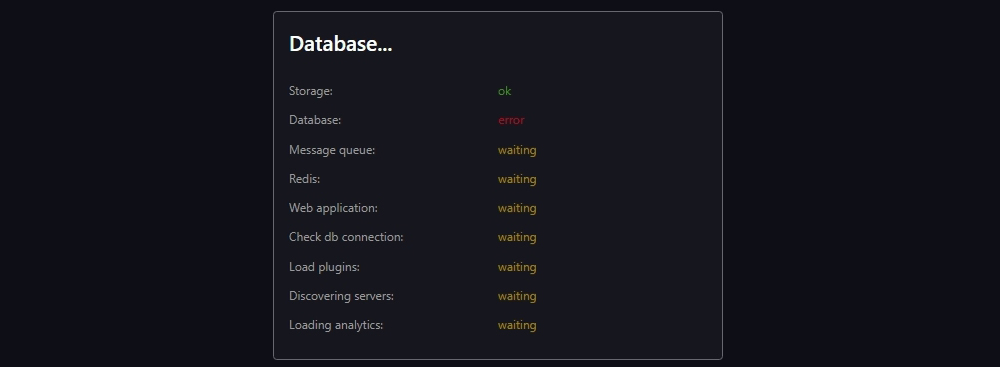
How to Prepare for Potential Errors When Using the Internal DB (H2)?
If you are using the Internal DB (H2) and encounter the Database error during the middleware plugin loading screen, which prevents the system from continuing to load, the issue is due to a corrupted database file:
The Internal DB (H2) is a file-based database, which means it is susceptible to the influence of various factors that can cause corruption or errors, such as:
- Running out of disk space
- Write failures during database operations
- File corruption
To avoid data loss, we recommend periodically backing up your database file:
- Stop the IncoreSoft Middleware Core Service: This ensures that the database file is not in use and can be safely copied.
- Manually сopy the database file: Locate the videoanalytics.mv.db file and create a backup copy of it. This file contains all the database data.
- Restart the IncoreSoft Middleware Core Service: This will resume the normal operation of the system with the database.
By following these steps, you can mitigate the risk of data loss and be prepared to recover quickly from any database-related issues. Regular database backups are a crucial part of maintaining the integrity and reliability of your system.
How to Restrict User Access to Only View Analytics Results Without Managing Analytics?
To ensure that a selected user can only view analytics results (such as search results, events, and statistics) without managing the analytics themselves, proceed with the following steps.
Set video streams permissions in the Video Streams item of the Settings section:
- Open the desired video stream settings.
- Assign the View Video Stream permission to the selected user (or role for multiple users) for the desired video stream.
- Do not assign the Manage Video Stream permission unless the user needs to manage the video stream.
Set general permissions in the Roles item of the Settings section, assigning the following permissions in the desired plugins:
- View Analytics permission, to:
- Access the list of created analytics based on the allowed video streams.
- Use the camera filter in other sections to filter analytics results by the allowed video streams (requires permissions for other sections in the same plugin).
- Additional permissions in the same plugins to access necessary sections for viewing analytics results (e.g., View Events, View Statistics, View Search Results).
Set analytics permissions in the Analytics item of the desired plugin section. In the settings of the desired analytics based on the video stream that the user (or role) has access to, restrict the following permissions:
- Start Analytics, to prevent the user from starting the analytics (disables the Start button).
- Stop Analytics, to prevent the user from stopping the analytics (disables the Stop button).
- Edit Analytics, to prevent the user from editing and deleting the analytics (disables Edit and Delete icons).
- Live View (optional in this case), to prevent the user from viewing the analytics live (disables the View icon).
- The View Analytics Events permission should be allowed so users can see the events/search results for the selected analytics depending on the desired plugin capabilities.
- For the Face Recognition, LPR, and Smart Parking plugins search results are visible in the Search item even without assigning the View Analytics Events permission. By restricting this permission, only analytics events become unavailable.
Thus, the user or group of users with the assigned role will have access to:
- Viewing the list of available video streams in the Video Streams section without the ability to edit them.
- Viewing the list of available analytics in the Analytics section of the desired plugin and the ability to filter them but without the ability to manage.
- Viewing detection results for the available analytics and the ability to sort data by the cameras they have access to.


