Event Manager: Examples of Use
Example 1: Notification about Crowd Accumulation
To receive a notification in a Telegram chatbot about an accumulated crowd, it is necessary to configure a series of settings.
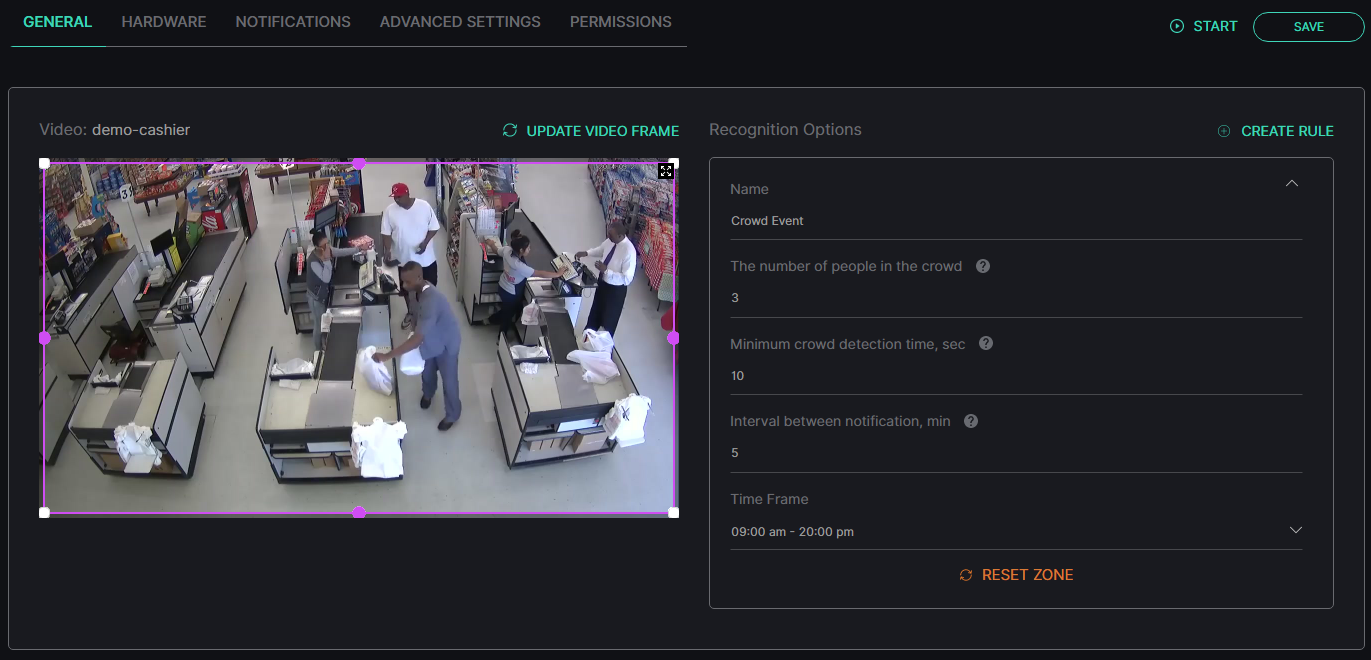
Create a new analytics in the Analytics item of the Crowd Detection section, set all required detection parameters in the General tab, and save the analytics:
Create a new event in the Events item of the Settings section in a separate browser tab:

Open the Event Manager Constructor for the created event:

- Build the sequence of blocks
- Fill in the fields in the Telegram block:
- Enter the Telegram chatbot token
- Enter Telegram chat ID
- Select the appropriate date format from the drop-down list
- Save the event configuration
Return to the editor of the previously created Crowd Detection analytics, and in the Notifications tab:
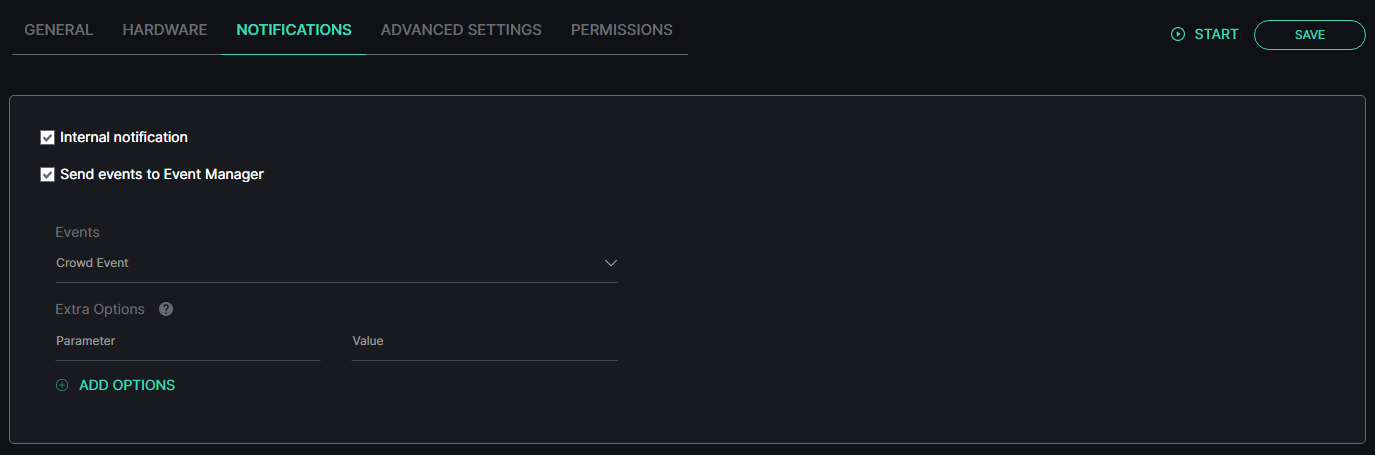
- Check the Send Events to Event Manager box
- Select the previously created event's name from the Events drop-down list
Complete the analytics parameters configuration in all other required tabs, save changes, and run the analytics.
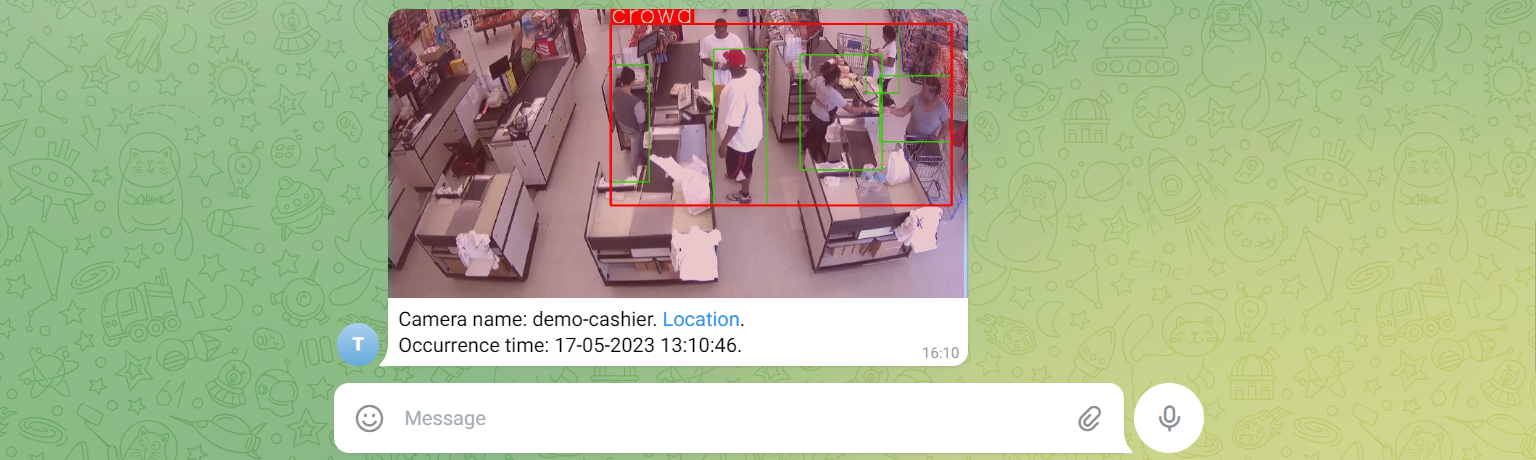
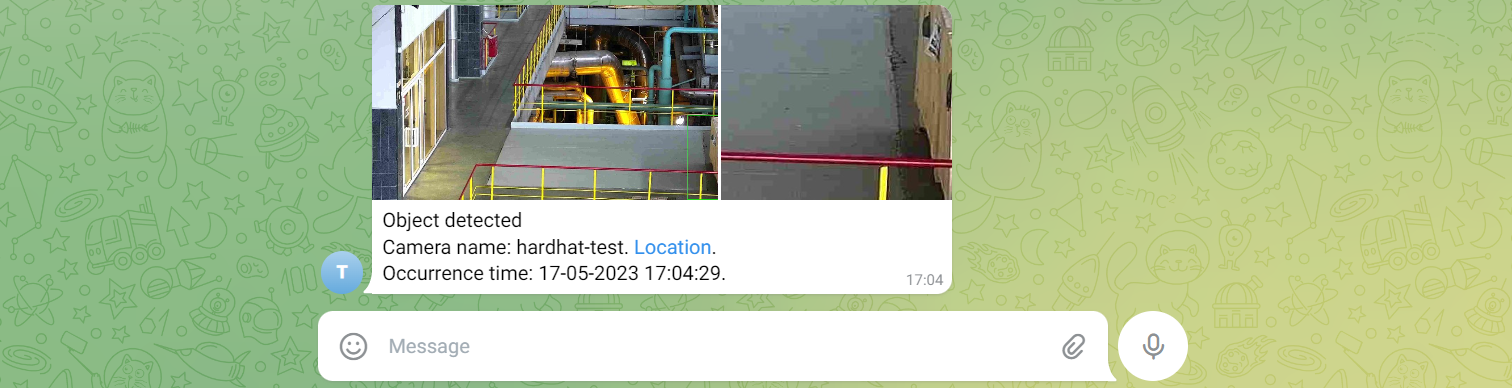
When all these settings are configured, wait for detection. Once the analytics detects a crowd accumulation in the designated detection zone, the system will send an event notification through the Telegram chatbot:
Example 2: Notification about License Plate Number from Wanted List
To receive a notification to a required API about a specified license plate number from the Wanted List, it is necessary to configure a series of settings.
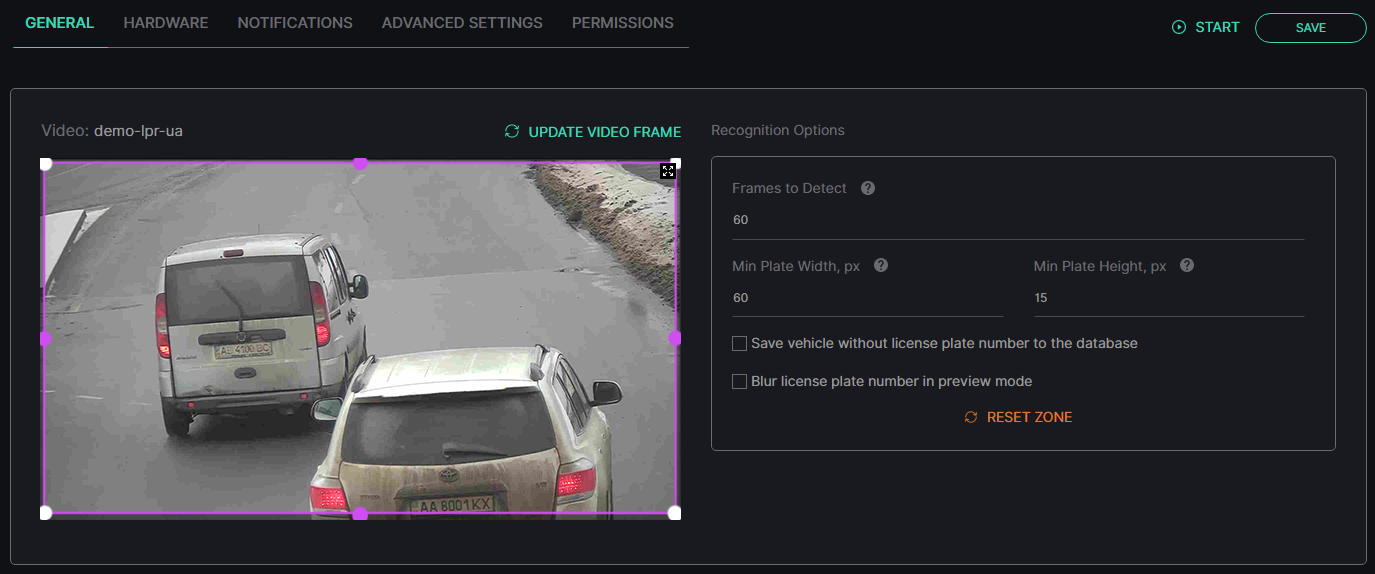
Create several new analytics from different video sources in the Analytics item of the LPR section, set parameters in all required tabs, and save the analytics:
Create a new event in the Events item of the Settings section in a separate browser tab:

Open the Event Manager Constructor for the created event:
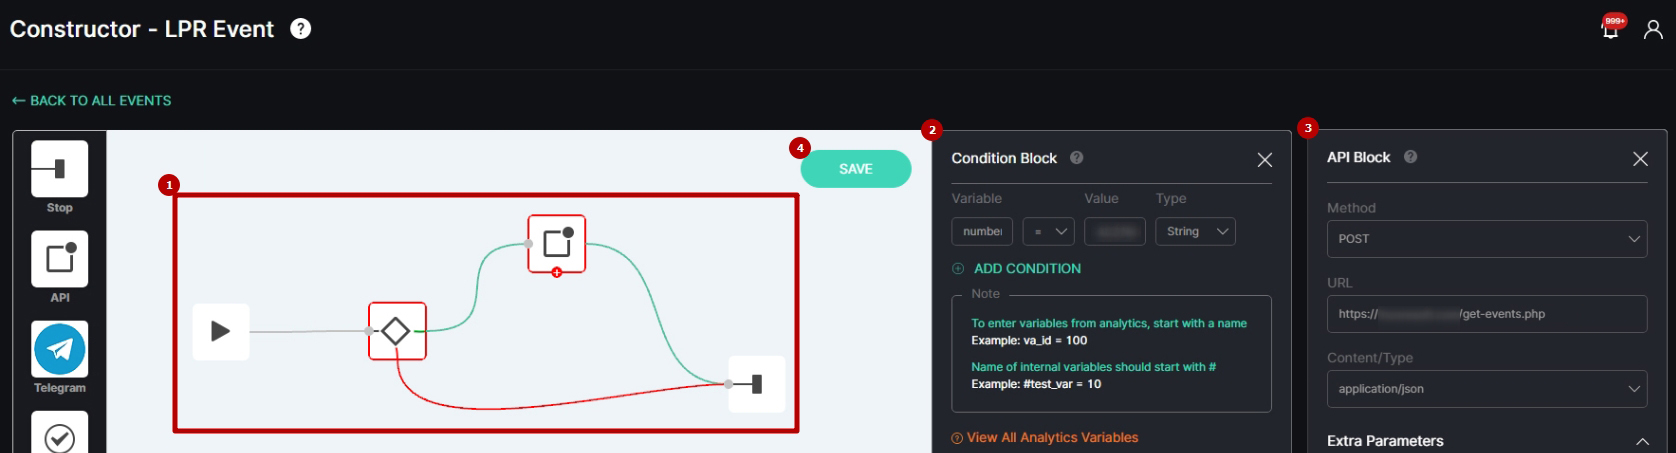
- Build the sequence of blocks
- Fill in the fields in the Condition block:
- Enter "number" in the Variable field
- Select the equal "=" comparison condition from the drop-down list
- Enter the required license plate number in the Value field
- Select the String data type from the drop-down list
- Fill in the fields in the API block:
- Select the POST request method from the drop-down list
- Enter the required API URL
- Select Application/JSON in the Content/Type drop-down list
- Save the event configuration
Create a new Wanted list in the Lists item of the LPR section, add all required analytics in the General Settings tab, and in the Notifications tab:

- Check the Send Events to Event Manager box
- Select the previously created event's name from the Events drop-down list
Complete the list parameters configuration in all other required tabs, and save the list.
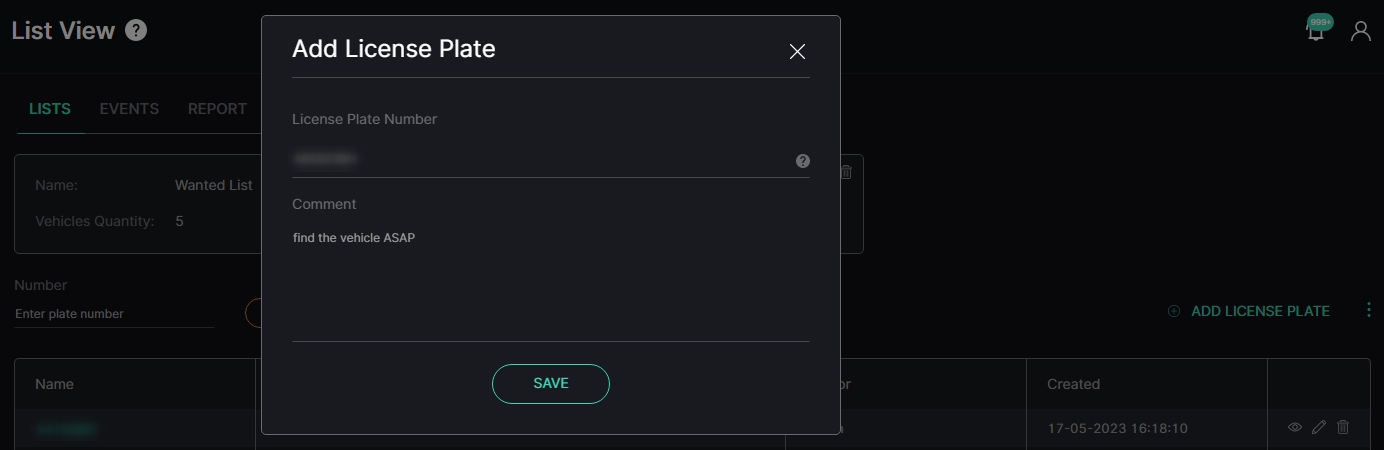
Open the created list and add a new license plate number. In the pop-up window enter the same license plate number that was previously added to the Condition block in the created event and save the vehicle card.
Return to the Analytics item of the LPR section and run all analytics related to the created Wanted list.
When all these settings are configured, wait for recognition. Once one of the added analytics detects a vehicle with the specified license plate number, the system will send a data package to the required API as shown in the example:
{
"":"",
"country":"UA",
"object_image":"plates/1298/2023/5/18/18/********_1684423851526_cropped.jpg",
"va_id":1298,
"color":"silver",
"frame_image":"plates/1298/2023/5/18/18/********_1684423851526.jpg",
"arabic_number":null,
"in_list":true,
"pattern":"UKRAINE-1",
"vehicle_type":7,
"box":[0.02239583246409893,0.9222221970558167,0.13124999403953552,0.9657407402992249],
"uuid":"c552d62d-50a6-4c85-835f-a0f0b1fb8d64",
"adr":null,
"make_model":{"model":"MEGANE","id":200094,"make":"RENAULT"},
"list_item":{"number":"********","comment":"find the vehicle ASAP","id":416,"list":{"color":"#fb0909","name":"Wanted List","comment":"","id":25}},
"number":"********",
"event_type":"alpr",
"stream":{"duration":null,"codec":"H.265","file_name":"9ajNqTfVOW.jpg","timezone":"Europe/Helsinki","name":"demo-lpr-ua","location":{"latitude":0.0,"longitude":0.0},"id":4,"params":{"type":"rtsp"},"resolution":{"width":1920,"height":1080},"uuid":"5960e935-203c-4fc0-9363-b5dd7453ecc5","status":"online"},
"direction":31,
"timestamp":1684423851526
}
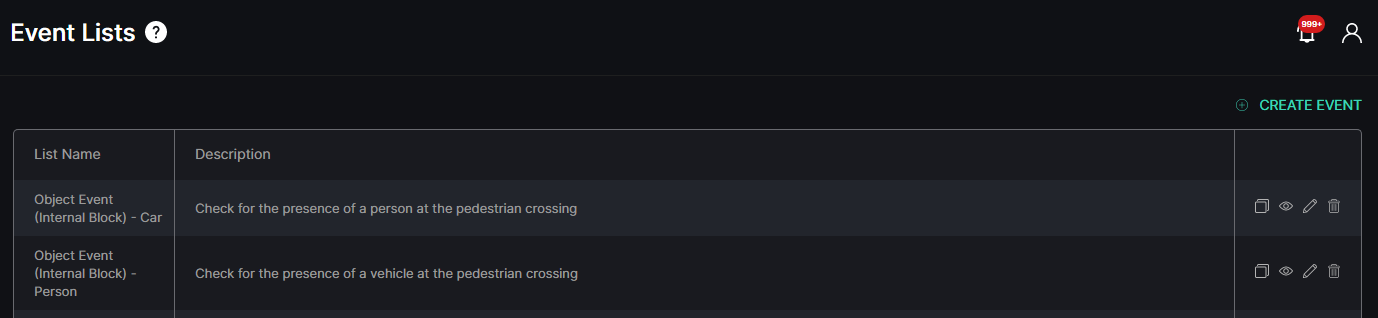
Example 3: Notifications about Human Presence and Absence in a Specified Zone
To receive notifications according to different rules in two separate Telegram chatbots about the human presence and absence in a specified zone, it is necessary to configure a series of settings.
Create a new analytics with two separate rules in the Analytics item of the Object Detection section.
Rule 1 with the In Zone trigger:

Rule 2 with the Out of Zone trigger:

Set all required detection parameters for each rule in the General tab, and save the analytics.
Create a new event in the Events item of the Settings section in a separate browser tab:

Open the Event Manager Constructor for the created event and build the sequence of blocks as shown in the picture:
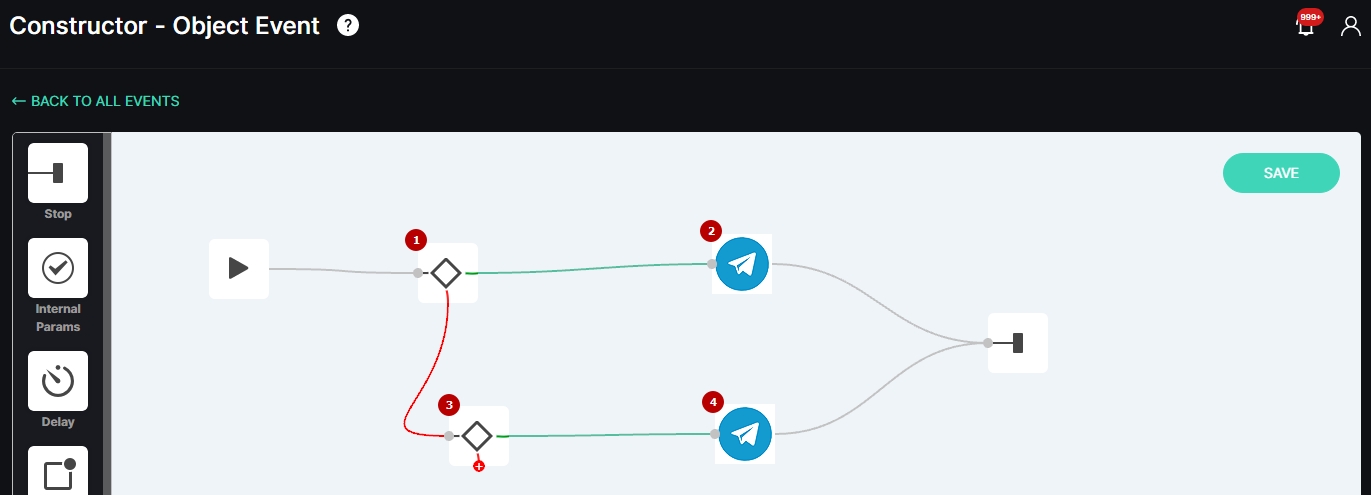
Fill in the fields for each pair of Condition and Telegram blocks:

- Fill in the fields in the first Condition block:
- Enter "trigger" in the Variable field
- Select the equal "=" comparison condition from the drop-down list
- Enter "IN_ZONE" in the Value field
- Select the String data type from the drop-down list
- Fill in the fields in the first Telegram block to receive notifications executed with the In Zone trigger:
- Enter the Telegram chatbot token
- Enter Telegram chat ID
- Select the appropriate date format from the drop-down list
- Fill in the fields in the second Condition block:
- Enter "trigger" in the Variable field
- Select the equal "=" comparison condition from the drop-down list
- Enter "OUT_ZONE" in the Value field
- Select the String data type from the drop-down list
- Fill in the fields in the second Telegram block to receive notifications executed with the Out of Zone trigger:
- Enter another Telegram chatbot token
- Enter another Telegram chat ID
- Select the appropriate date format from the drop-down list
Save the event configuration.
Return to the editor of the previously created Object Detection analytics, and in the Notifications tab:

- Check the Send Events to Event Manager box
- Select the previously created event's name from the Events drop-down list
Complete the analytics parameters configuration in all other required tabs, save changes, and run the analytics.
When all these settings are configured, wait for detection. Once the analytics detects a zone occupation, the system will send an event notification through the first Telegram chatbot:

And when the analytics detects the designated zone as empty, the system will send an event notification through the second Telegram chatbot:
Example 4: Notification about a Potential Emergency Situation at the Pedestrian Crossing
To receive a notification in the Telegram chatbot about the simultaneous presence of a vehicle and a person at the pedestrian crossing, which could be an emergency, it is necessary to configure a series of settings.
Create two new separate analytics with the same video source in the Analytics item of the Object Detection section.
Analytics 1 with the Person object type:

Analytics 2 with the Car object type:
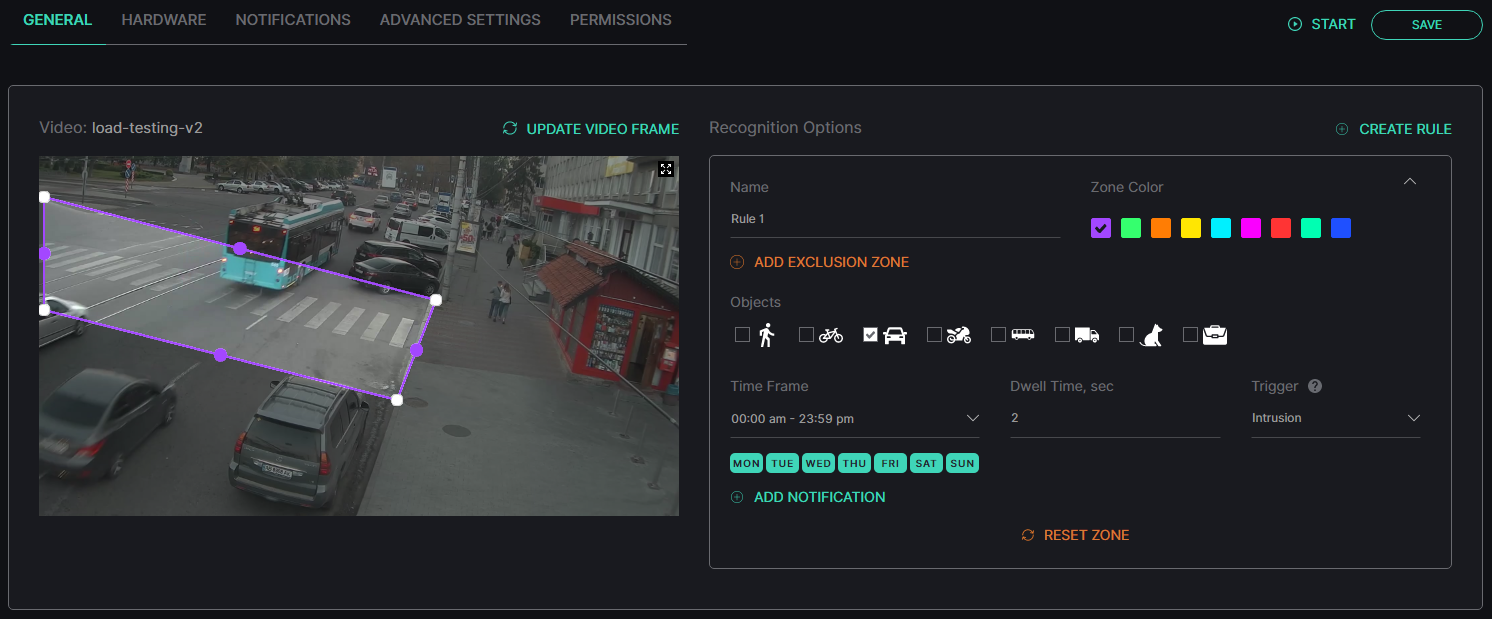
Set all required detection parameters for each analytics in the General tab, and save the analytics.
Create two new separate events in the Events item of the Settings section in a separate browser tab:
Open the Event Manager Constructor for the event created upon the analytics with the Car object type:
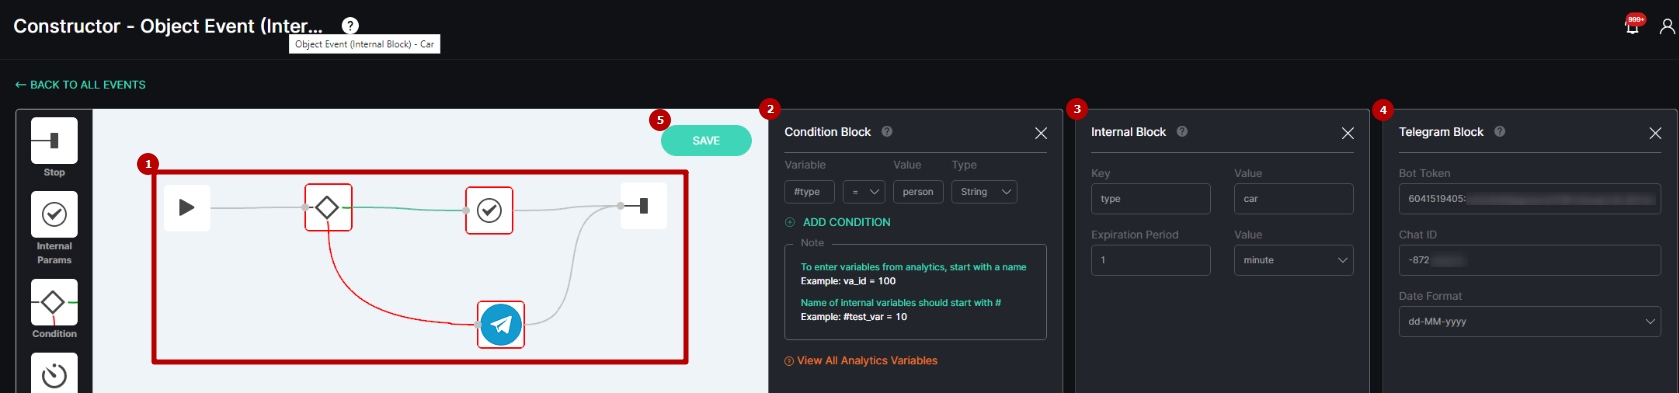
- Build the sequence of blocks
- Fill in the fields in the Condition block:
- Enter "#type" in the Variable field
- Select the equal "=" comparison condition from the drop-down list
- Enter "person" in the Value field
- Select the String data type from the drop-down list
- Fill in the fields in the Internal block:
- Enter "type" and "car" in the Key/Value pair of fields
- Set the expiration period to 1 minute in the Expiration Period/Value pair of fields
- Fill in the fields in the Telegram block:
- Enter the Telegram chatbot token
- Enter Telegram chat ID
- Select the appropriate date format from the drop-down list
- Save the event configuration
Open the Event Manager Constructor for the event created upon the analytics with the Person object type:
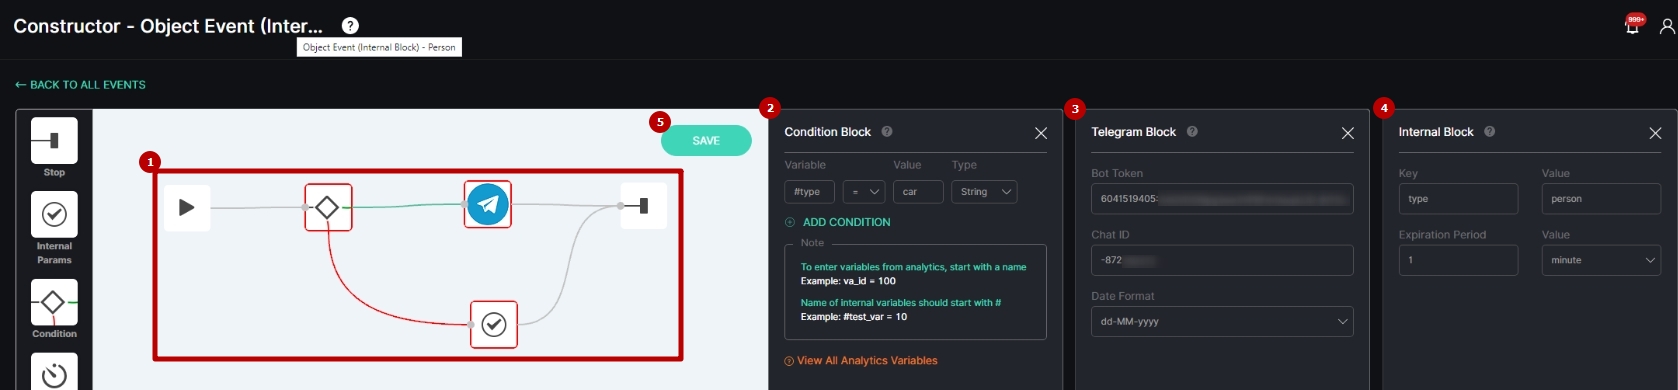
- Build the sequence of blocks
- Fill in the fields in the Condition block:
- Enter "#type" in the Variable field
- Select the equal "=" comparison condition from the drop-down list
- Enter "car" in the Value field
- Select the String data type from the drop-down list
- Fill in the fields in the Internal block:
- Enter "type" and "person" in the Key/Value pair of fields
- Set the expiration period to 1 minute in the Expiration Period/Value pair of fields
- Fill in the fields in the Telegram block:
- Enter the Telegram chatbot token
- Enter Telegram chat ID
- Select the appropriate date format from the drop-down list
- Save the event configuration
Return to the editors of both previously created Object Detection analytics.
In the Notifications tab of Analytics 1 with the Person object type:
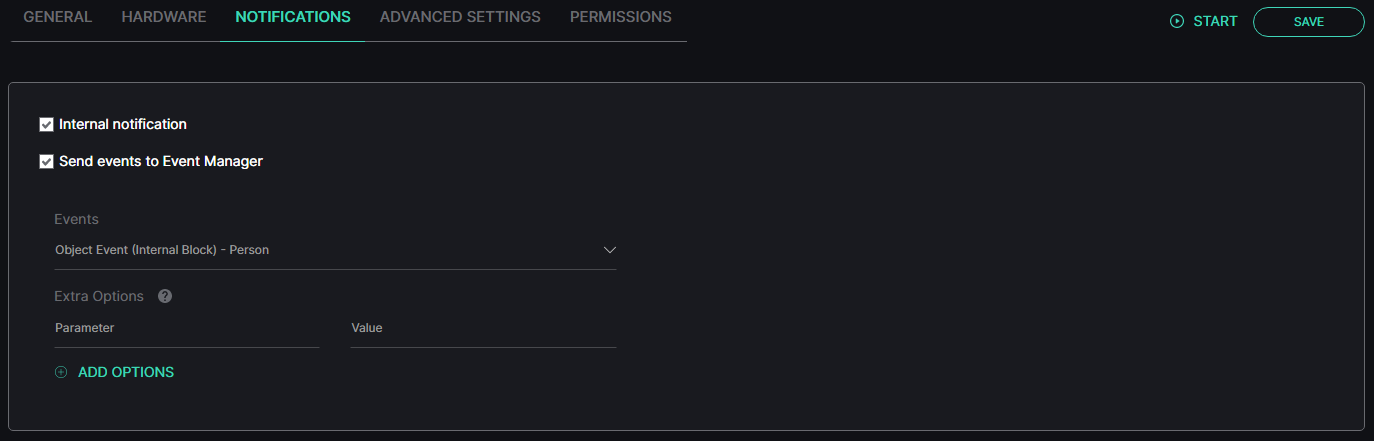
- Check the Send Events to Event Manager box
- Select the previously created event's name from the Events drop-down list
In the Notifications tab of Analytics 2 with the Car object type:
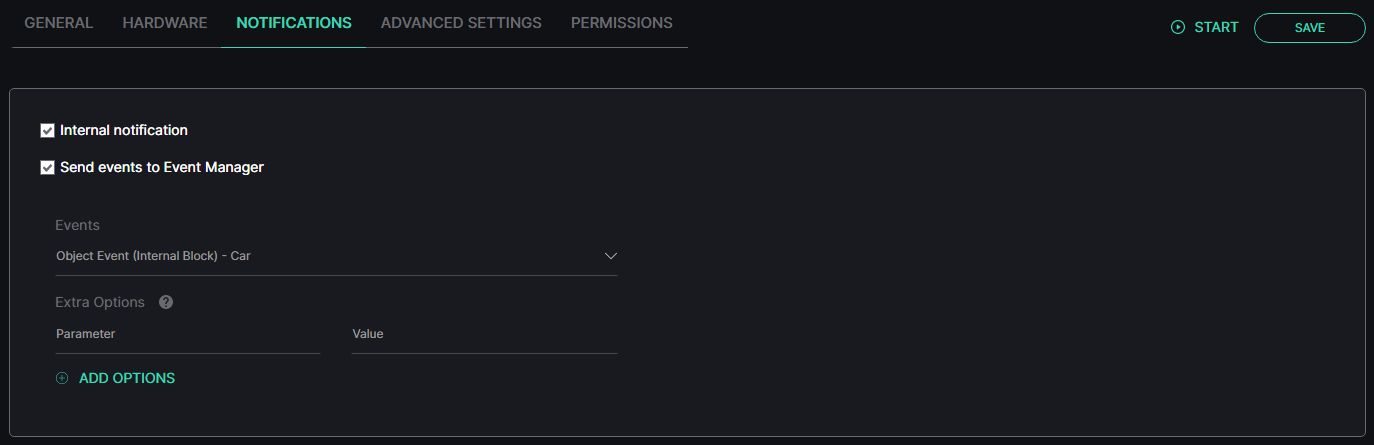
- Check the Send Events to Event Manager box
- Select the previously created event's name from the Events drop-down list
Complete the analytics parameters configuration in all other required tabs, save changes, and run both analytics.
When all these settings are configured, wait for detection. Once the first analytics detects a car in the designated zone, the system checks with the second analytics whether a person is in the same zone at the same time. If both analytics simultaneously detect the presence of a car and a person in the zone, the system sends a notification through the Telegram chatbot about a potential incident:

Example 5: Notification about a Person with Specified Attributes
To receive a notification to a required API about a person with specified gender and age attributes, it is necessary to configure a series of settings.
Create a new analytics in the Analytics item of the Face Recognition section, set all required detection parameters, including the Age and Gender Detection checkbox, in the General tab, and save the analytics:

Create a new event in the Events item of the Settings section in a separate browser tab:

Open the Event Manager Constructor for the created event:

- Build the sequence of blocks
- Fill in the fields in the Condition block:
- Enter pairs of Variables/Values in the according fields:
- "face.gender"/"male"
- "face.age"/"22-30"
- Select the equal "=" comparison condition from the drop-down list for both pairs
- Select the String data type from the drop-down list for both pairs
- Enter pairs of Variables/Values in the according fields:
- Fill in the fields in the API block:
- Select the POST request method from the drop-down list
- Enter the required API URL
- Select Application/JSON in the Content/Type drop-down list
- Save the event configuration
Return to the editor of the previously created Face Recognition analytics, and in the Notifications tab:
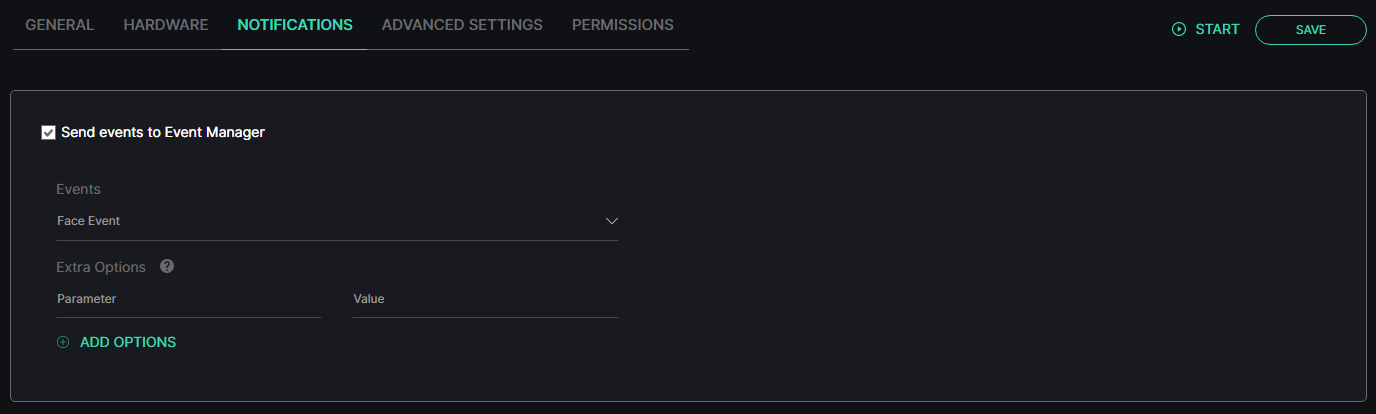
- Check the Send Events to Event Manager box
- Select the previously created event's name from the Events drop-down list
Complete the analytics parameters configuration in all other required tabs, save changes, and run the analytics.
When all these settings are configured, wait for recognition. Once the analytics detects a person with specified appearance attributes, the system will send a data package to the required API as shown in the example:
{"":"",
"face":{"gender":"male","race":null,"millis_from_start":null,"confidence":0,"frame_image":"faces/1519/2023/5/23/16/f7cee510-059d-45d5-a5fd-f239b4727cb0_1684849934293.jpg","face_image":"faces/1519/2023/5/23/16/f7cee510-059d-45d5-a5fd-f239b4727cb0_1684849934293_cropped.jpg","box":[0.8984375,0.4027777910232544,0.921875,0.43981480598449707],
"list_item":null,"spoofed":null,"id":989687,"age":"22-30","mask":false,"timestamp":1684849934293},
"event_type":"face",
"va_id":1519,
"stream":{"duration":null,"codec":"H.264","file_name":"0xsGGOzhPE.jpg","timezone":"Europe/Helsinki","name":"Face Rec. Glasses","location":"latitude":50.390749031103816,"longitude":30.525696755069173},
"id":23, "params":{"type":"rtsp"},"resolution":{"width":1920,"height":1080},"uuid":"f53fd967-ed26-4530-8632-494504a5d6c1","status":"online"},
"frame_image":"faces/1519/2023/5/23/16/f7cee510-059d-45d5-a5fd-f239b4727cb0_1684849934293.jpg",
"in_list":false,
"box":[0.8984375,0.4027777910232544,0.921875,0.43981480598449707],
"thumbnail_image":"faces/1519/2023/5/23/16/f7cee510-059d-45d5-a5fd-f239b4727cb0_1684849934293_cropped.jpg",
"timestamp":1684849934293
}