Milestone Block
Overview
To open the Milestone block, in the Event Manager Constructor workspace:
- Select the Milestone block icon
- See the Milestone block
Use and Functionality
The Milestone block functional menu allows to:
- Enter the hostname after http://
- Enter port
- Enter server ID
- Enter the analytics event name
- Enter custom tag
Necessary Values Determination
The required values for filling in the fields in the Milestone block are located in the Milestone XProtect Management Client.
To find the hostname, open the Milestone XProtect Management Client and copy the server address from the Computer field:
The default port value is 9090. However, to ensure that access to XProtect Event Server on port 9090 is allowed, follow these steps:
- Open the Tools tab in the menu bar and select Options from the drop-down menu (or press Ctrl + O)
- Navigate to the Analytics Events tab
- Check the Enabled checkbox
To find the server ID, follow these steps:
- Open the Servers section and select the Recording Servers item
- Click the name of the required recording server
- Switch to any other tab at the bottom of the Properties window (for example, Failover)
- Hold down the Ctrl key and left-click the Info tab
- Copy the server ID from the field that appears
If no analytics event has been created yet, follow these steps to create a new one:
- Open the Rules and Events section and select the Analytics Events item
- Right-click the Analytics Events and select Add New from the drop-down menu (or press Ctrl + N)
- Enter the analytics event name and description
- Press Ctrl + S to save the changes
To fill in the Custom Tag field, enter any meaningful value that can be used for further purposes.
Use the image below as a visual reference to ensure the correct input of values in the fields:
Alarm Reception Configuration
To ensure that alarms are correctly received in Alarm Manager, adhere to the following conditions:
- Analytics Event Configuration: The analytics event is created in the Milestone XProtect Management Client.
- Alarm Configuration: The alarm is:
- Created in the Milestone XProtect Management Client.
- Configured with the name of the previously created analytics event specified in the Triggering Event field.
- Enabled.
- Event Manager Block Setup:
- All fields in the Milestone block are properly filled in with valid data.
- The Name field contains the name of the created analytics event linked to the alarm.
- A sequence of blocks is designed in the Event Manager constructor to send events via the Milestone block and saved in the event.
- Event Linking: The created event is properly linked to the desired analytics/list/off-the-list/rule from which you wish to receive alarms.
Depending on the source from which you want to receive event data, configure analytics, list, rule, or off-the-list notification settings.
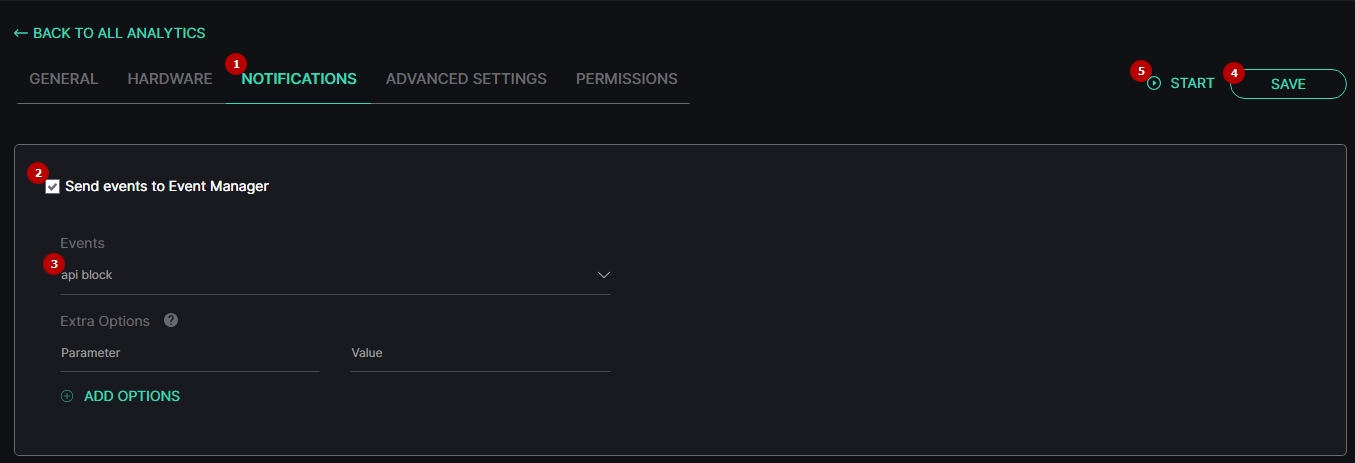
To configure the analytics settings, open the analytics editor:
- Navigate to the Notifications tab
- Select the Send Events to Event Manager checkbox
- Choose the created event from the Events drop-down list
- Save the analytics settings
- Start the analytics and wait for detection
Upon each detection, the event will be sent to the Alarm Manager in Milestone XProtect Smart Client through the Milestone block.
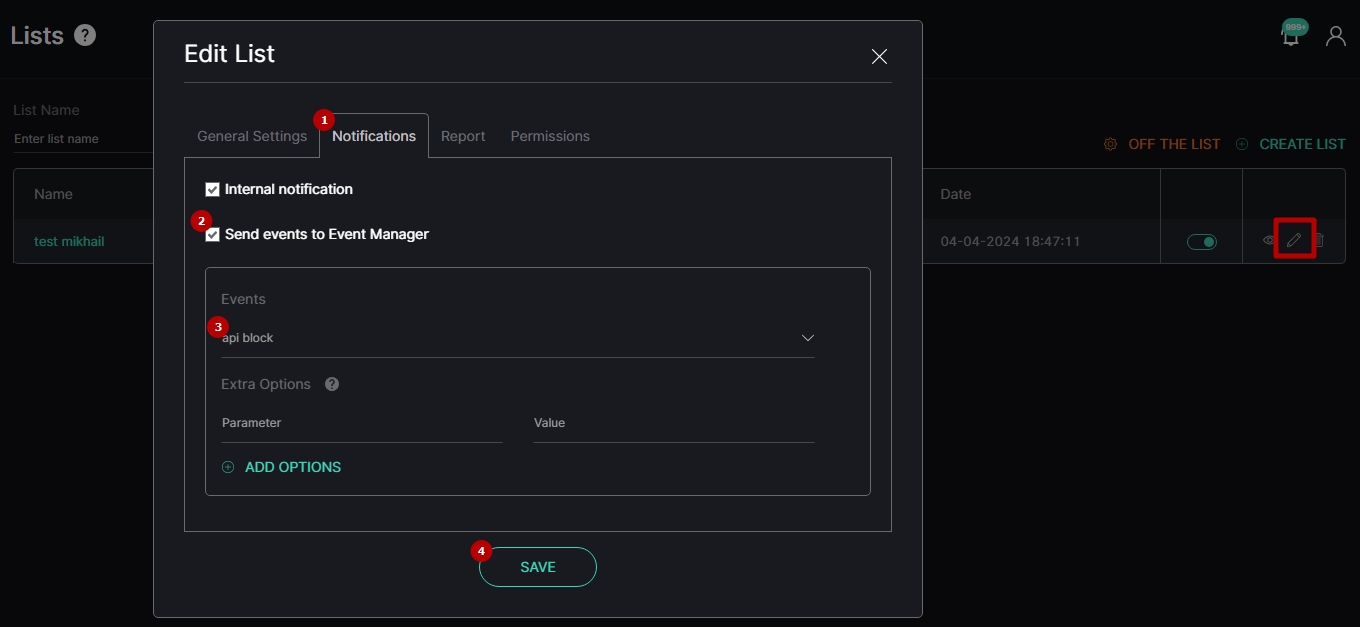
To configure the list settings, open the list editor:
- Navigate to the Notifications tab
- Select the Send Events to Event Manager checkbox
- Choose the created event from the Events drop-down list
- Save the list settings
Afterward, start the analytics included in the list and wait for recognition. Upon each recognition, the event will be sent to the Alarm Manager in Milestone XProtect Smart Client through the Milestone block.
- Lists are available for Face Recognition and LPR plugins only.
- To learn more about list management in the Face Recognition plugin, refer to Face Recognition: Lists documentation.
- To learn more about list management in the LPR plugin, refer to LPR: Lists documentation.
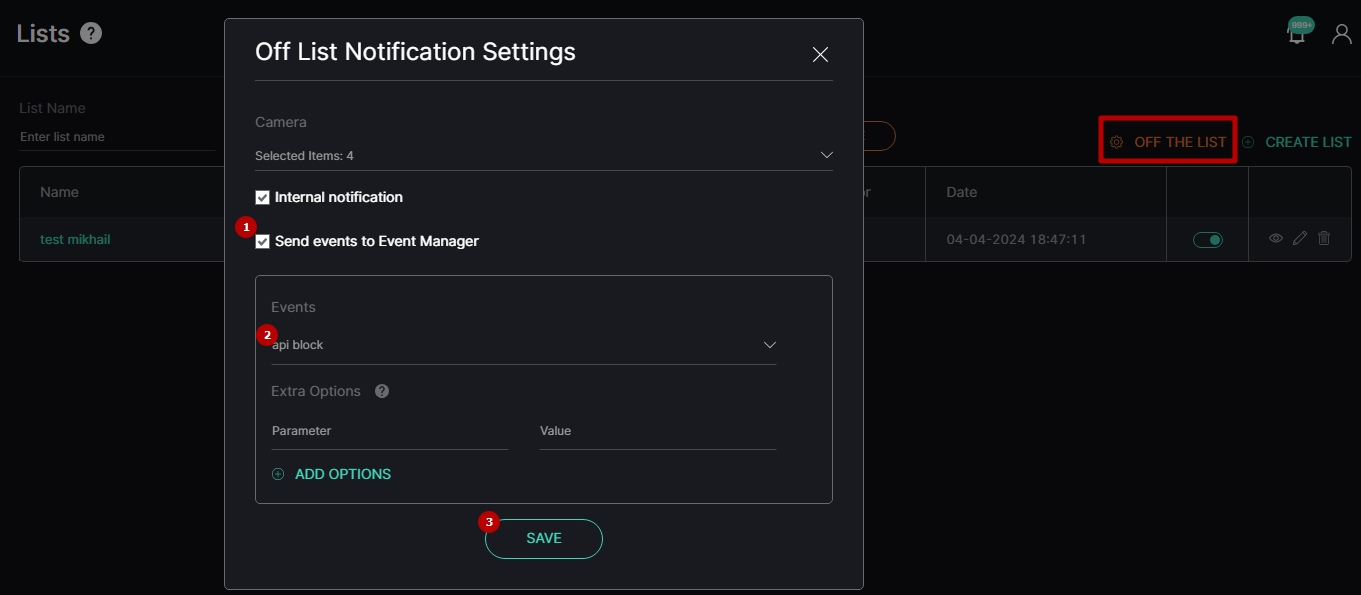
To configure off-the-list notifications, open the Off List Notification Settings:
- Select the Send Events to Event Manager checkbox
- Choose the created event from the Events drop-down list
- Save the off-the-list settings
Afterward, start the analytics included in the off-the-list notification settings and wait for detection. Upon each detection, the event will be sent to the Alarm Manager in Milestone XProtect Smart Client through the Milestone block.
- Off-the-list notification settings are available exclusively for Face Recognition and LPR plugins.
- To learn more about setting parameters for off-the-list notifications in the Face Recognition plugin, refer to Off List Notification Settings documentation.
- To learn more about setting parameters for off-the-list notifications in the LPR plugin, refer to Off List Notification Settings documentation.
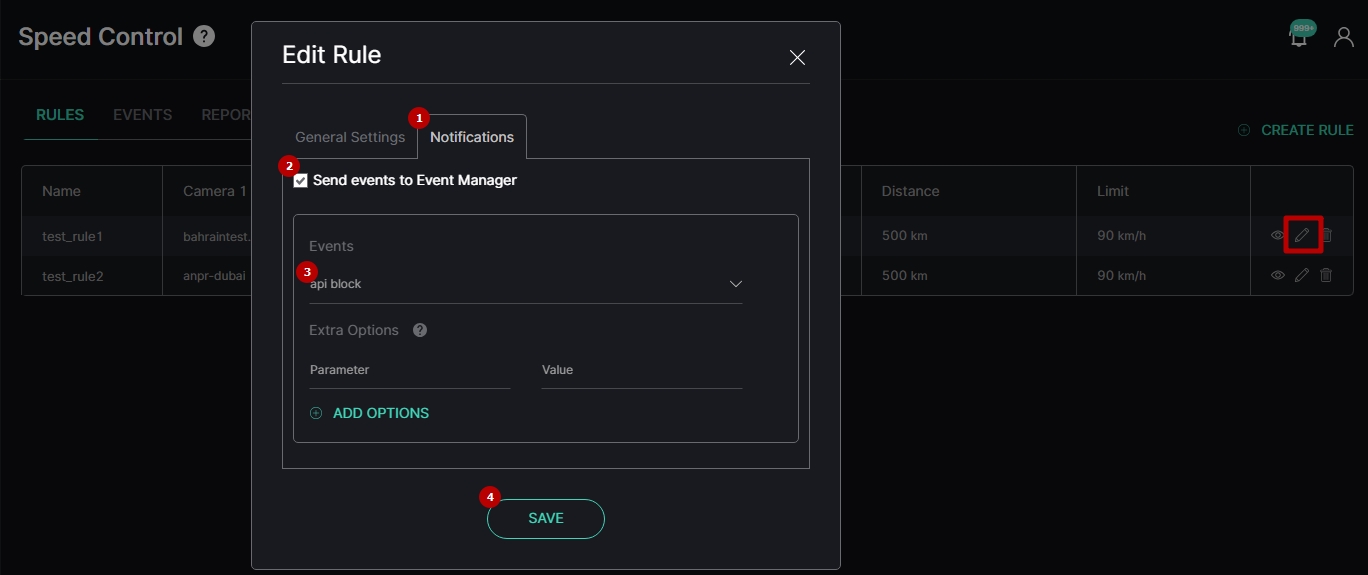
To configure the Speed Control rule settings, open the rule editor:
- Navigate to the Notifications tab
- Select the Send Events to Event Manager checkbox
- Choose the created event from the Events drop-down list
- Save the rule settings
Afterward, start both analytics included in the Speed Control rule and wait for detection. Upon each detection, the event will be sent to the Alarm Manager in Milestone XProtect Smart Client through the Milestone block.
- Speed Control rules are available exclusively for the LPR plugin.
- To learn more about Speed Control rules, refer to Speed Control: Rules documentation.
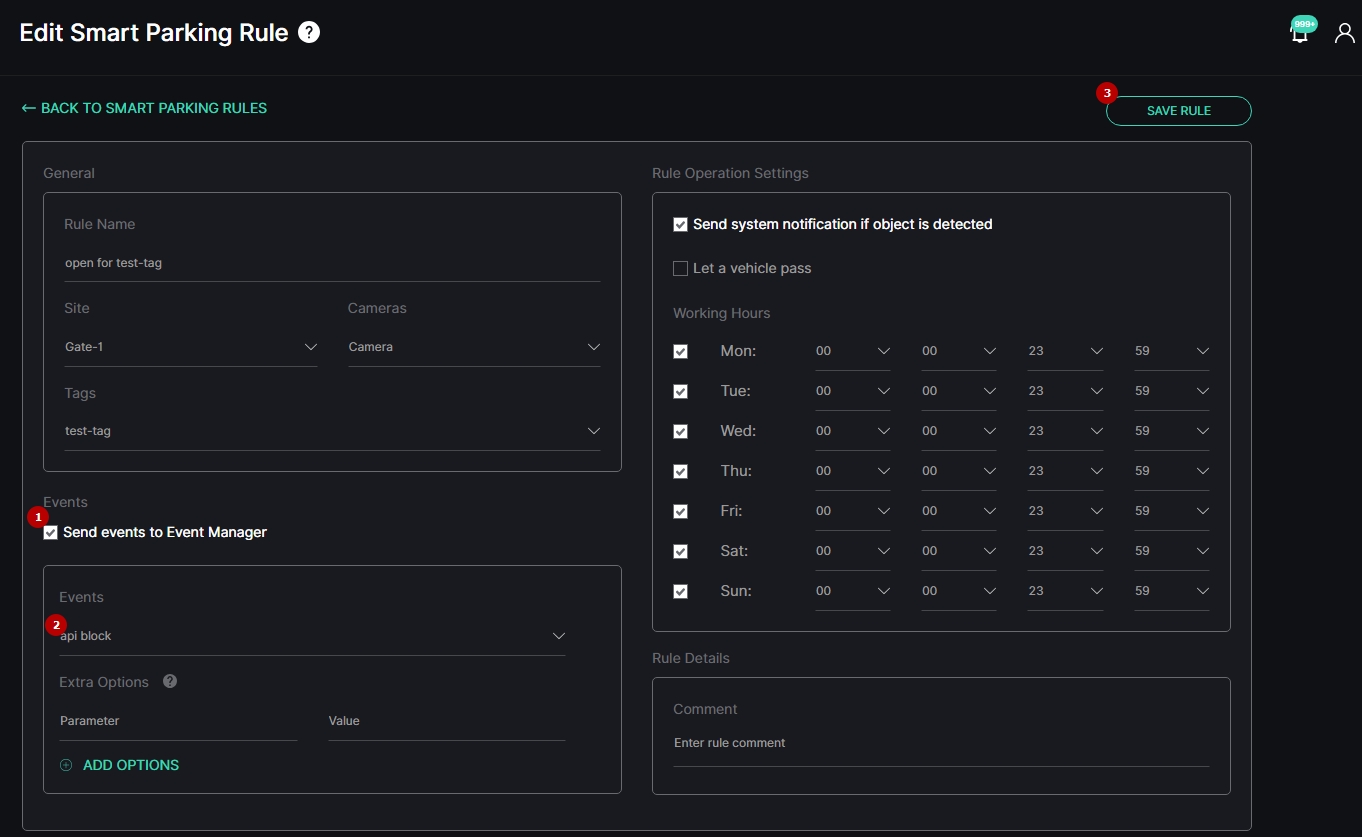
To configure the Smart Parking rule settings, open the rule editor:
- Select the Send Events to Event Manager checkbox
- Choose the created event from the Events drop-down list
- Save the rule settings
Afterward, start analytics included in the Smart Parking rule and wait for detection. Upon each detection, the event will be sent to the Alarm Manager in Milestone XProtect Smart Client through the Milestone block.
- Smart Parking rules are available exclusively for the Smart Parking plugin.
- To learn more about Smart Parking rules, refer to Settings: Rules documentation.
Milestone Compatible Video Sources
Sending event notifications from the analytics system as alarms to Milestone XProtect Smart Client is exclusively supported for analytics that operate through Milestone ONVIF or Milestone RTSP video stream types, provided the Camera GUID is correctly specified. Analytics that function through video files or other video stream types are incompatible with Milestone.
To receive event notifications in Milestone from analytics using a video file, follow these additional steps:
- Convert the video file into an RTSP video stream
- Add this RTSP video stream to Milestone
- Perform one of the following actions:
- Add this RTSP video stream to the analytics system as Milestone RTSP type, and ensure that the Camera GUID is correctly specified
- Add this RTSP video stream to the analytics system via Milestone Open Network Bridge* as Milestone ONVIF type
- For detailed guidelines on converting the video file into an RTSP video stream, refer to the How to Create a Cyclic RTSP Video Stream from a Video File? documentation.
- To find the camera's GUID, refer to the official Milestone Finding the camera's GUID (XProtect Advanced VMS) documentation.
- *Milestone Open Network Bridge has to be already installed and configured.


