Settings: Cameras
Overview
Select the Cameras tab in the tabs menu:

Use and Functionality
The Smart Parking Cameras functional menu allows to:

- Fill in the Camera field with:
- Camera name or characters in the name
- Analytics ID
- Video stream ID
- Select the required analytics status
- Click the Reset button to clear the filters
See the list of analytics in the table below. It contains:
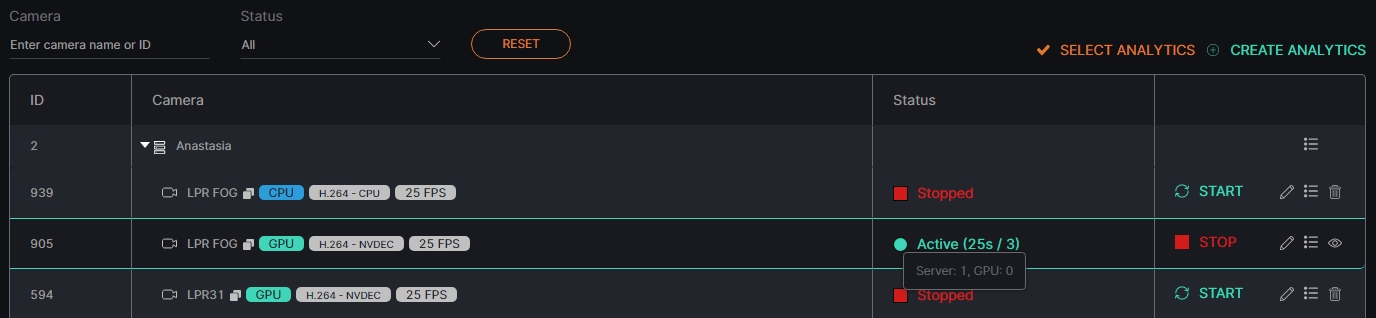
- Analytics and folders ID
- Camera comprises:
- Folders' and separate video streams' names
- Copy Name icon to copy the video stream name
- Video source type
- Additional hardware parameters
- Video stream or video file playback status. For the Active and Offline statuses, the system also displays:
- Countdown since analytics launch
- Last server connection to analytics (seconds ago)
- Toolbox comprises:
- Start/Stop
- Edit
- Search Results
- View
- Delete
- To learn more about grouping video streams into folders and making the appropriate changes in the Video Streams item, read Video Streams.
- To find out the ID of the CPU/GPU and the server running the video stream, hover the mouse over the circle next to the status of the running analytics.
Create Analytics
To create new analytics, click the Create Analytics button:

The Create Smart Parking Analytics navigation menu allows to:

- Click the Back to All Analytics button to return to the main Analytics item
- See the title and serial number of the current tab
- Click the Back or Next button to move among tabs:
- General
- Hardware
- Advanced Settings
- Permissions
General Tab
The General tab provides the ability to set a video stream and customize analytics parameters.
To set a video stream:

- Click the Video field
- See the Set Video Stream pop-up window
- Fill in the Search field with:
- Camera name or characters in the name
- Video stream ID
- Select the required camera from the filtered list
- Click the Set Video Stream button to confirm the intention
General Options
The General Options block determines the parameters of all zones:
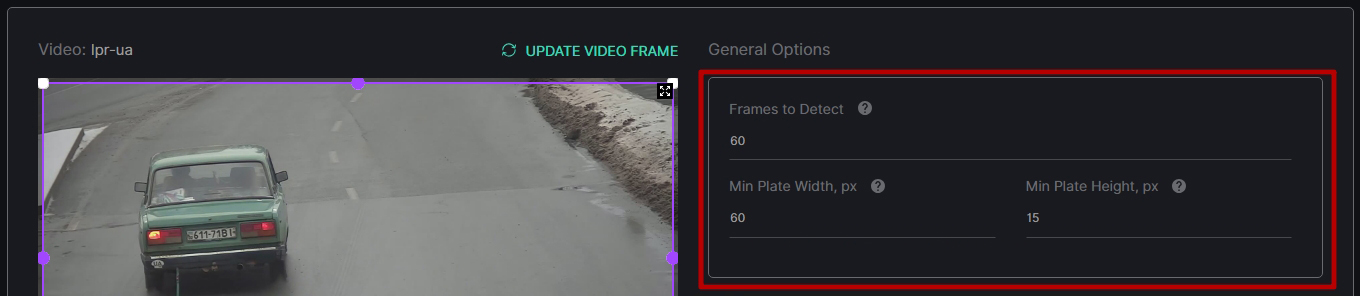
- Set the number of frames for the sample from which the best frame is selected for vehicle detection
- Set the minimum plate width for recognition (in pixels)
- Set the minimum plate height for recognition (in pixels)
- The possible range for the Frames to Detect parameter is from 3 to 100 frames. If a license plate is clearly visible in the frame, it is possible to significantly lower the parameter value to save hardware resources without detection quality loss (e.g. set the value to 5 frames, and set the FPS parameter to 1 in the Hardware tab. The system collects 5 frames within 5 seconds and selects the best one for recognition).
- The minimum value for the Min Plate Width, px parameter is 40 pixels.
- The minimum value for the Min Plate Height, px parameter is 15 pixels.
Recognition Options
To perform the recognition, apply these recognition options:
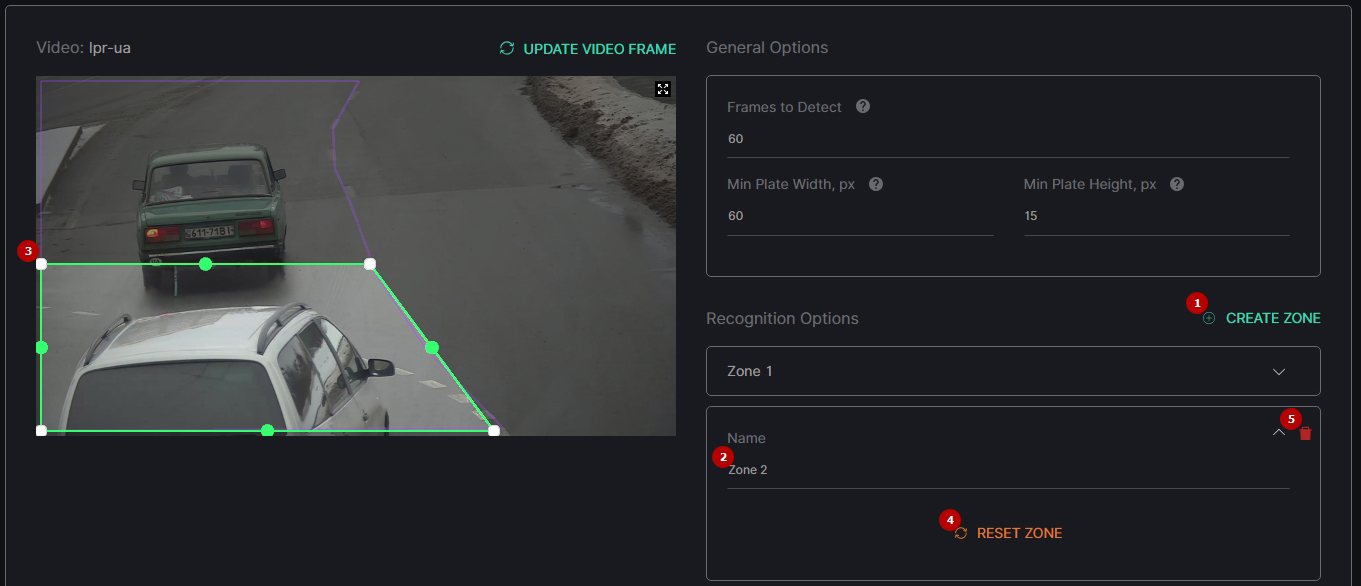
- Select the Create Zone button to create a new detection zone
- Enter the zone name
- Modify the detection zone:
- Click and drag the handles with LMB to set the zone borders
- Click and drag the area inside the zone with LMB to move the whole zone
- Click the handle with RMB to delete it
- Click the Reset Zone button to return the detection zone borders to their original position
- Click the red Delete Zone icon to delete the detection zone section
Hardware Tab
The Hardware tab provides the ability to customize hardware parameters:
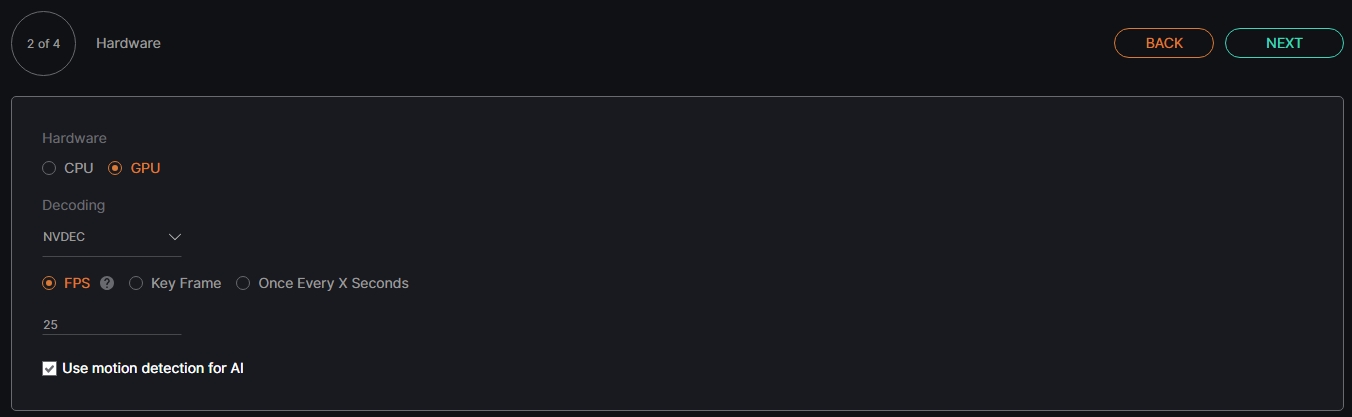
- Choose the CPU or GPU hardware acceleration
- Select the hardware decoder from the drop-down list:
- CPU
- Intel
- NVDEC
- Select the frame processing mode:
- FPS to set the desired number of frames per second
- Key Frame to set the frame processing only by keyframes
- Once Every X Seconds to set intervals in seconds between frame processing
- Select the Use motion detection for AI checkbox to enable analytics to process frames only when motion is detected in the frame
- The recommended value for the FPS mode is 25.
- The Use motion detection for AI checkbox is available only for FPS frame processing mode.
- The default parameters allow the production of analytics. To customize the analytics, set parameters as required.
- To learn more about hardware settings, read How to Сonfigure the Hardware Tab Settings.
Advanced Settings Tab
The Advanced Settings tab allows the users to:
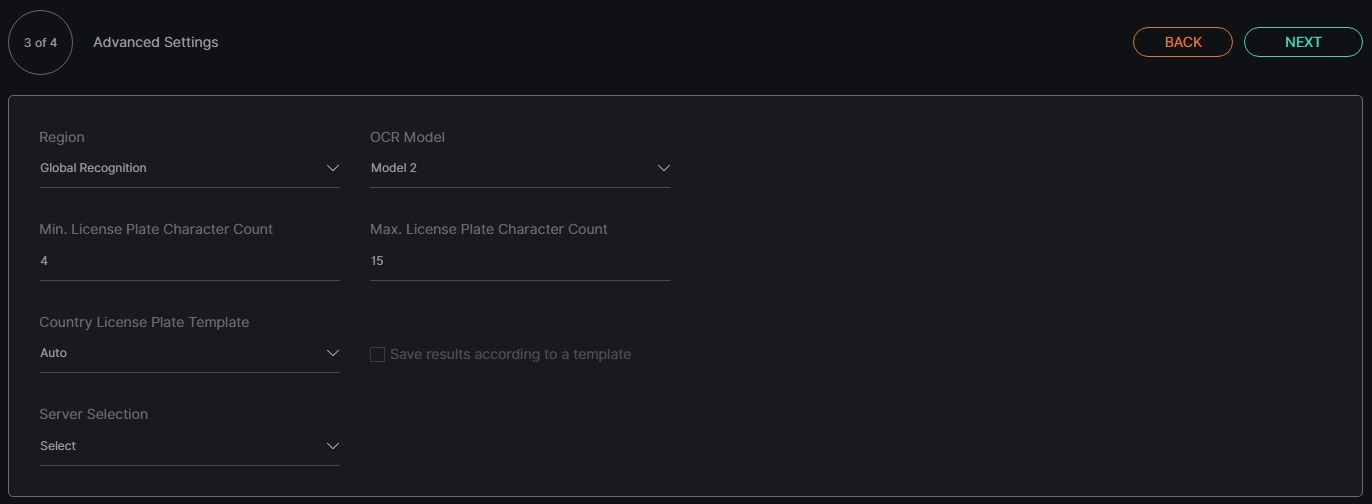
- Choose a region for license plate recognition based on predefined templates:
- Global Recognition
- Europe + CIS
- USA + Canada + Mexico
- Australia + New Zealand
- Japan
- Thailand
- Middle East
- Latin America
- Select an OCR model for recognition
- Enter the values from 1 to 15 for the minimum and maximum license plate character count
- Select a specific country (recommended) for focused license plate recognition and dynamic adaptation to the detected country's license plate templates, or leave the Auto option to ensure targeted recognition for a predefined region
- Enable the Save Results According to a Template option to filter and recognize license plates that match the specified country template, ensuring only relevant plates are processed and saved in the results (disabled if the Auto option is selected in the Country License Plate Template parameter)
- Select a server from the drop-down list to run the analytics
- Utilize various OCR models to optimize results based on specific scenarios. Experiment with different models to identify and select the most suitable one that aligns with your requirements.
- Employ the Min. License Plate Character Count and Max. License Plate Character Count parameters to control the character count in the license plate number, providing flexibility in customizing the length as needed.
- Refer to the Supported Countries documentation for comprehensive information on the list of supported countries within each region (analytical model).
Permissions Tab
The Permissions tab provides the ability to:
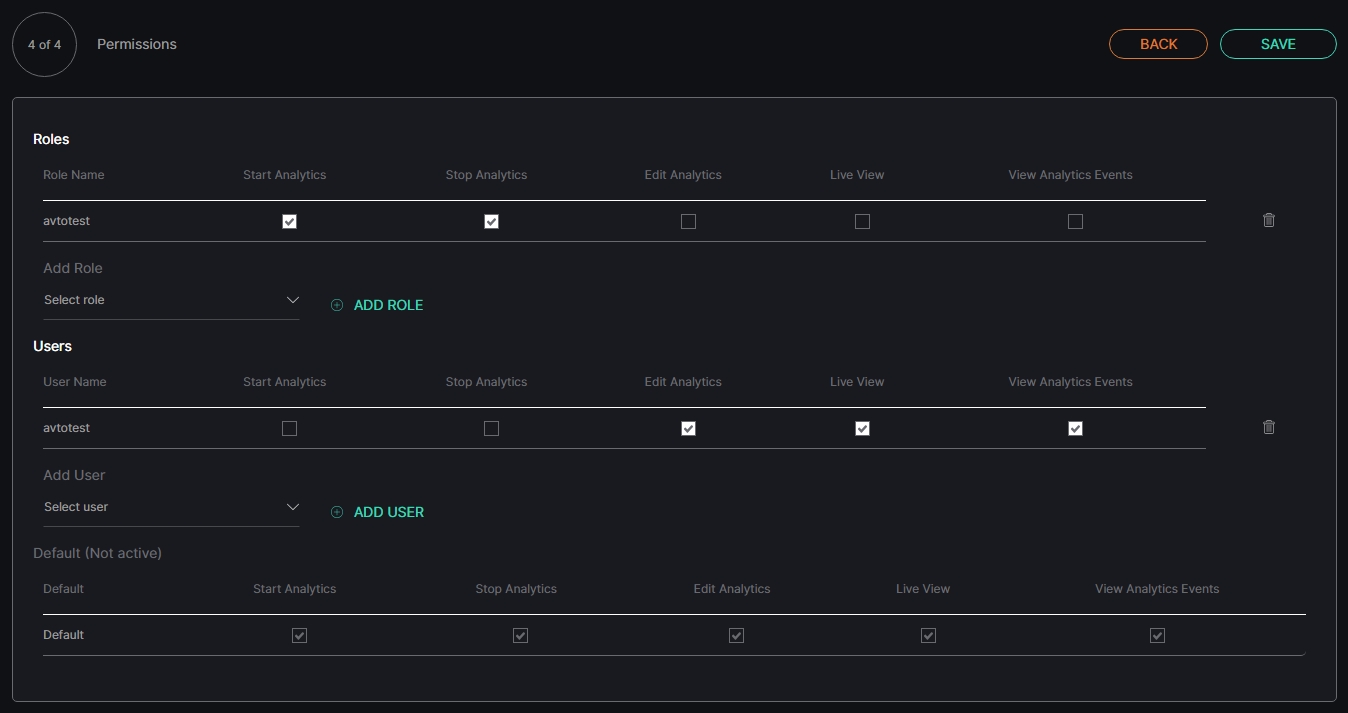
- Assign analytics access rights for Roles:
- Select the required role from the drop-down list
- Click the Add Role button
- Select the checkboxes for the required access rights
- Click the Delete icon to remove the unnecessary role
- Assign analytics access rights for Users:
- Select the required user from the drop-down list
- Click the Add User button
- Select the checkboxes for the required access rights
- Click the Delete icon to remove the unnecessary user
- Select the checkboxes for the required analytics access rights by default
- Select the Save button to confirm the intention in the navigation menu
- Default parameters are active only if no Roles or Users are added.
- The quantity of added Roles and Users is not limited.
Once saved, the Smart Parking Analytics editor opens to allow the users to:
- Modify parameters
- Set parameters
- Run the created analytics
- Proceed to live view mode
Edit Analytics
To edit settings in the selected analytics, click the Edit icon on the toolbox:

The Edit Smart Parking Analytics navigation menu allows to:

- Click the Back to All Analytics button to return to the main Analytics item
- See the setting tabs and move among them by clicking their titles:
- General
- Hardware
- Advanced Settings
- Permissions
- Select the Stop button to disable the analytics:
- Yes to confirm the analytics disabling
- No to cancel the intention or close the pop-up window
- Select the Start button to enable the analytics
- Click the Live View button to see the selected analytics process in real-time
- Select the Save button to apply the changes to the selected analytics
- The current tab is always highlighted.
- Analytics editing is available only when selected analytics is disabled.
- The Stop button is available only when the current analytics is active.
- The Start button is available only when the current analytics is stopped.
- The Live View button is available only when the current analytics is active.
To view editing parameters for the General, Hardware, Advanced Settings, and Permissions tabs, read Create Analytics.
Analytics Status
To enable or disable the analytics and view the change of the analytics status:
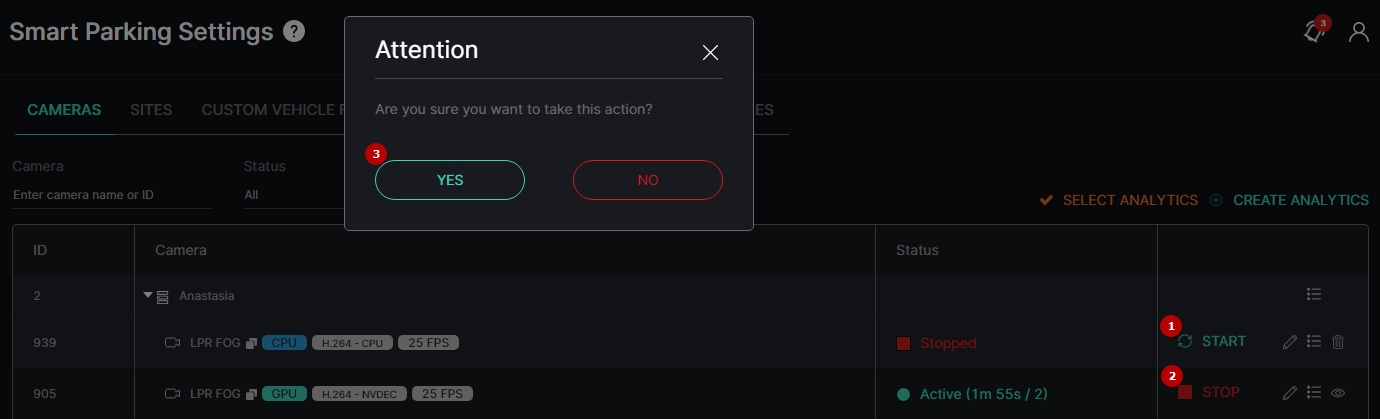
- Select the Start button to enable the analytics
- Click the Stop button to disable the analytics process
- Confirm the intention
To enable or disable multiple analytics at once, click the Select Analytics button:

The Select Analytics functional menu allows to:

- Check the boxes next to the required folders or separate analytics to select them
- Click the Start Analytics button and confirm the intention in the pop-up window to enable all selected analytics
- Click the Stop Analytics button and confirm the intention in the pop-up window to disable all selected analytics
- Click the Cancel button to quit the analytics selection
View Analytics
To see the selected analytics in real-time, click the View icon on the toolbox:

Live view analytics mode allows to:
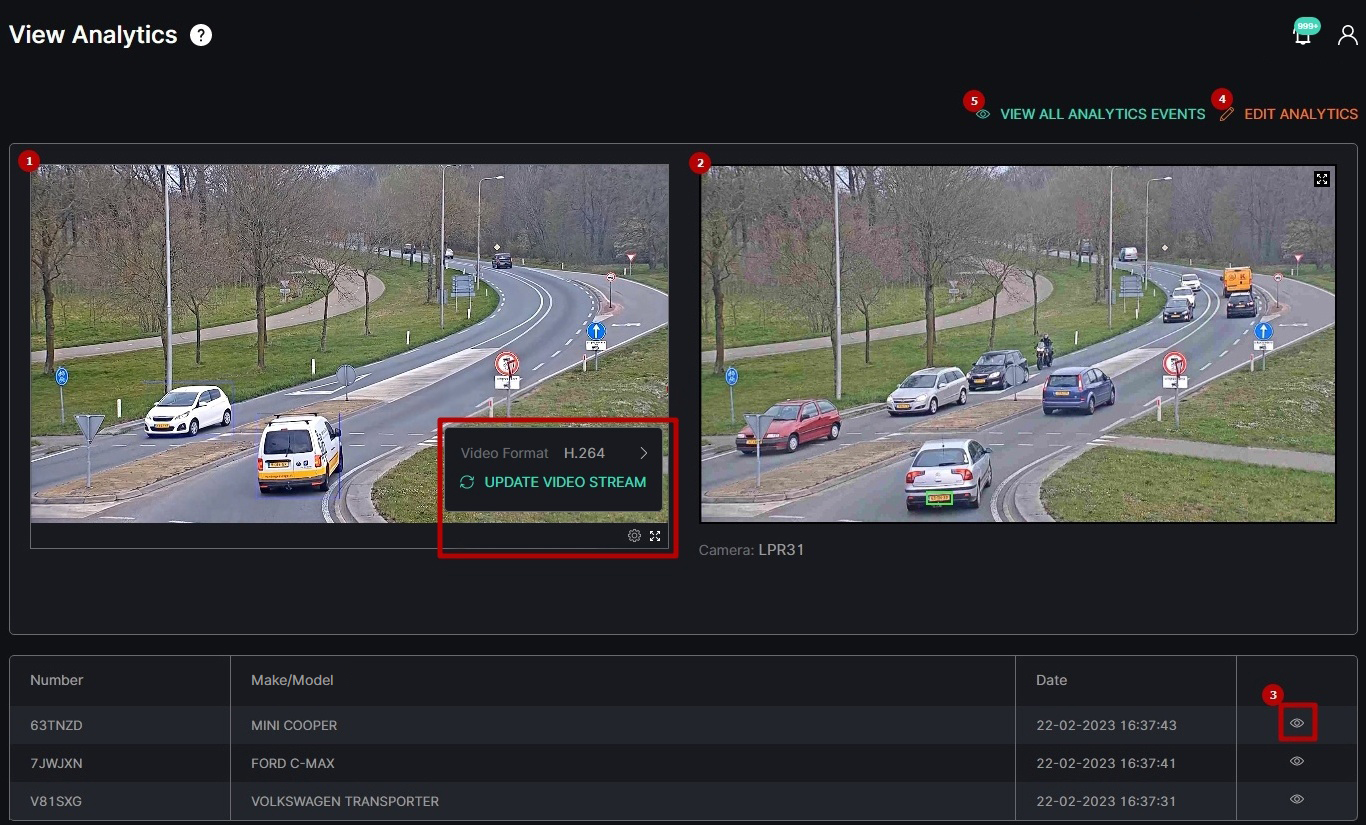
- View the video from the camera in real-time mode. At the bottom of the block:
- Hover the mouse over the Settings icon to:
- Select the desired video format
- Click the Update Video Stream button to manually update the video
- Click the Enlargement icon to expand the video to full screen
- Hover the mouse over the Settings icon to:
- View the frame preview with the recognized license plate number
- Select the View icon in the table below to open the image and see the event information. In the pop-up window:
- Use frame view tools:
- Zoom Out icon (-) to zoom out from a specific area of the frame
- Zoom In icon (+) to zoom in on a specific area of the frame
- Reset View icon (~) to reset the frame to its original size and position
- Target icon to zoom in on the detected object in the frame
- Enlargement icon to open the frame in full-screen (in the full-screen press the Esc button to return to default view)
- Hover the mouse over the Extra Options icon and click the Save Image button to download the event frame in full size
- Use frame view tools:
- Click the Edit Analytics button to make changes to the current analytics settings
- Click the View All Analytics Events button to see all events from the selected analytics
- Click the enlargement icon in the upper-right corner of the frame preview to open the full-screen view mode.
- Click and drag the image across the zoomed-in frame in order to view different parts of it.
View Search Results
To view selected analytics search results in the Analytics item, click the Search Results icon on the toolbox:

Delete Analytics
To delete the analytics:
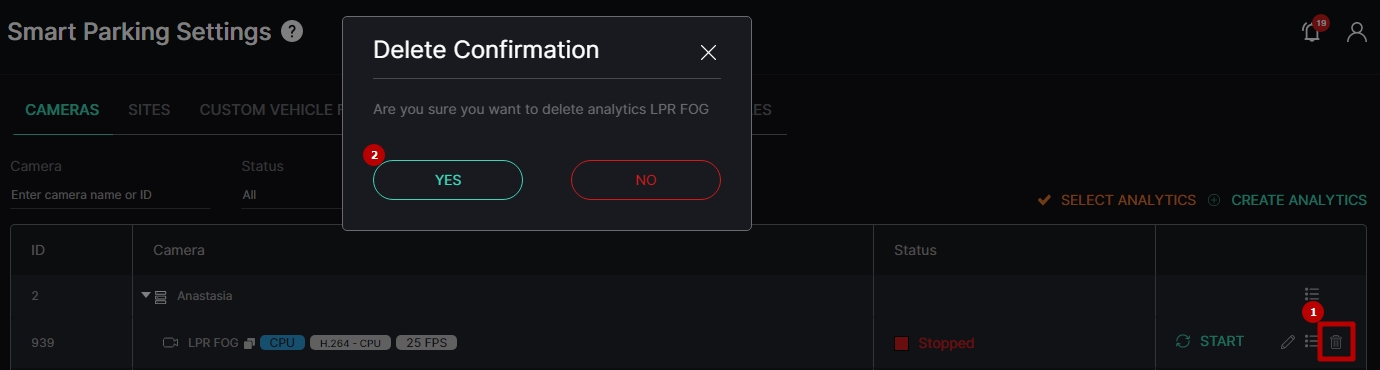
- Select the Delete icon on the toolbox
- Confirm the intention