Linux: 1 PC System Installation
Introduction
- Before starting the installation:
- Ensure that the operating system is Ubuntu 20.04 Server (64-bit). Other Ubuntu versions are not supported.
- Use only Intel CPUs with AVX2 and SSE4.2 for the proper functioning of the VEZHA Analytics System. AMD CPUs are not supported.
- Install and configure MySQL, PostgreSQL, or MSSQL database management system before proceeding with the analytics system installation to establish a connection to the server. For instructions on installing MySQL DBMS, refer to the MySQL Installation Guide. VEZHA Analytics System supports the following DBMS versions:
PostgreSQL: 9.5 or later
MySQL: 8.0 or later
MSSQL (Microsoft SQL Server): 2014 or later
- Disable Secure Boot in the BIOS settings following the Disable Secure Boot guidelines. It allows all necessary drivers to be installed and loaded correctly.
- Maintain a stable internet connection during the software installation process. After the installation is complete, disconnect the internet if desired.
- During the installation process, all necessary drivers will be downloaded and installed automatically. Do not pre-install any drivers.
- After the system installation, it is crucial to disable automatic package updates following the Disable Automatic Updates guidelines. Additionally, manual package updates must be strictly avoided. Failure to adhere to this instruction may result in the improper functioning of the system.
To initiate the system installation, navigate to the Installation Files section in the Partners Portal and select either the Linux CPU Server Analytics block or the Linux GPU Server Analytics block to view and download the required installation files.
- The installation files for system version 23.3 have been unified for both CPU and CPU+GPU versions.
- The Process Runner installer includes files for installing Process Runner itself, as well as all analytical components.
To enhance access rights before working with archives in Linux, run the command in the command line:
sudo -i
To obtain the necessary archives, input the command in the command line for each required archive as shown in the example:
Middleware Core:
wget <full_link_from_distr_website>/23.3/incoresoft-middleware-core.tgz

Proccess Runner:
wget <full_link_from_distr_website>/23.3/incoresoft-process-runner.tgz
Press Enter and wait patiently until the file download is completed.
For a comprehensive installation, download the following files:
Middleware Core:
incoresoft-middleware-core.tgz

Process Runner:
incoresoft-process-runner.tgz
Unpack each file archive individually:
Middleware Core:
tar -xzf incoresoft-middleware-core.tgz

Process Runner:
tar -xzf incoresoft-process-runner.tgz
Middleware Core Installation
To install the Middleware Core, execute the following command:
./install-incoresoft-middleware-core.sh
Then, open the corresponding URL:
- If the system was installed on the current PC, use http://localhost:2001/
- If the system was remotely installed on a server, use http://ip:2001/ where IP is the IP address of the server
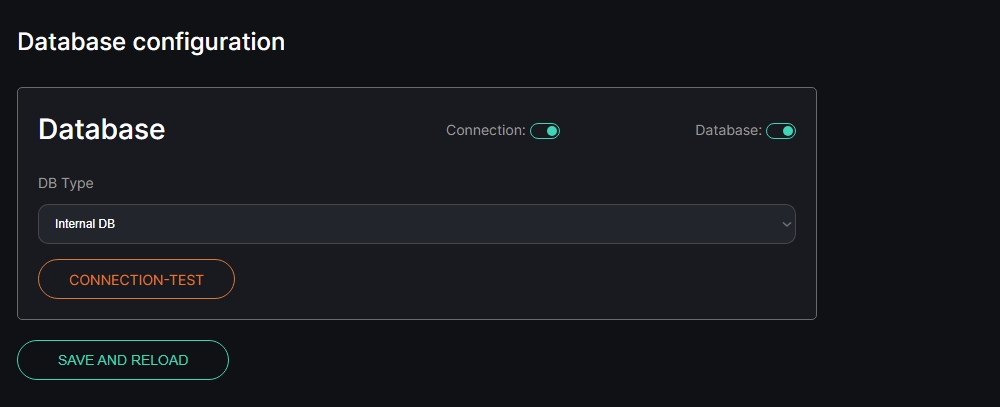
Within the Database block, perform the following steps:
- Choose the appropriate DB type from the drop-down list:
- Internal DB for small projects with up to 20 analytics and low server load
- MySQL/PostgreSQL/MSSQL for larger projects with over 20 analytics
- Fill in the necessary fields for the DB connection (applicable only for MySQL/PostgreSQL/MSSQL type):
- In the Host field, specify the IP address of the server with the preinstalled and configured DB
- In the Login field, enter the admin login for accessing the DB
- In the Password field, provide the password associated with the DB admin login
- Click the Connection Test button to:
- Verify the DB server connection: A successful connection is indicated by a green Connection toggle
- Create the database: A successful DB creation is indicated by a green Database toggle
- Click the Save and Reload button to save the current settings and restart the service
- If there are plans to expand the system to a server cluster in the future, selecting MySQL is preferable.
- The admin login and password are used only once during the initial setup to create a limited internal user for creating the database.
- If you choose to use the Internal DB, it is crucial to back up the database file periodically. This ensures that if the database becomes corrupted for any reason, you can restore your data from the backup. Refer to the documentation How to Prepare for Potential Errors When Using the Internal DB (H2)? for details on the backup process.
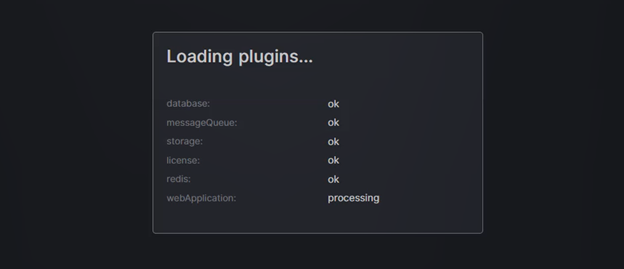
Wait while the system checks for installed middleware plugins:
Once the webpage reloads, use the default user login and password to access the system:
- Login: admin
- Password: admin
Process Runner Installation
To install the Process Runner, execute the following command:
./install-incoresoft-process-runner.sh
For the Server ID in Cluster field, keep the default value and click the Ok button:
In the installation dialog that follows, input "localhost" to indicate the server with preinstalled Middleware Core, and then click the Ok button:
- After the system installation, it is crucial to disable automatic package updates following the Disable Automatic Updates guidelines. Additionally, manual package updates must be strictly avoided. Failure to adhere to this instruction may result in the improper functioning of the system.
- Once the installation of Process Runner and analytics components is finished, it is necessary to restart the computer to ensure proper operation of the NVIDIA graphics card drivers.
Use the default user login and password to access the system:
- Login: admin
- Password: admin
To verify the analytical server is installed correctly, after the installation of Process Runner and all analytics components, follow these steps:
- Open the Settings section in the left menu
- Select the Servers item
- Check if the new analytical server has been successfully added to the server table
The initial system setup is now complete.
Disable Secure Boot
To ensure successful installation of VEZHA Analytics System on Linux, Secure Boot should be disabled in the BIOS settings. Secure Boot blocks certain unsigned drivers that are required for the system's operation. Disabling this feature allows all necessary drivers to be installed and loaded correctly.
Follow these steps to disable Secure Boot:
- Restart the computer and enter the BIOS setup.
- Navigate to the Security tab in the BIOS menu.
- Set Secure Boot to Disabled.
- Save the changes and exit the BIOS.
- Reboot the system to apply the changes, then proceed with the installation of VEZHA Analytics System.
Disable Automatic Updates
To disable automatic package updates, access the file via the command line:
nano /etc/apt/apt.conf.d/20auto-upgrades
Modify the contents of the file as follows:
Replace:
APT::Periodic::Update-Package-Lists "1";

APT::Periodic::Unattended-Upgrade "1";
With:
APT::Periodic::Update-Package-Lists "0";

APT::Periodic::Download-Upgradeable-Packages "0";

APT::Periodic::AutocleanInterval "0";

APT::Periodic::Unattended-Upgrade "0";
Make sure that all values are set to 0. Save the changes.


