Face Recognition: Lists
Overview
To open the Lists item, in the left menu:

- Select the Face Recognition section
- Choose the Lists item
- See lists
Use and Functionality
The Lists functional menu allows to:

- Enter the list name or characters in the name to filter lists
- Select the Search button to start filtering
- Select the Reset button to clear the filters
See the filtered lists in the table below. It contains:
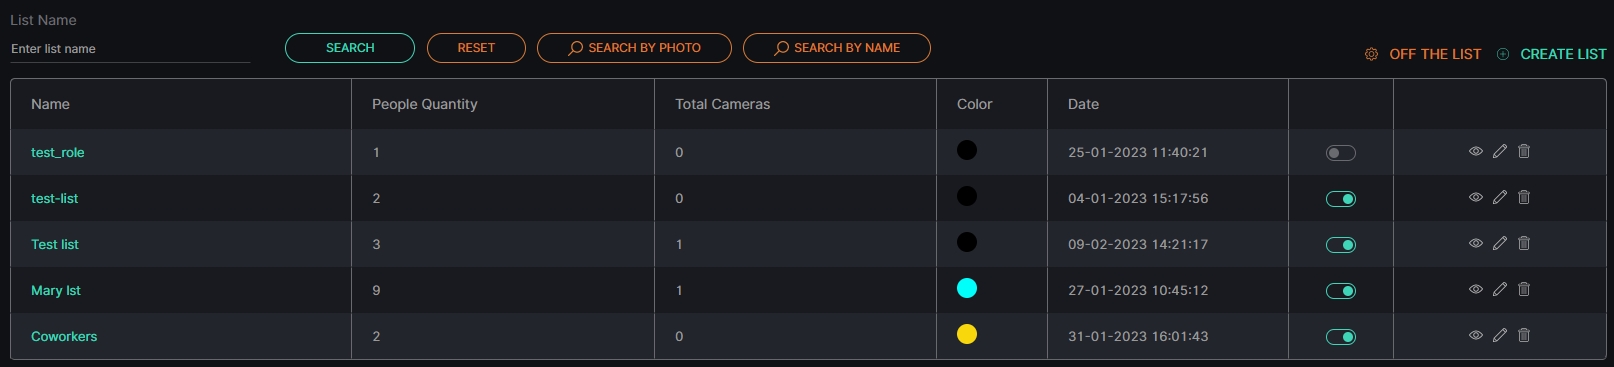
- List name
- Number of people included in the list
- Total number of video streams involved in the list
- List color
- List creation date and time
- Enabled/Disabled list toggle
- Toolbox comprises:
- Edit List
- Delete List
- View List
Off List Notification Settings
To set up notifications about recognized faces off lists select the Off the List button:

In the Off List Notification Settings pop-up window:
- Click the Camera parameter to choose the desired video analytics. In the pop-up window:
- Check the boxes next to the required video analytics and folders
- Click the Select Video Analytics button
- Check the Internal Notification box to allow the system to send all notifications to the Events item
- Check the Send Events to Event Manager box to allow the system to send all notifications about people out of lists to the Event Manager and then to external resources
- Click the Save button
Create List
To create a new list, click the Create List button. In the Create List pop-up window:
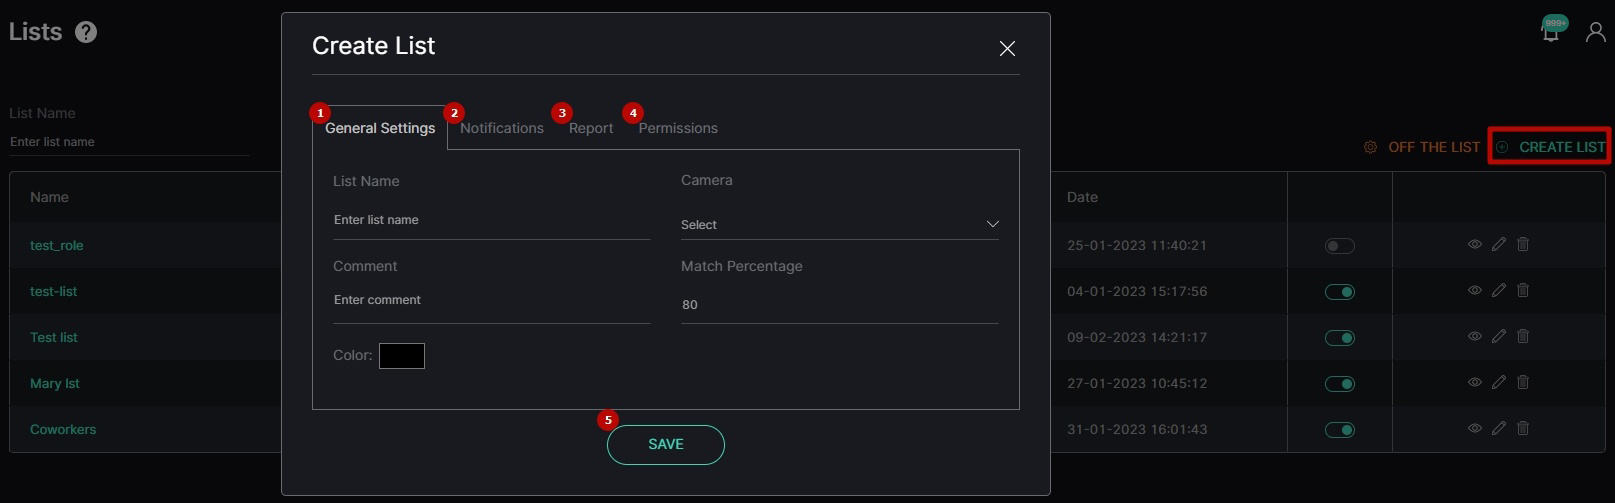
- Configure the General Settings tab's parameters:
- Enter the list name
- Click the Camera parameter to select the desired video analytics. In the pop-up window:
- Check the boxes next to the required video analytics and folders
- Click the Select Video Analytics button
- Type a comment to the list in the Comment field
- Set the confidence threshold in percentage
- Click on the Color block to pick a color for the list
- Configure the Notifications tab's parameters:
- Check the Internal Notification box to allow the system to send all notifications related to the list to the Events item
- Check the Send Events to Event Manager box to allow the system to send all notifications about people in the list to the Event Manager and then to external resources
- Select the Report tab to check the Time & Attendance and Building Evacuation Reports box to set entrance and exit cameras for list report generation
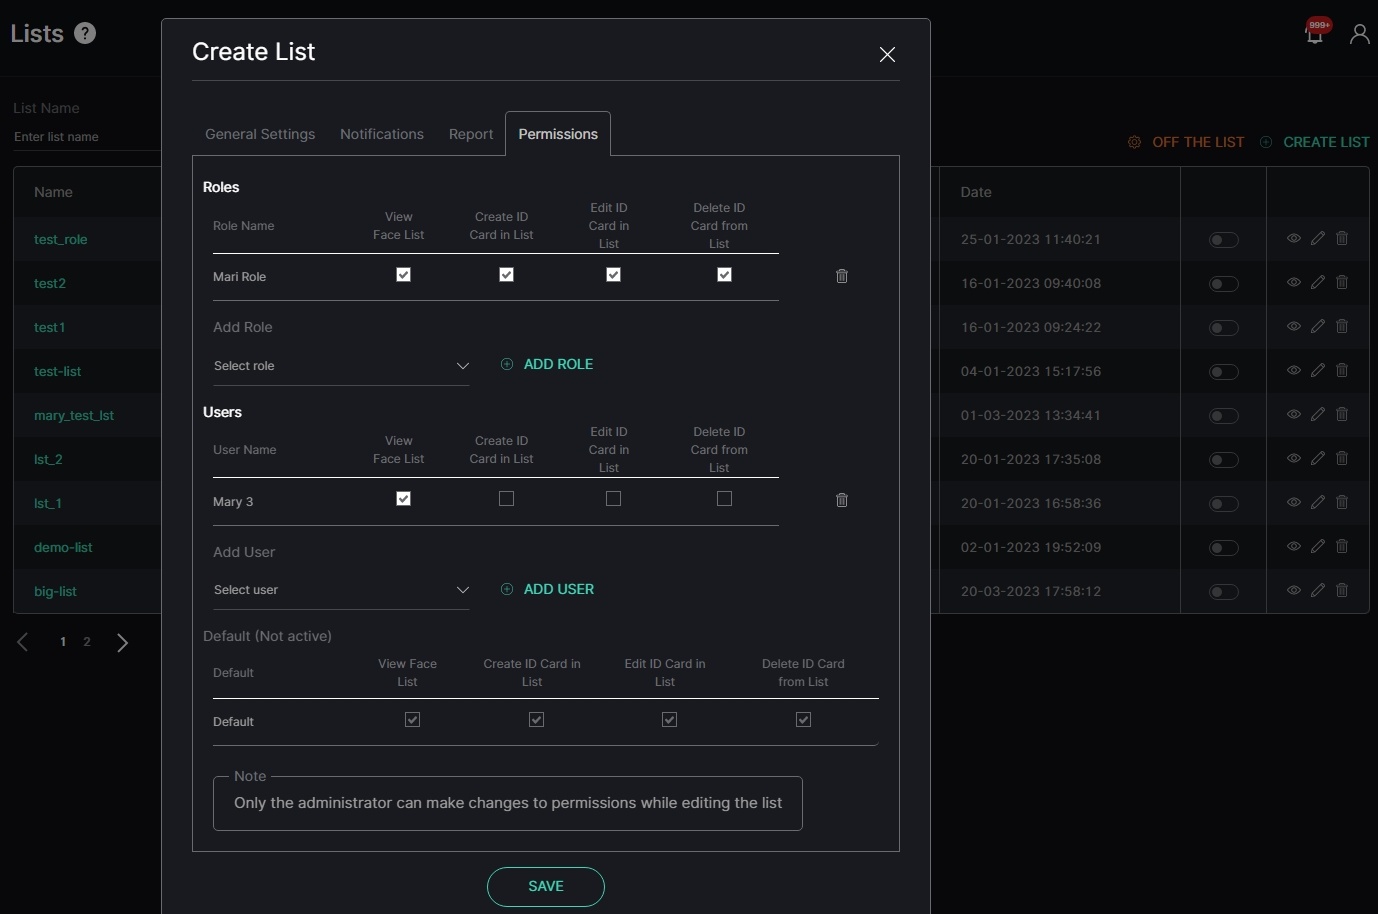
- Configure the Permissions tab's parameters:
- Assign list access rights for roles:
- Select the required role from the drop-down list
- Click the Add Role button
- Select the checkboxes for the required access rights
- Click the Delete icon to remove the unnecessary role
- Assign list access rights for users:
- Select the required user from the drop-down list
- Click the Add User button
- Select the checkboxes for the required access rights
- Click the Delete icon to remove the unnecessary user
- Select the checkboxes for the required list access rights by default
- Assign list access rights for roles:
- Click the Save button to save parameters and create a new list
- The Permissions tab's default parameters are active only if no Roles or Users are added.
- The quantity of added Roles and Users in the Permissions tab is not limited.
- Checking the Internal Notification box allows getting event notifications only in case the Enabled/Disabled list toggle is turned on.
Once the list is created with the checked Internal Notification box, the Enabled/Disabled list toggle is turned on, and at least one of the selected analytics is enabled, the Notification icon signals about each new event notification. Click the Notification icon to open the Notification Panel. It comprises:
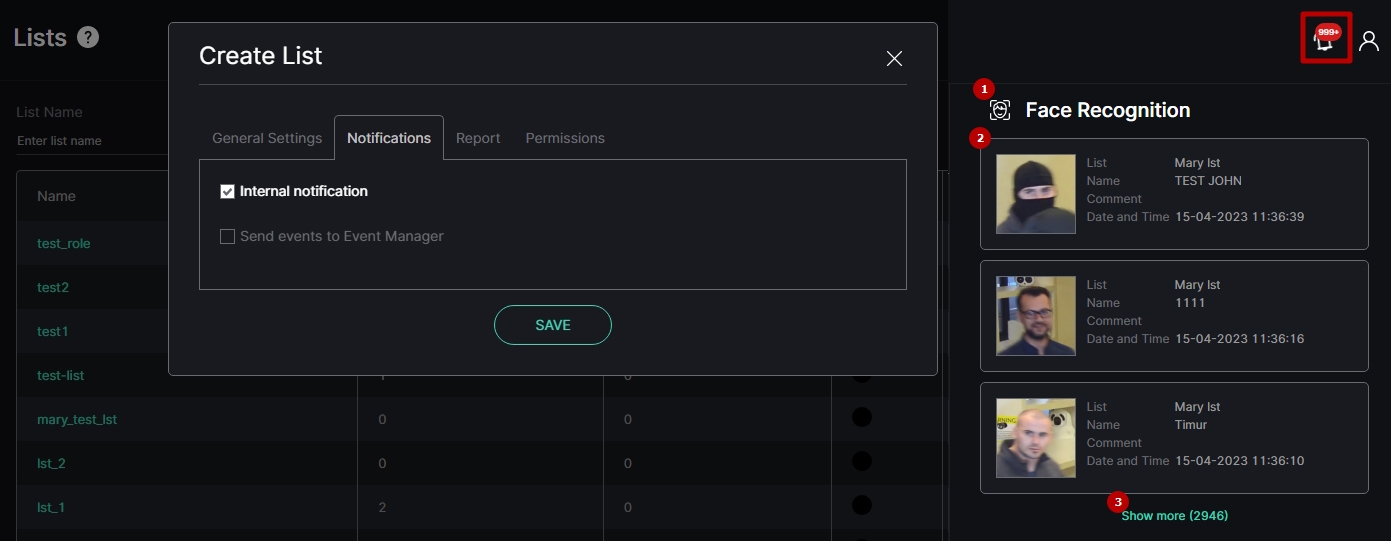
- Plugin name box to:
- Collapse/expand the list of event notifications by clicking the plugin name
- Clear all plugin event notifications at once from the Notification Panel by clicking the Close button (this action doesn't affect events in the Events item)
- Event notification box to:
- View short event information and frame preview for up to 3 last notifications
- Open the event pop-up window by clicking the required notification
- Clear the desired event notification from the notification list by clicking the Close button inside the box (this action doesn't affect the event in the Events item)
- Show More button with the total events number to open the Events item and view all events
List Permissions Configuration
For example, it is necessary to give full access to a new list to all users related only to a specific role, and at the same time, to restrict the ID Card managing access rights in the list for one of the users related to this role. For this purpose:
- In the Roles item of the Settings section assign all required Face Recognition permissions to the role, including:
- View Face Lists
- Create ID Card in List
- Edit ID Card in List
- Delete ID Card from List
- In the Users item of the Settings section assign the selected role to all required users
- In the Create List pop-up of the Lists item open the Permissions tab
Configure the parameters in the Permissions tab:
- In the Roles block, add the required role and check all access rights boxes
- In the Users block, add the required user and check only the View Face Lists access right box
- Finish the list configuration and save it
Once the list is created, all users with the selected role can view the new list and manage ID Cards in it. At the same time, the additionally selected user can only view the new list but cannot manage ID Cards in this list.
- User permissions are with higher priority than Role permissions.
- The sequence of access rights validation in the list by the system:
- Global permissions
- User permissions
- Role permissions
- Default permissions
Edit List
To edit the list, select the Edit icon on the toolbox:

To view editing list parameters, read Create List.
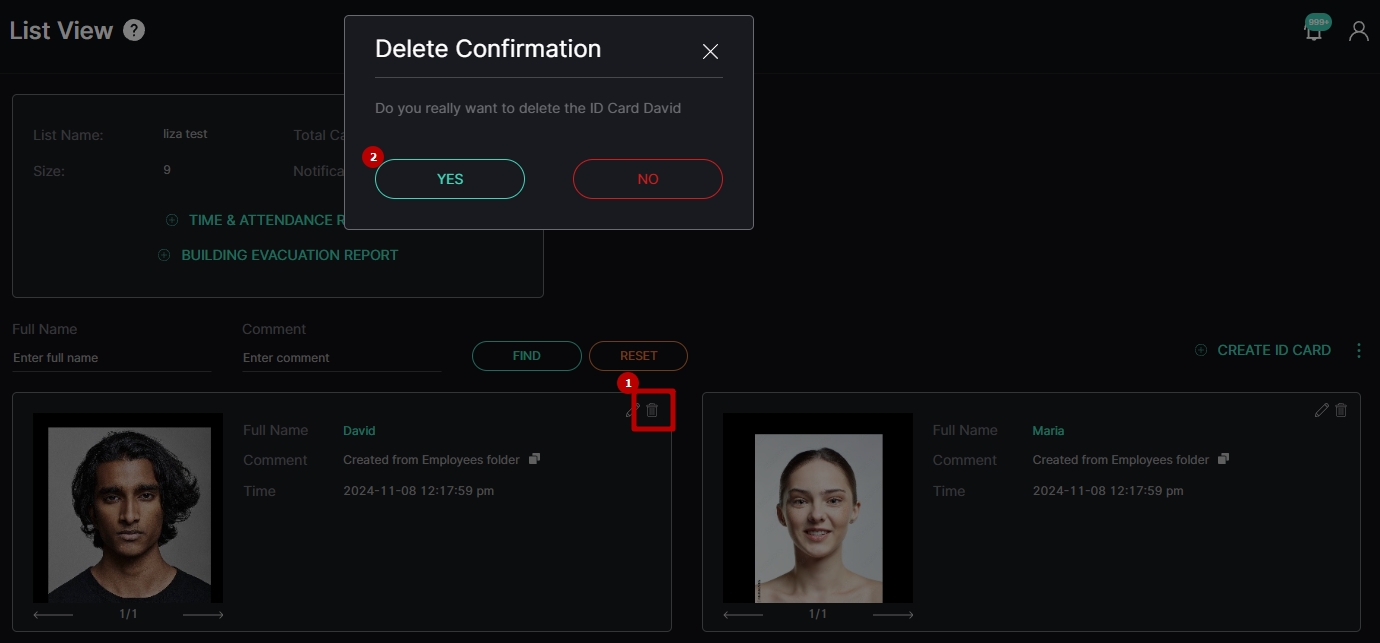
Delete List
To delete the list:

- Select the Delete icon on the toolbox
- Confirm the intention
View List
To view the list, select the View icon on the toolbox:

The List View functional menu comprises:
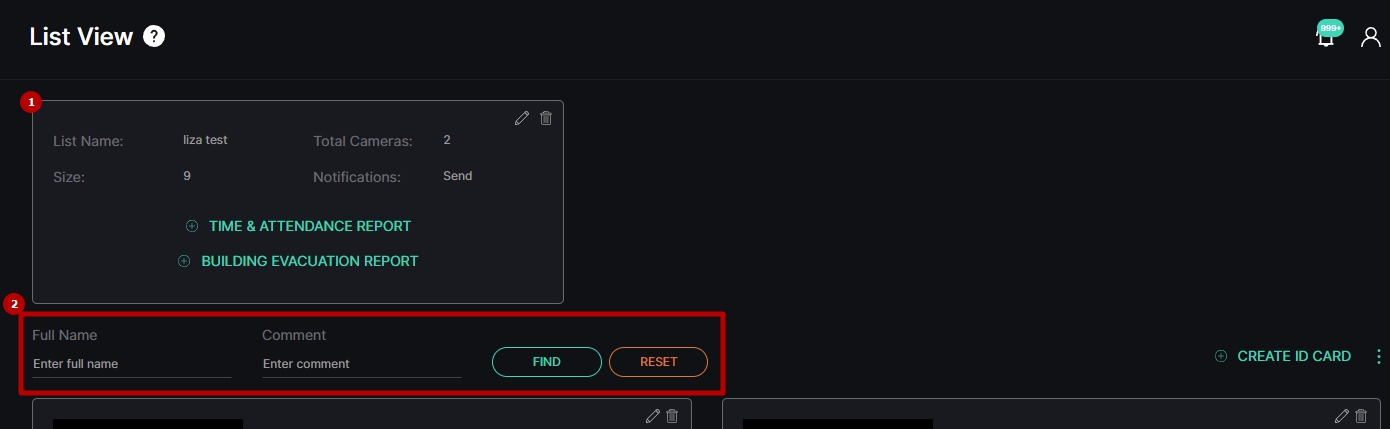
- List Info Box contains:
- List parameters
- Edit List tool
- Delete List tool
- Time & Attendance Report and Building Evacuation Report buttons to generate a list report. In the Generate a Report pop-up window:
- Select the required time frame
- Select the report file format type (CSV)
- Click the Generate button
- Filters to:
- Enter the person's full name or characters in the name
- Enter the comment or characters in the comment
- Click the Find button to start filtering
- Click the Reset button to clear the filters
- Time & Attendance Report and Building Evacuation Report options become available only upon checking the Time & Attendance checkbox in the Report tab of the Create/Edit List pop-up window.
- Time & Attendance Reports and Building Evacuation Reports are generated based on records from entrance and exit cameras selected in the Report tab of the Create/Edit List pop-up window. The system analyzes the time when an employee is recognized by the entrance and exit cameras and provides the results in the form of a CSV file.
The generated Time & Attendance Report comprises the following data:
- Date
- Employee's full name
- Time the employee was recognized by the entrance camera during the first visit within the selected period of time
- Time the employee was recognized by the exit camera during the last visit within the selected period of time
- Total presence time between employee recognitions by entrance and exit cameras during all visits within the selected period of time
- Records of a person's entrance and exit time with the total time of their presence during separate visits
Time & Attendance Report data example. By the time the report was generated, employees Igor and Anatoliy had not left the building yet (or had not been identified by the exit camera as being on the list), while employees Valeriy and Artem had two visits to the building:
Date;Employee;In;Out;Presence Time
14/09/2023;Igor;12:29;;no checkout
14/09/2023;Valeriy;12:29;17:20;04h03m
"";;12:29;15:23;02h53m
"";;16:10;17:20;01h10m
14/09/2023;Anatoliy;12:29;;no checkout
14/09/2023;Artem;12:29;17:40;04h54m
"";;12:29;15:23;02h54m
"";;15:40;17:40;02h00m
The generated Building Evacuation Report comprises the following data:
- Date
- Employee's full name
- Presence indicator:
- True, to indicate the employee is still inside the building. Executes in case the entrance camera detected the employee, but the exit camera didn't detect the same employee after that
- False, to indicate the employee has left the building. Executes in case both entrance and exit cameras detected the employee on the specified date
Building Evacuation Report data example. By the time the report was generated, all employees had not left the building yet (or had not been identified by the exit camera as being on the list):
Date;Employee;Present
01-09-2023;Igor;true
01-09-2023;Valeriy;true
01-09-2023;Artem;true
01-09-2023;Anatoliy;true
The tiles with ID Cards contain:
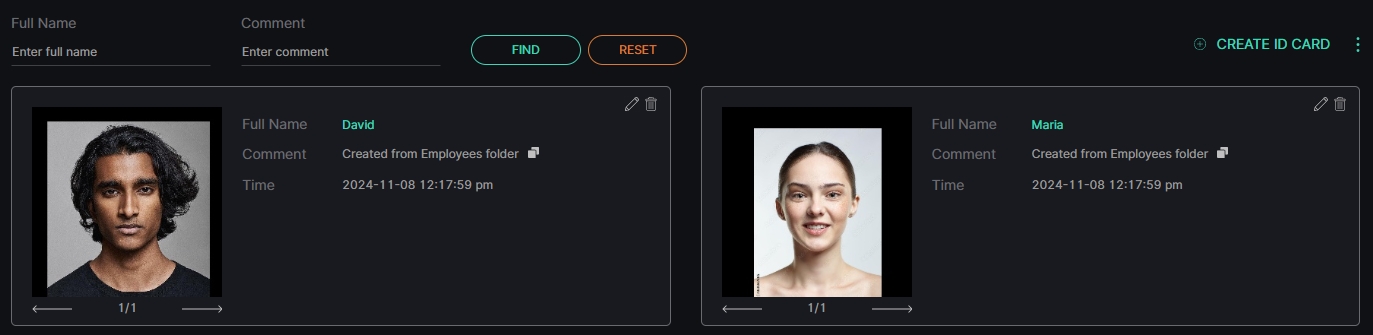
- Clickable photo of the person
- Person's full name
- Comment about the person
- Copy Comment icon to copy the required comment to the clipboard
- Date and time the person was added to the list
- Edit ID Card tool
- Delete ID Card tool
Create ID Card
To add a person to the list and create the ID Card, click the Create ID Card button. In the Create ID Card pop-up window:
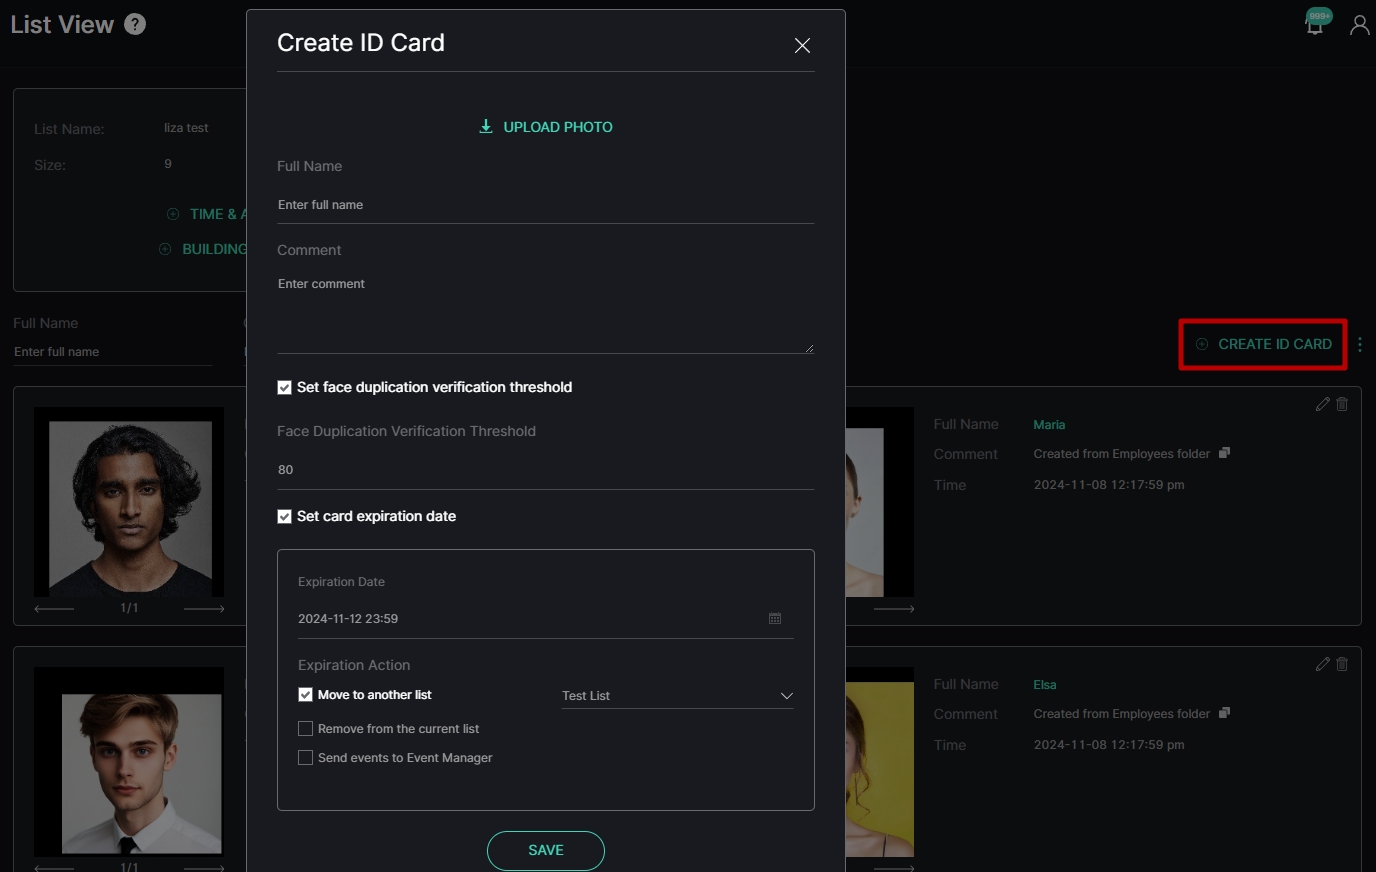
- Upload multiple photos with a person for comparison and identification by clicking the Upload Photo button
- Enter the person's full name
- Type a comment to the person in the Comment field
- Check the Set Face Duplication Verification Threshold box to manually define the verification threshold for all new ID cards. In the Face Duplication Verification Threshold field:
- Decrease the value in percentage to lower the threshold for face duplication verification. This allows a broader range of facial features to be considered as potential matches, increasing the likelihood of identifying individuals from ID cards with less strict similarity criteria.
- Increase the value in percentage to raise the threshold for face duplication verification. This enhances the precision of duplicate recognition, ensuring that only individuals with very similar facial features are identified as matches. Higher values reduce the chance of creating a new ID card for the same person.
- Check the Set Card Expiration Date box to set the ID Card expiration parameters:
- Select the date and time
- Choose the action after the expiration. Check the:
- Move to Another List box and select another list to move the ID Card
- Remove from the Current List box to remove the ID Card from the list
- Send Event to Event Manager box to allow the system to send the notification about ID Card expiration to the Event Manager and then to external resources
- Click the Save button
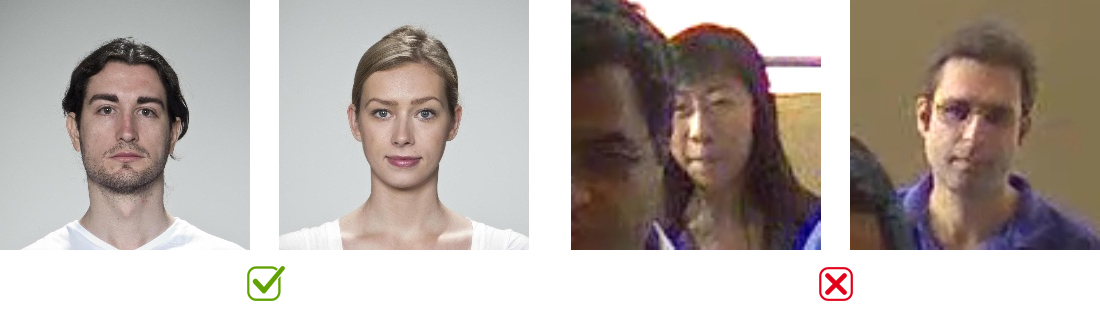
- Before adding a photo to the ID Card, ensure that:
- The face occupies no more than 70-80% of the overall photo dimensions.
- The selected photo has a minimum resolution of 150x150 pixels in both width and height.
- The selected photo meets quality standards comparable to official documents, including sharpness, color accuracy, lighting, background uniformity, size, focus, absence of artifacts, and appropriate pose and facial expression.
- To delete the photo in the Create ID Card pop-up window, hover the mouse over the required photo and select the Delete icon.
- To create the ID Card, select at least one photo.
- If the Set Face Duplication Verification Threshold checkbox is deselected, the default value of 80% for face similarity verification will be applied.
- The Face Duplication Verification Threshold parameter persists at the browser level, offering convenience in filtering out duplicates for the specific user adding them. The selected threshold remains consistent across sessions, ensuring efficient management of duplicate verification. This parameter can be modified at any time by editing any ID Card in any desired list.
Examples of appropriate and inappropriate reference photos in the ID Card:
Once the ID Card is saved, check if the faces in the added reference photos are properly recognized:
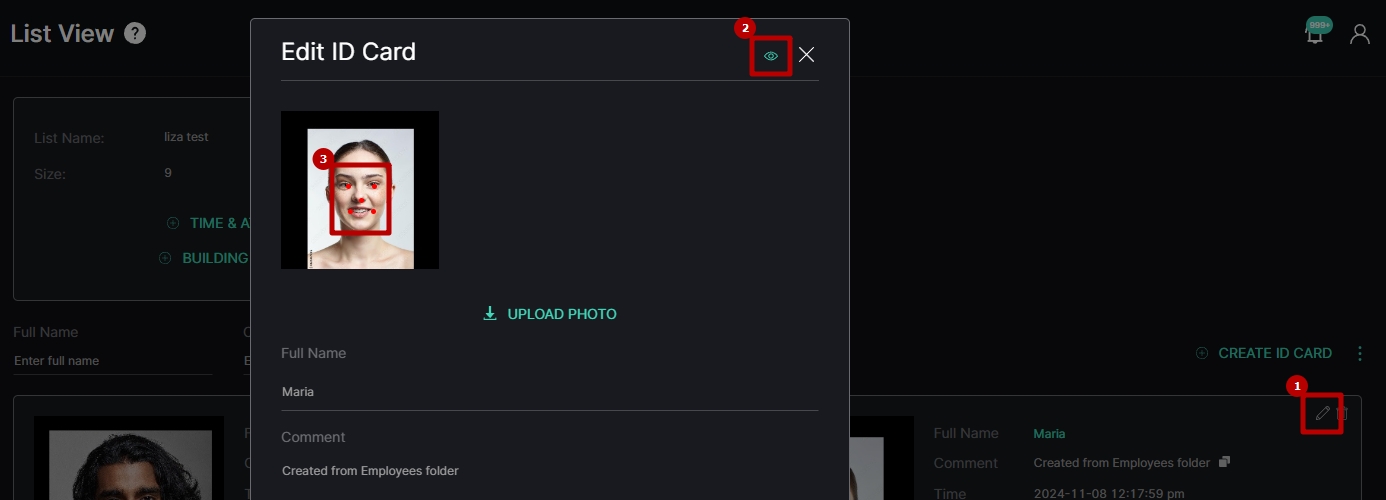
- Open the desired ID Card again
- Select the View icon
- See the red dots over the reference photos indicating 5 facial key points:
- Two for eyes
- One for nose
- Two for corners of the mouth
- To disable the visibility of the red dots, click the View icon again.
- If some red dots are not positioned according to the specified facial key points or are missing entirely, it means the reference photo was not recognized correctly and needs to be replaced with a more suitable one. Correct positioning of the dots in accordance with the facial key points is crucial for improving the accuracy of person identification analytics.
- The recognition of facial key points and the subsequent display of red dots on the reference photo is possible only for photos added to the ID Card via the Upload Photo button. This does not apply to reference photos added by creating an ID Card from search results.
Import Multiple ID Cards
This built-in functionality is best suited for importing smaller batches of photos (a few thousand). For larger volumes, up to millions of photos, we recommend using an external script, which imports approximately 20 photos per second, significantly reducing import time compared to the built-in functionality.
For assistance with the script, please get in touch with our technical specialists via the Help Desk.
To import multiple ID Cards at once, prepare a folder with reference photos of individuals. These photo files must meet the following requirements:
- The file name must match the first and last name of the person in the photo, as it will correspond to the ID Card name.
- The face occupies no more than 70-80% of the overall photo dimensions.
- The photo has a minimum resolution of 150x150 pixels in both width and height.
- The photo meets quality standards comparable to official documents, including sharpness, color accuracy, proper lighting, uniform background, correct size, focus, and the absence of artifacts. The pose and facial expression should also be appropriate.
- Supported photo formats: .jpg, .jpeg, .png.
Once the folder with photos is prepared:
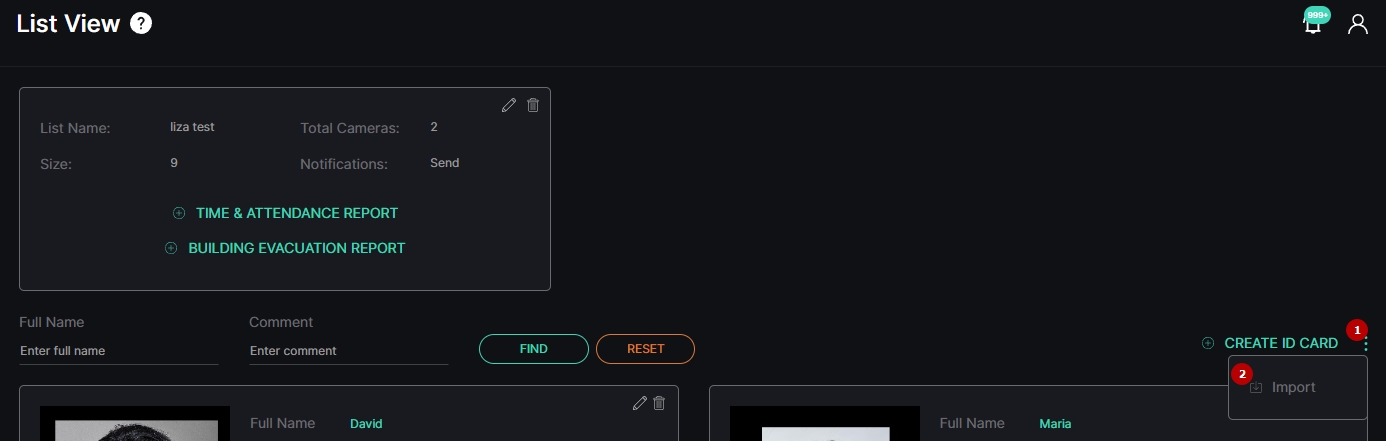
- Click the "⋮" menu
- Select Import
In the Import ID Cards to List pop-up window proceed with the following steps:
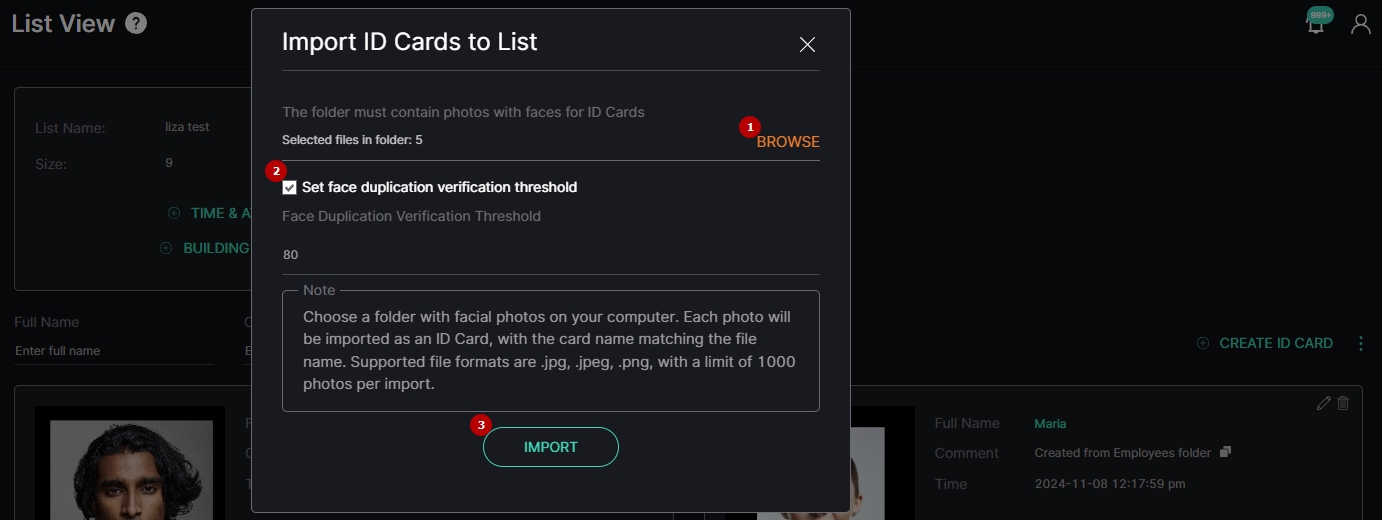
- Click Browse and select the prepared folder with photo files from your computer.
- Check the Set Face Duplication Verification Threshold box to manually define the verification threshold for all new ID cards. In the Face Duplication Verification Threshold field:
- Decrease the percentage value to lower the threshold for face duplication verification. This will consider a broader range of facial features as potential matches, increasing the likelihood of identifying individuals from ID cards with less strict similarity criteria.
- Increase the percentage value to raise the threshold for face duplication verification. This will enhance the precision of duplicate recognition, ensuring that only individuals with very similar facial features are identified as matches. Higher values reduce the chance of creating a new ID card for the same person.
- Click the Import button to import all photo files from the selected folder and create ID Cards.
- The selected folder must contain no more than 1000 photo files, as this is the maximum number of photos that can be imported at once.
- If the Set Face Duplication Verification Threshold checkbox is deselected, the default value of 80% for face similarity verification will be applied.
- If an ID card with the same name as an imported photo file already exists in the list, a new ID Card will not be created, and the duplicate will be skipped.
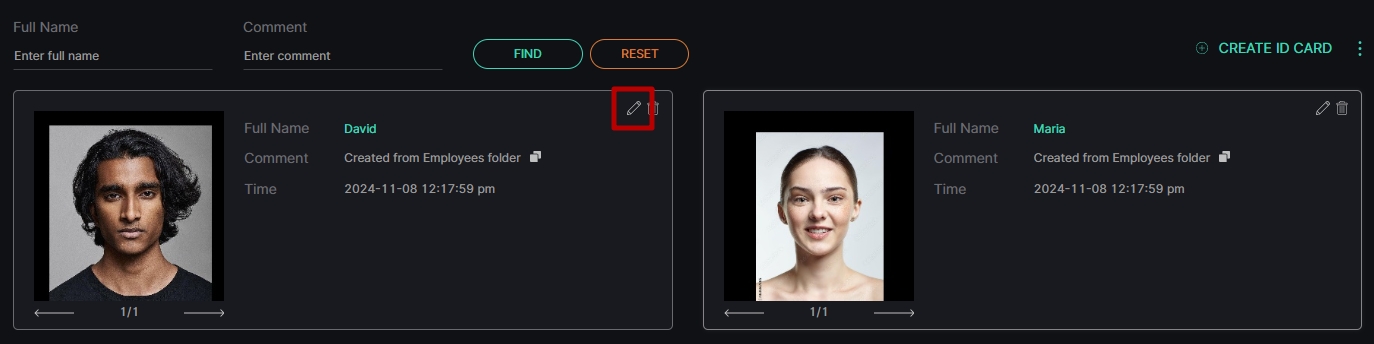
Edit ID Card
To edit the ID Card, select the Edit icon:
In the Edit ID Card pop-up window:
- Add other photos with a person for comparison and identification by clicking the Upload Photo button
- Delete the photo by hovering the mouse over the required photo and selecting the Delete icon
- Change the person's full name
- Type a comment to the person in the Comment field
- Select another list to move the ID Card
- Check the Set Face Duplication Verification Threshold box to manually define the verification threshold for all new ID cards. In the Face Duplication Verification Threshold field:
- Decrease the value in percentage to lower the threshold for face duplication verification. This allows a broader range of facial features to be considered as potential matches, increasing the likelihood of identifying individuals from ID cards with less strict similarity criteria.
- Increase the value in percentage to raise the threshold for face duplication verification. This enhances the precision of duplicate recognition, ensuring that only individuals with very similar facial features are identified as matches. Higher values reduce the chance of creating a new ID card for the same person.
- Check the Set Card Expiration Date box to set the ID Card expiration parameters:
- Select the date and time
- Choose the action after the expiration. Check the:
- Move to Another List box and select another list to move the ID Card
- Remove from the Current List box to remove the ID Card from the list
- Send Event to Event Manager box to allow the system to send the notification about ID Card expiration to the Event Manager and then to external resources
- Click the Save button
- Before adding a photo to the ID Card, ensure that:
- The face occupies no more than 70-80% of the overall photo dimensions.
- The selected photo has a minimum resolution of 150x150 pixels in both width and height.
- The selected photo meets quality standards comparable to official documents, including sharpness, color accuracy, lighting, background uniformity, size, focus, absence of artifacts, and appropriate pose and facial expression.
- To delete the photo in the Create ID Card pop-up window, hover the mouse over the required photo and select the Delete icon.
- To create the ID Card, select at least one photo.
- If the Set Face Duplication Verification Threshold checkbox is deselected, the default value of 80% for face similarity verification will be applied.
- The Face Duplication Verification Threshold parameter persists at the browser level, offering convenience in filtering out duplicates for the specific user adding them. The selected threshold remains consistent across sessions, ensuring efficient management of duplicate verification. This parameter can be modified at any time by editing any ID Card in any desired list.
Delete ID Card
To delete the ID Card:
- Select the Delete icon
- Confirm the intention
View ID Card
To view the required ID Card, click the photo of a person:

The Personal Information functional menu comprises:
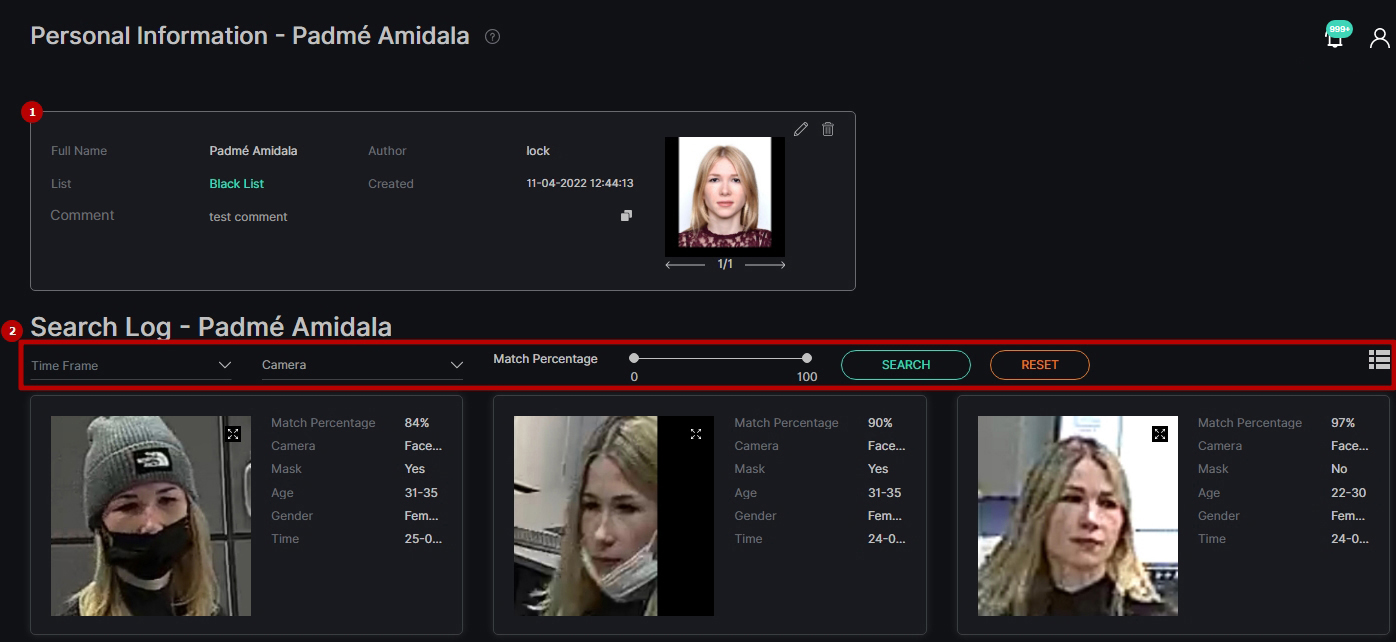
- ID Card Info Box contains:
- Information about the person
- Copy Comment icon
- Photos of a person for comparison and identification
- Edit ID Card tool
- Delete ID Card tool
- Search Log filters to:
- Select the required time frame
- Click the Camera parameter to select the desired video analytics. In the pop-up window:
- Check the boxes next to the required video analytics and folders
- Click the Select Video Analytics button
- Set the range of coincidence in percentage by moving the sliders
- Click the Search button to start filtering
- Click the Reset button to clear the filters
- Move between List and Grid view modes by clicking the corresponding toggle
Once selected and filtered, in the search log:
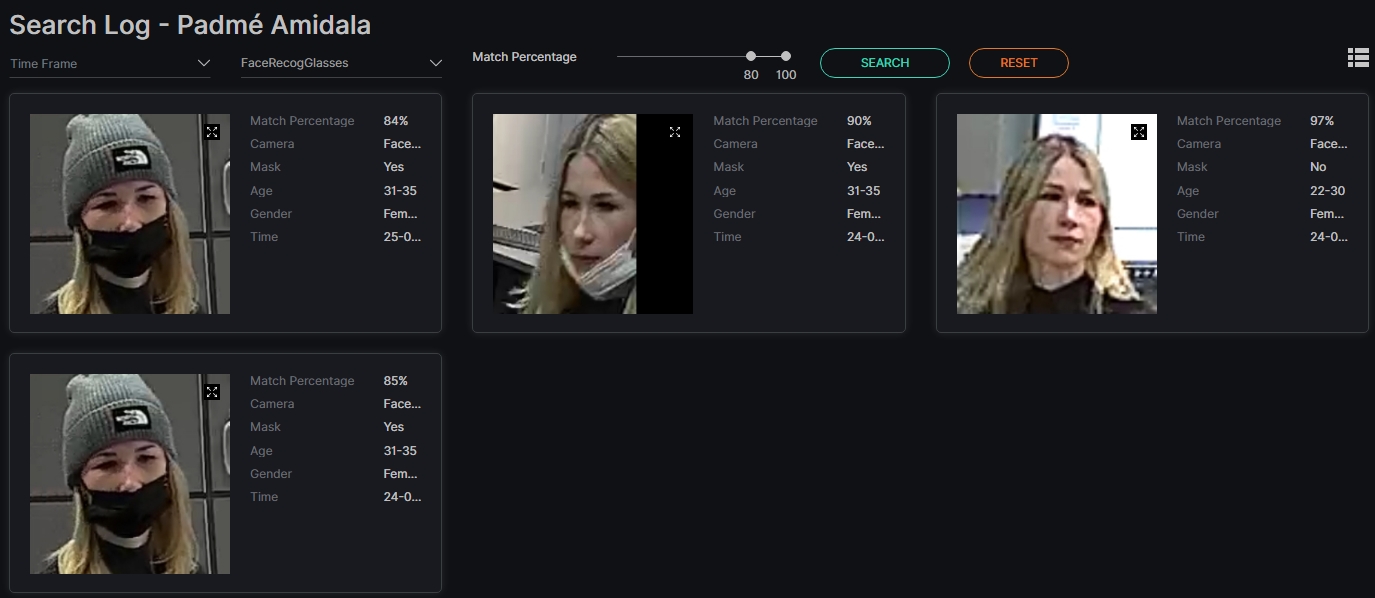
- View recognized person's data, date and time the person has been recognized, and coincidence in percentage
- View the camera location on the map by clicking the corresponding icon in the Camera parameter
- Select the Enlargement icon to open the frame with the person. In the pop-up window:
- See the person's data
- Use frame view tools:
- Zoom Out icon (-) to zoom out from a specific area of the frame
- Zoom In icon (+) to zoom in on a specific area of the frame
- Reset View icon (~) to reset the frame to its original size and position
- Target icon to zoom in on the detected object in the frame
- Enlargement icon to open the frame in full-screen (in the full-screen press the Esc button to return to default view)
- Hover the mouse over the Extra Options icon and click the Save Image button to download the event frame in full size
- The same options are available in the grid view mode.
- Click and drag the image across the zoomed-in frame in order to view different parts of it.
Search by Photo
To identify faces among chosen photos on a device, on the main Lists item click the Search by Photo button:

In the Search by Similarity pop-up window:
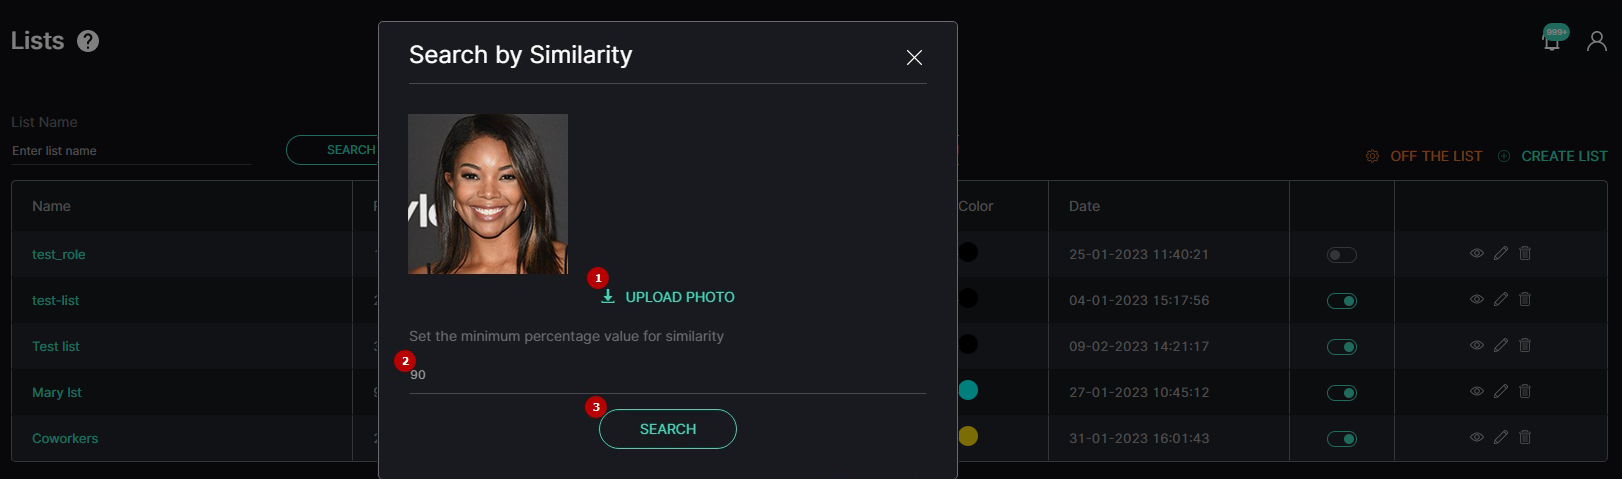
- Click the Upload Photo button to upload photos from the device
- Set the minimum percentage value for similarity
- Select the Search button to find similar faces among ID Cards in the lists
Once search results are ready, ID Cards are displayed on the Search by Photo page. They comprise:

- Clickable photo of a person
- Person's full name
- Time the ID Card was created
- List which contains the ID Card
- Percentage of similarity
- Comment to the ID Card
Search by Name
To quickly find an ID Card, on the main Lists item click the Search by Name button:

The Search by Name functional menu allows to:

- Enter the person's full name or characters in the name
- Enter the comment or characters in the comment
- Click the Find button to start filtering
- Click the Reset button to clear the filters
View the search results in the tiles below. They comprise:
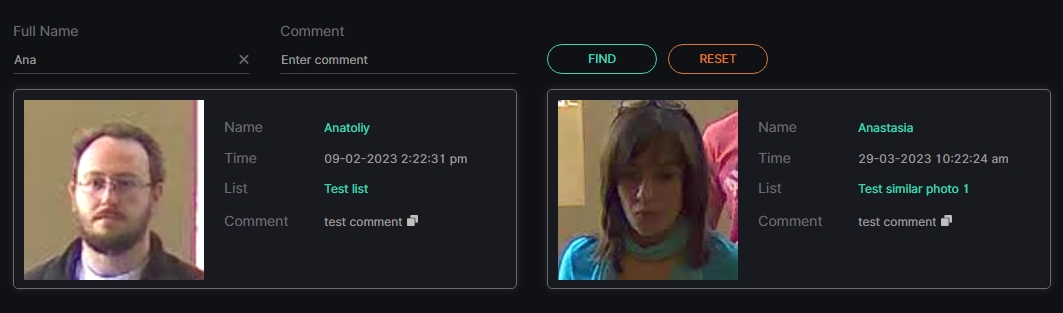
- Clickable photo of a person
- Person's full name
- Date and time the person was added to the list
- List which contains the ID Card
- Comment to the ID Card
- Copy Comment icon to copy the required comment to the clipboard