NX VMS Block
Overview
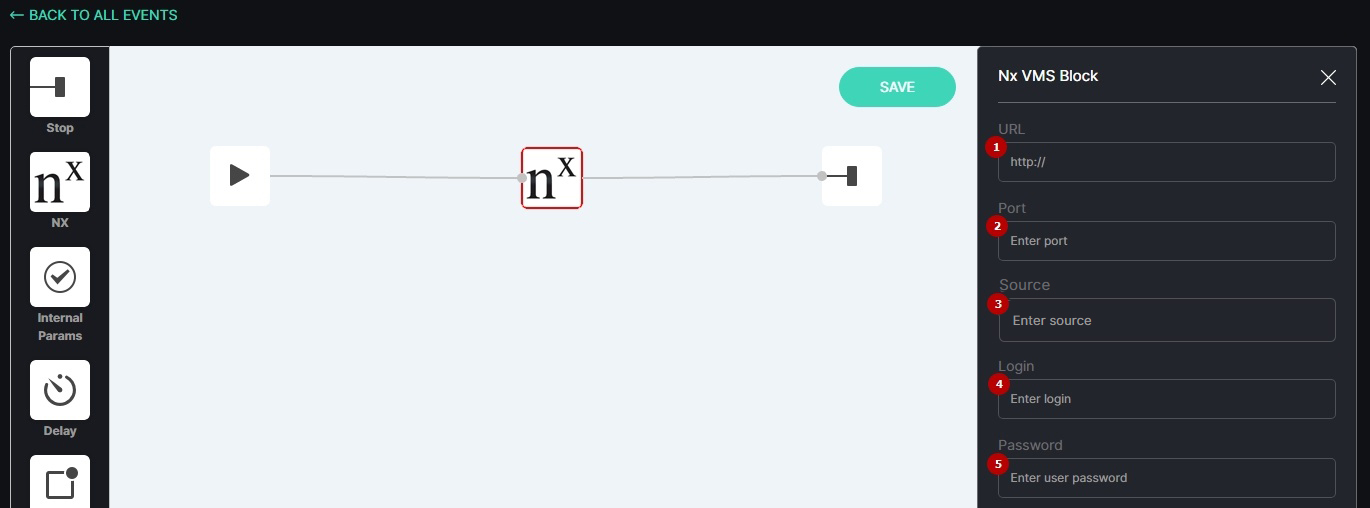
To open the NX VMS block, in the Event Manager Constructor workspace:
- Select the NX VMS block icon
- See the NX VMS block
Use and Functionality
The NX block functional menu allows to:
- Enter the NX VMS server IP address or domain name after http://
- Enter NX VMS server port, 7001 by default
- Enter a source to filter events
- Enter NX VMS user's login
- Enter NX VMS user's password
- HTTPS connection is not supported. Please, avoid using https:// in the URL field, as the request will not be sent.
- If you have both VEZHA Middleware Core and NX VMS installed on the same server and intend to use "localhost" in the URL, please ensure that IPv6 is disabled on the server. VEZHA operates exclusively on TCP/IP version 4 (IPv4). To prevent potential compatibility issues or errors, we recommend using an IPv4 address instead of "localhost".
- Please avoid using the user's password with special symbols such as: "!@#$%^&*()", as it may lead to errors. Symbols "." and "-" are allowed.
- The NX user login must be in lowercase when entered in the VEZHA system.
Necessary Values Determination
The required values for filling in the fields in the NX VMS block are located in the NX VMS Client.
To find the NX VMS user's login and password, open the NX VMS Client and see the user credentials in the server authorization window:
To find the NX VMS server IP address and port if you are already logged in, in the NX VMS Client proceed with the following steps:
- Right-click the server name on the sidebar
- Select the Server Settings option from the context menu
- See the server IP address and port in the General tab of the Server Settings pop-up window
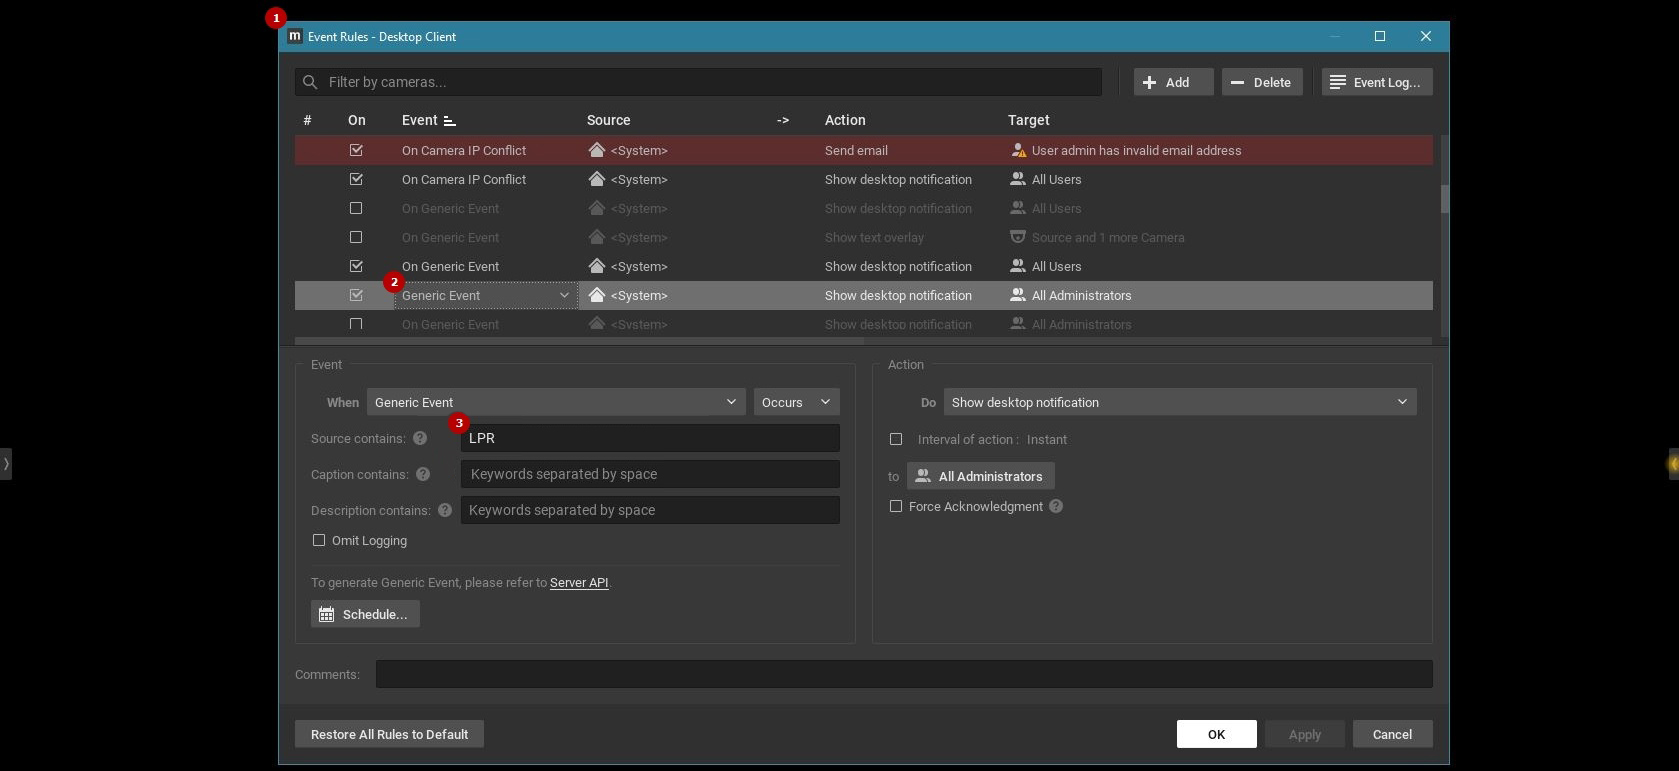
To find captions used in the required rule, proceed with the following steps:
- Press Ctrl+E to open the Event Rules pop-up window
- Select the required Generic Event in the table
- Copy one or multiple required sources from the Source Contains field, to execute the rule action only after receiving events with these sources
- When configuring an Event Rule with a Generic Event, it is also crucial to assign an Action (such as Bookmark, Show Desktop Notification, Play Sound, etc.) to the rule. This action will signal that an event has been received in the NX VMS.
- NX VMS processes rules by matching any word in the source field. This may cause multiple rules to trigger from a single event in VEZHA due to partial word matches. To avoid this, ensure source names are unique.
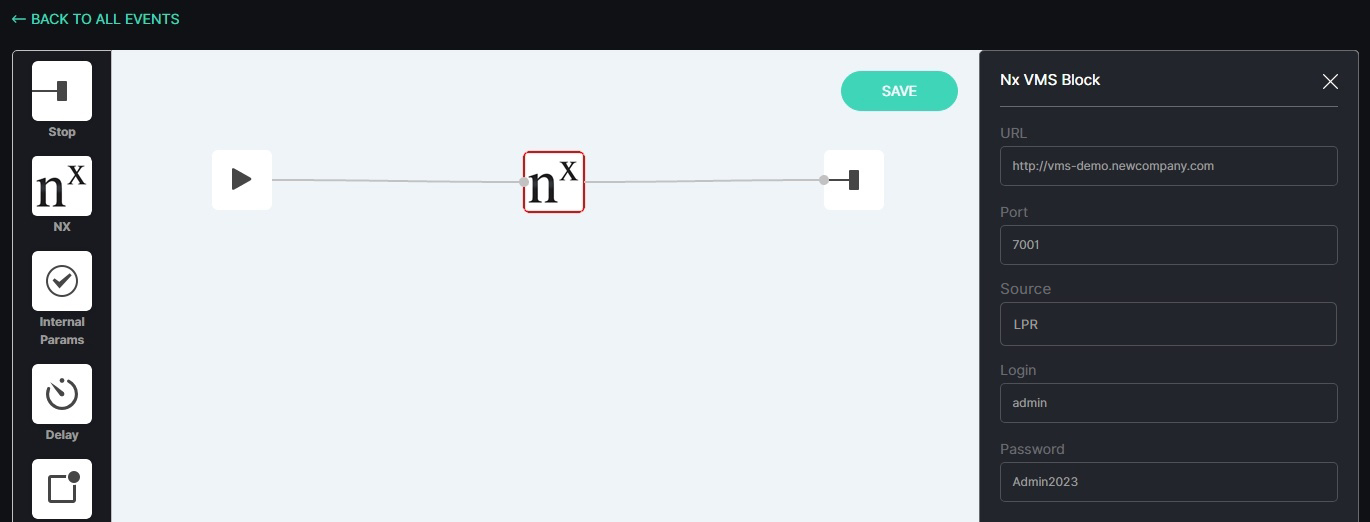
Use the image below as a visual reference to ensure the correct input of values in the fields:
Enabling HTTP Request Reception
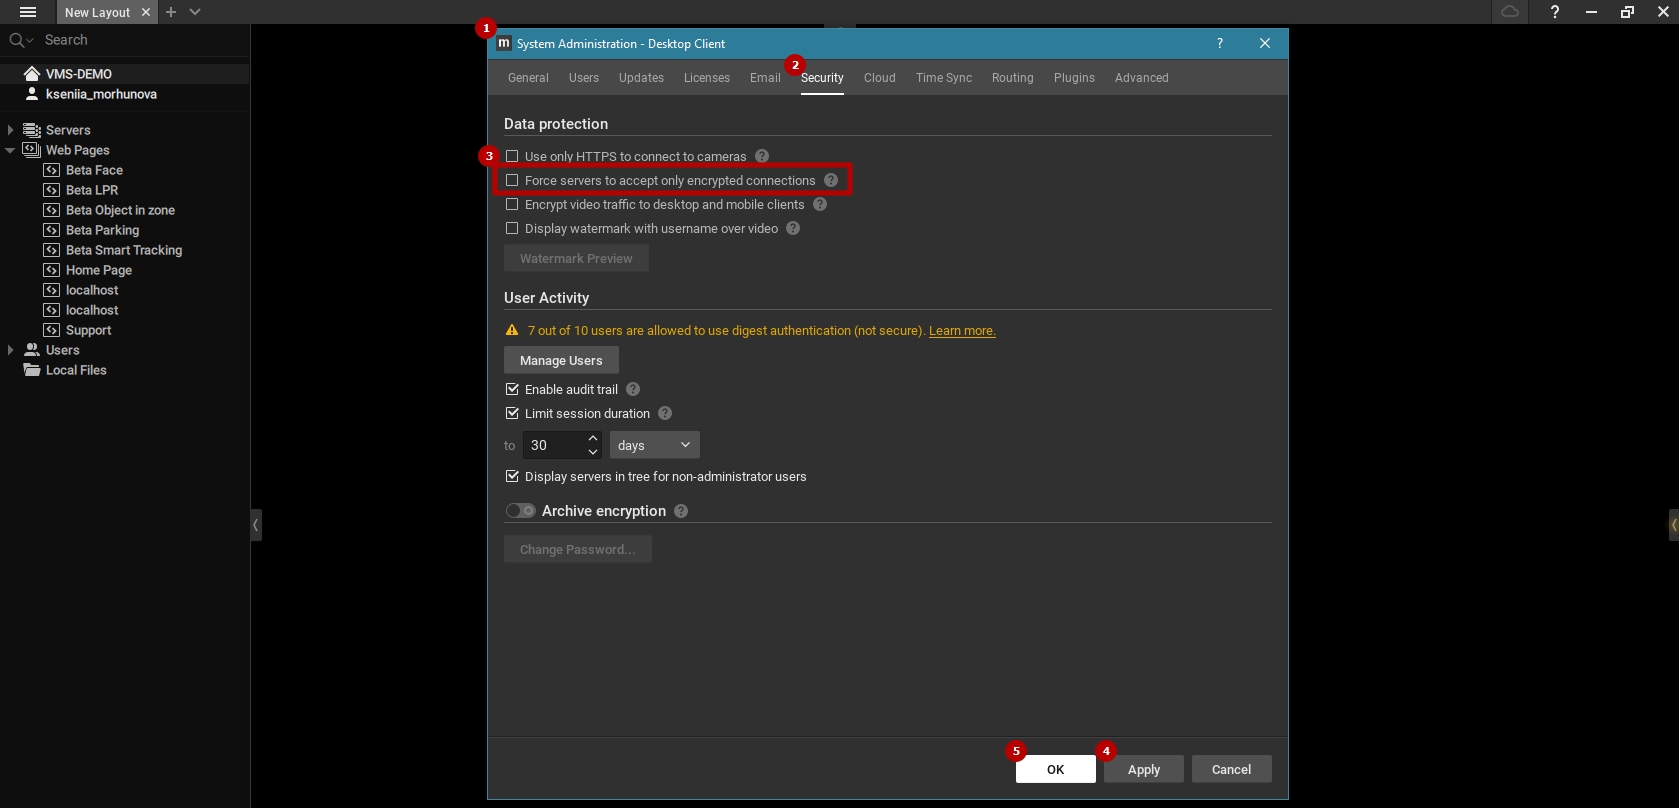
To allow the NX VMS to receive HTTP requests, proceed with the following steps in the NX VMS:
- Press Ctrl+Alt+A to open the System Administration pop-up window
- Navigate to the Security tab
- Uncheck the Force Servers to Accept the Encrypted Connections checkbox
- Click the Apply button to save changes
- Click the Ok button to close the pop-up window
NX Camera Adding
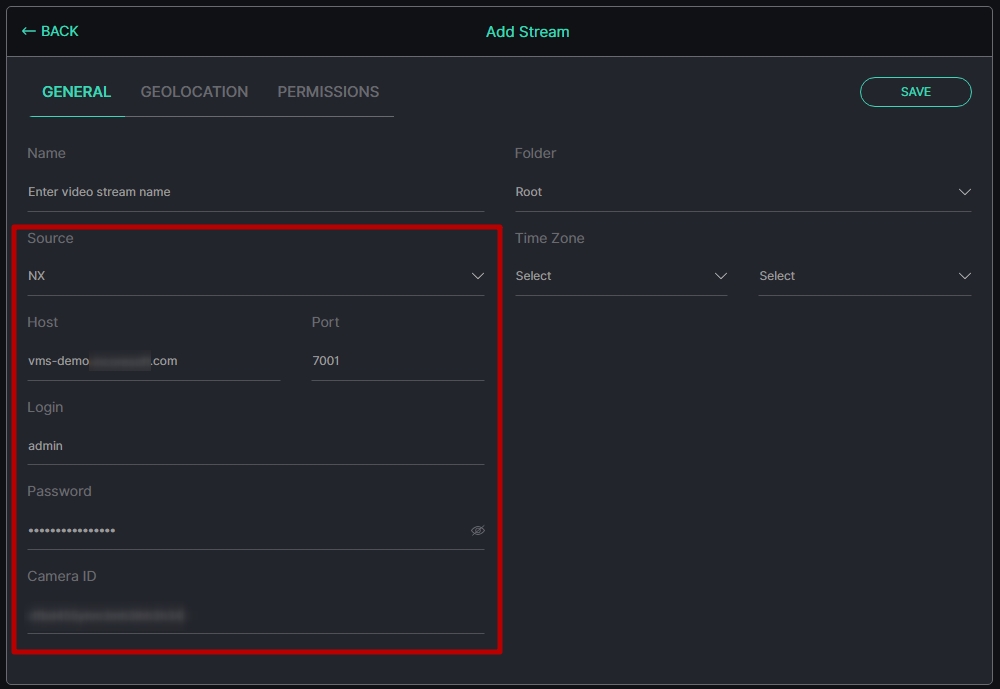
To add the NX camera to the VEZHA Analytics System as the NX video stream, configure the required parameters while adding a video stream:
- Select NX from the Source drop-down list
- Enter the NX VMS server address in the Host field
- Enter NX VMS port in the Port field, 7001 by default
- Enter the NX user login and password
- Enter the required NX camera ID
- To learn more about the configuration of other parameters while adding a video stream, refer to our Manage Cameras documentation.
- The data for the Host, Port, Login, and Password fields can be found on the NX VMS authorization screen.
- Please avoid using the user's password with special symbols such as: "!@#$%^&*()", as it may lead to errors. Symbols "." and "-" are allowed.
- The NX user login must be in lowercase when entered in the VEZHA system.
- The NX user whose credentials are used for adding the video stream must be:
- Assigned all permissions for this video stream in NX VMS.
- Allowed to use digest authentication in NX VMS, as digest authentication enables this user to retrieve the video stream from NX VMS securely.
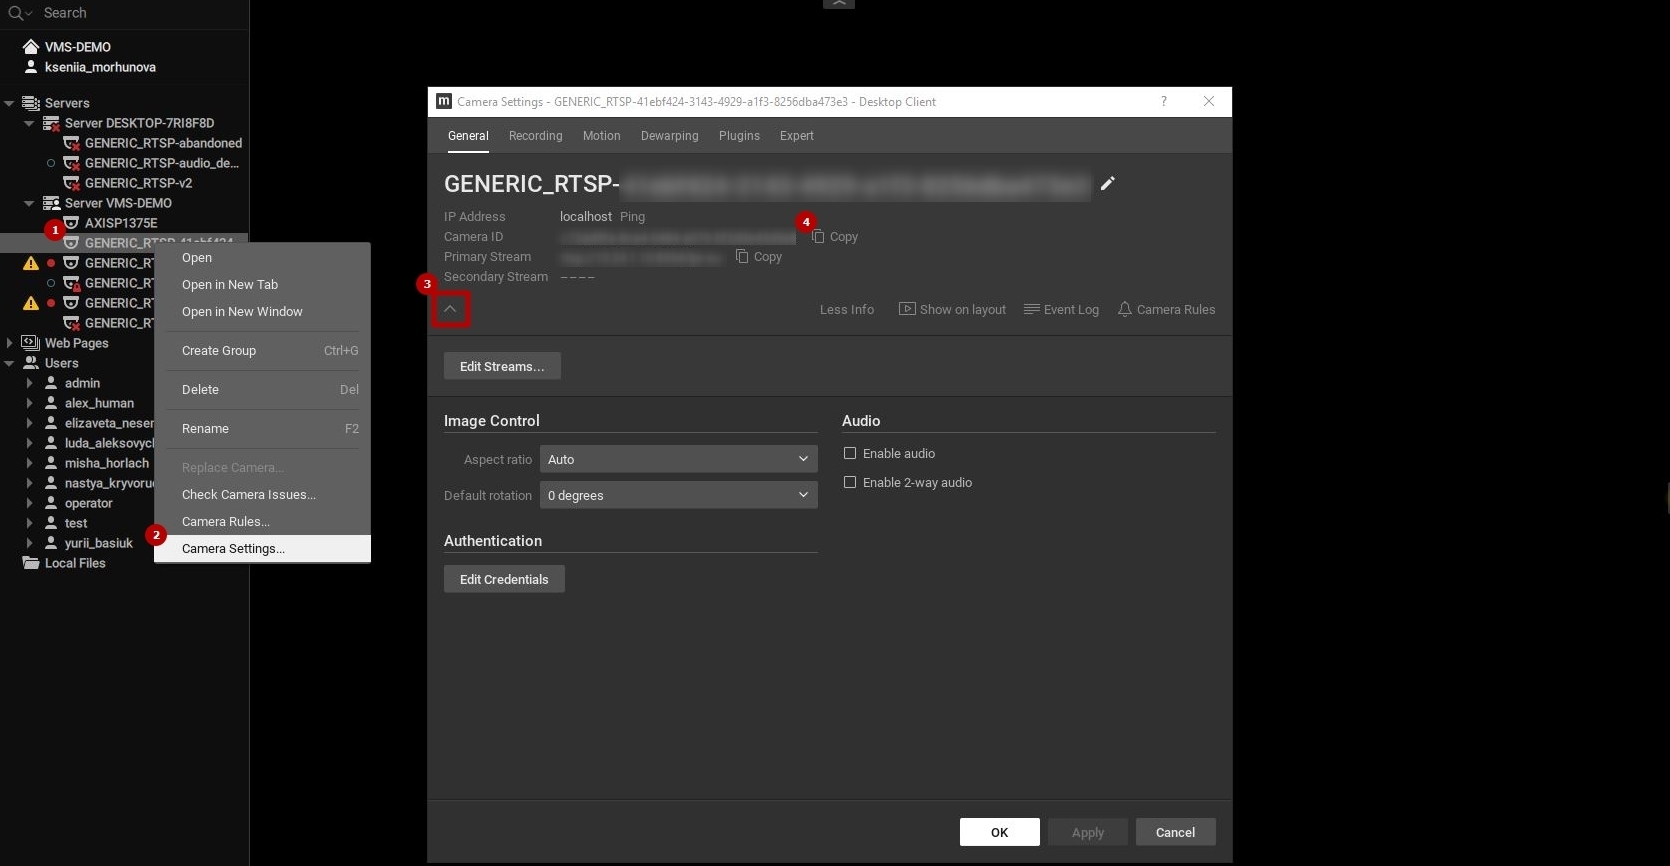
To find the required NX camera ID, in the NX VMS navigate to Servers on the sidebar and proceed with the following steps:
- Right-click the desired camera
- Select the Camera Settings option from the context menu
- Click the Arrow icon or More Info button to reveal the required information block in the General tab of the Camera Settings pop-up window
- Copy the selected NX camera ID
User Digest Authentication
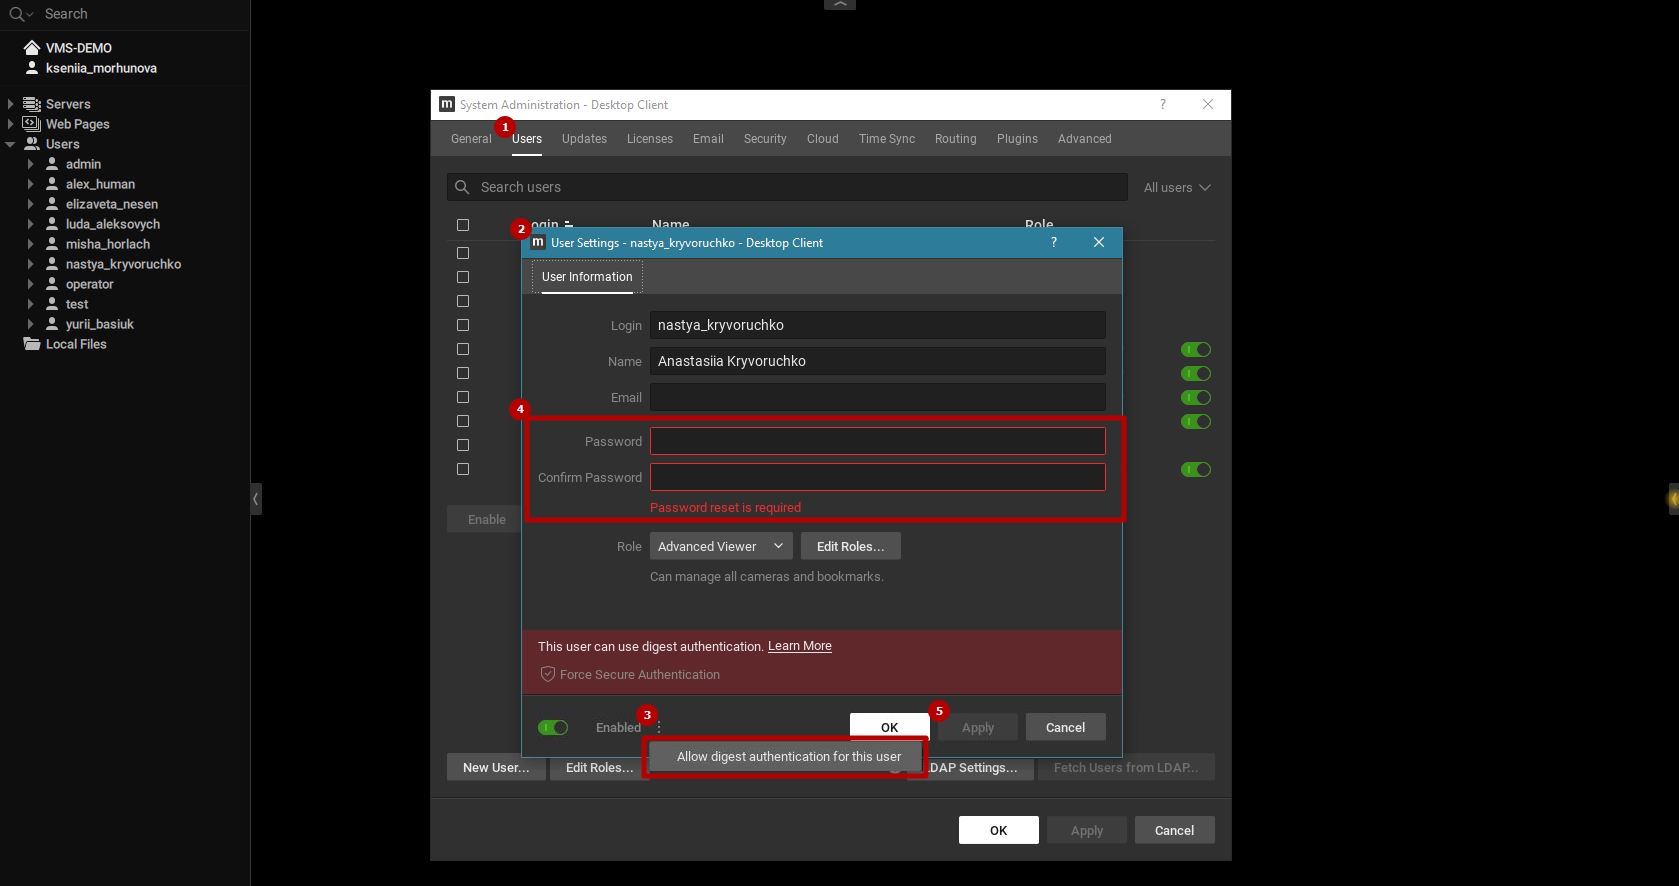
To allow the digest authentication for the desired user, in the NX VMS open the System Administration settings ( press Ctrl+Alt+A) and proceed with the following steps:
- Select the Users tab in the System Administration pop-up window
- Click the required user in the table to open the User Settings pop-up window
- Click the "⋮" icon and select Allow Digest Authentication for This User from the context menu
- Renew the user password
- Click the Apply button to save changes
- The caption "The User Can Use Digest Authentication" in the User Settings pop-up window indicates that digest authentication has already been allowed to the selected user.
- Please avoid using the user's password with special symbols such as: "!@#$%^&*()", as it may lead to errors. Symbols "." and "-" are allowed.

