Milestone: Face Recognition Plugin Configuration
Introduction
Open the XProtect Management Client application and sign in by performing the following steps in the login dialog:
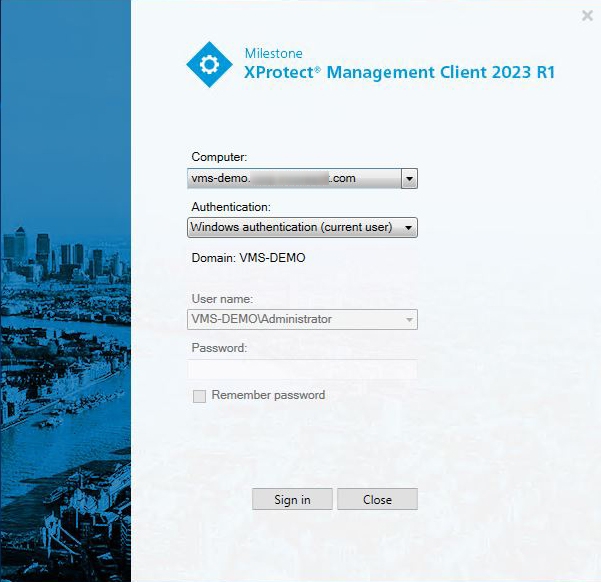
- Specify the hostname or the IP address of the Management Server in the Computer field
- Select the desired authentication method
- Enter the username and password
- Click the Sign In button
Plugin Configuration
To configure the Face Recognition plugin, follow these steps:
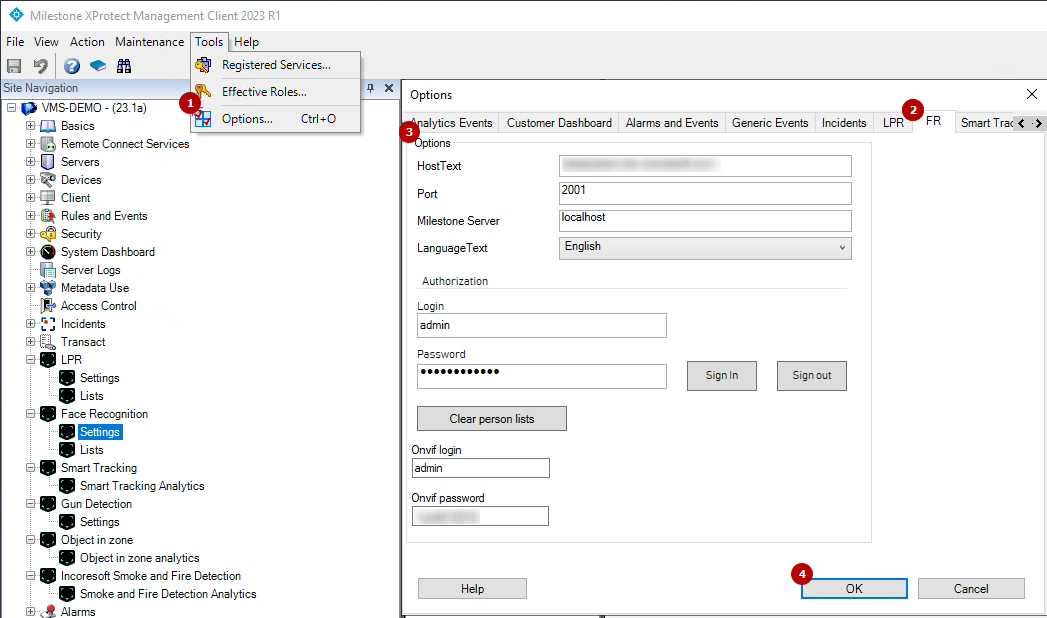
- Open the Tools tab in the menu bar and select Options from the drop-down menu (or press Ctrl + O)
- Navigate to the FR tab
- Set parameters as required:
- In the Options block:
- Enter the IncoreSoft VEZHA Middleware Core server address in the HostText field. If installed on the current PC, use "localhost".
- Specify the port (2001 by default).
- Enter the Milestone Management Server address in the Milestone Server field. If installed on the current PC, use "localhost".
- Select the desired interface language.
- In the Authorization block:
- Specify the VEZHA login and password.
- Click the Sign In button to connect to the VEZHA system.
- Specify the ONVIF login and password.
- In the Options block:
- Click the Ok button in the Options pop-up window to save the settings
Analytics Configuration
To proceed with the Face Recognition analytics configuration:
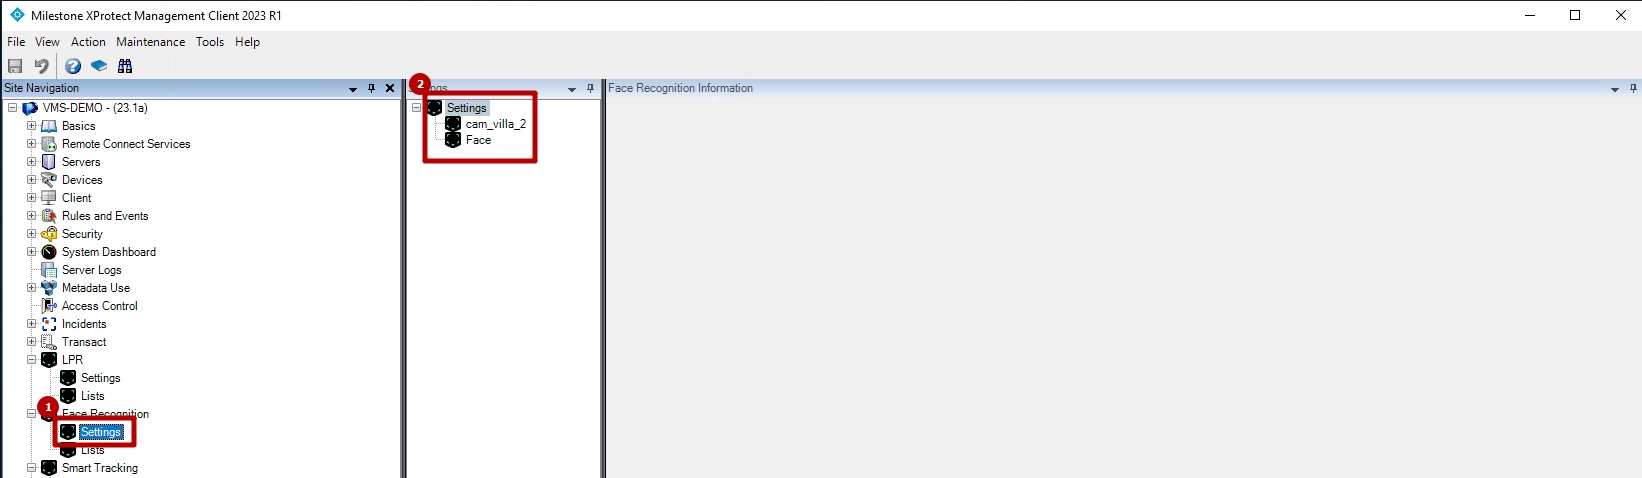
- Open the Face Recognition section and select the Settings item
- View the list of analytics
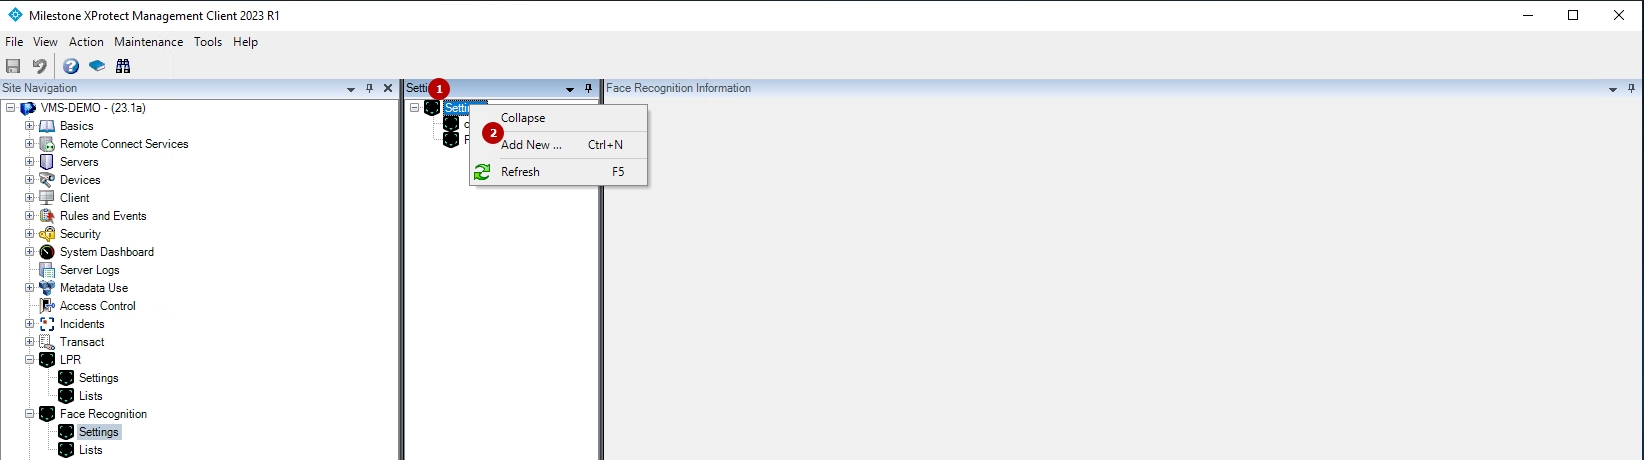
Add Analytics
To add new analytics, right-click Settings and select Add New from the drop-down menu (or press Ctrl + N):
The Add Face Recognition pop-up window opens.
The first settings block provides the ability to add a Milestone video source:
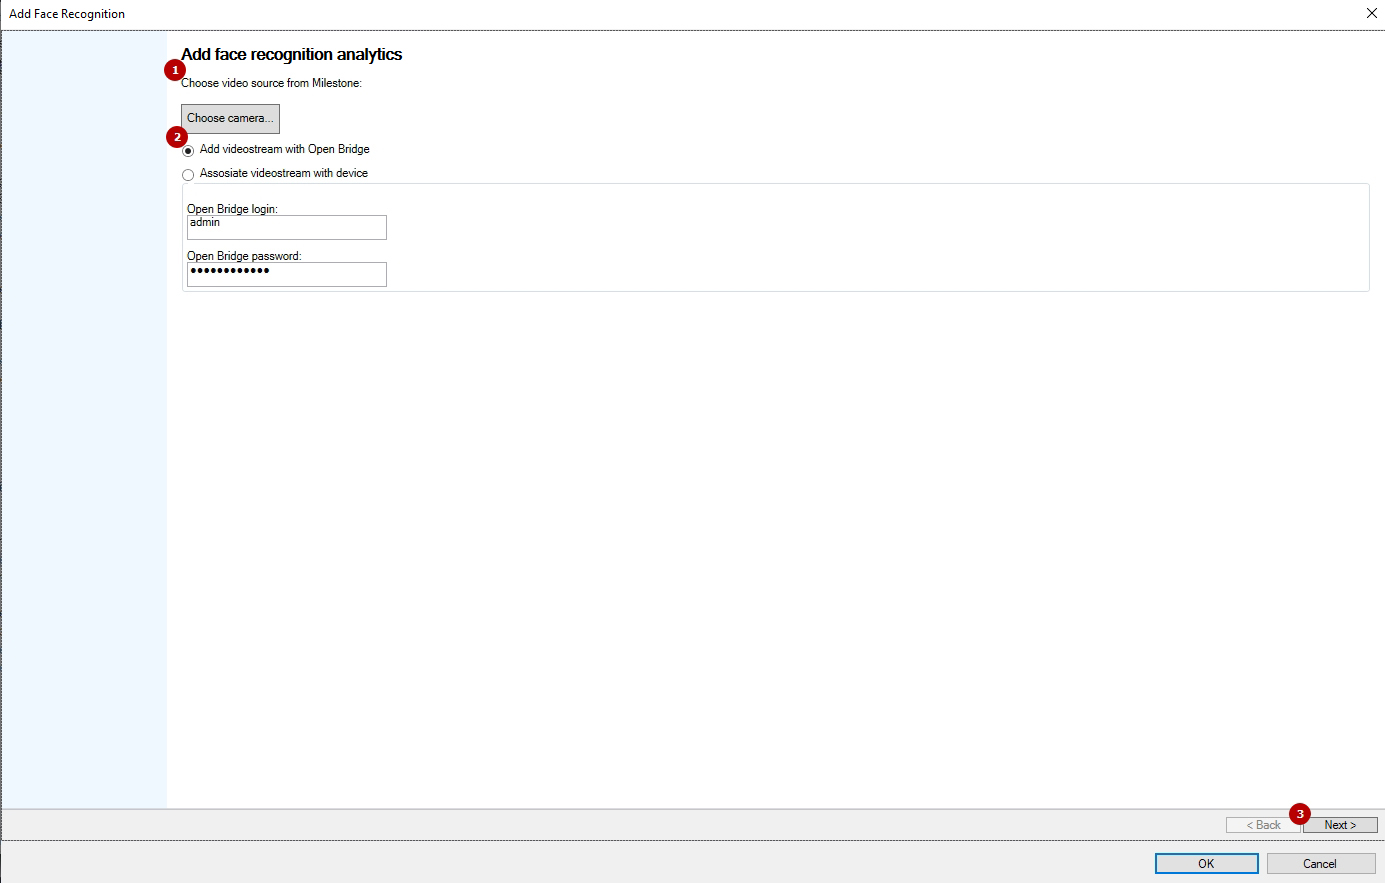
- Choose the desired video source from Milestone:
- Click the Choose Camera button
- Select the desired video source in the opened window
- Click the Ok button
- Select the desired connection method:
- For the Add Video Stream with Open Bridge (ONVIF) method:
- Enter the Open Bridge login
- Enter the Open Bridge password
- For the Add Video Stream with Device method:
- Specify the path to the associated video stream
- If required, select the Authorization checkbox and enter the required login and password to access the video stream
- For the Add Video Stream with Open Bridge (ONVIF) method:
- Click the Next button to proceed with the analytics configuration
The second settings block provides the ability to:
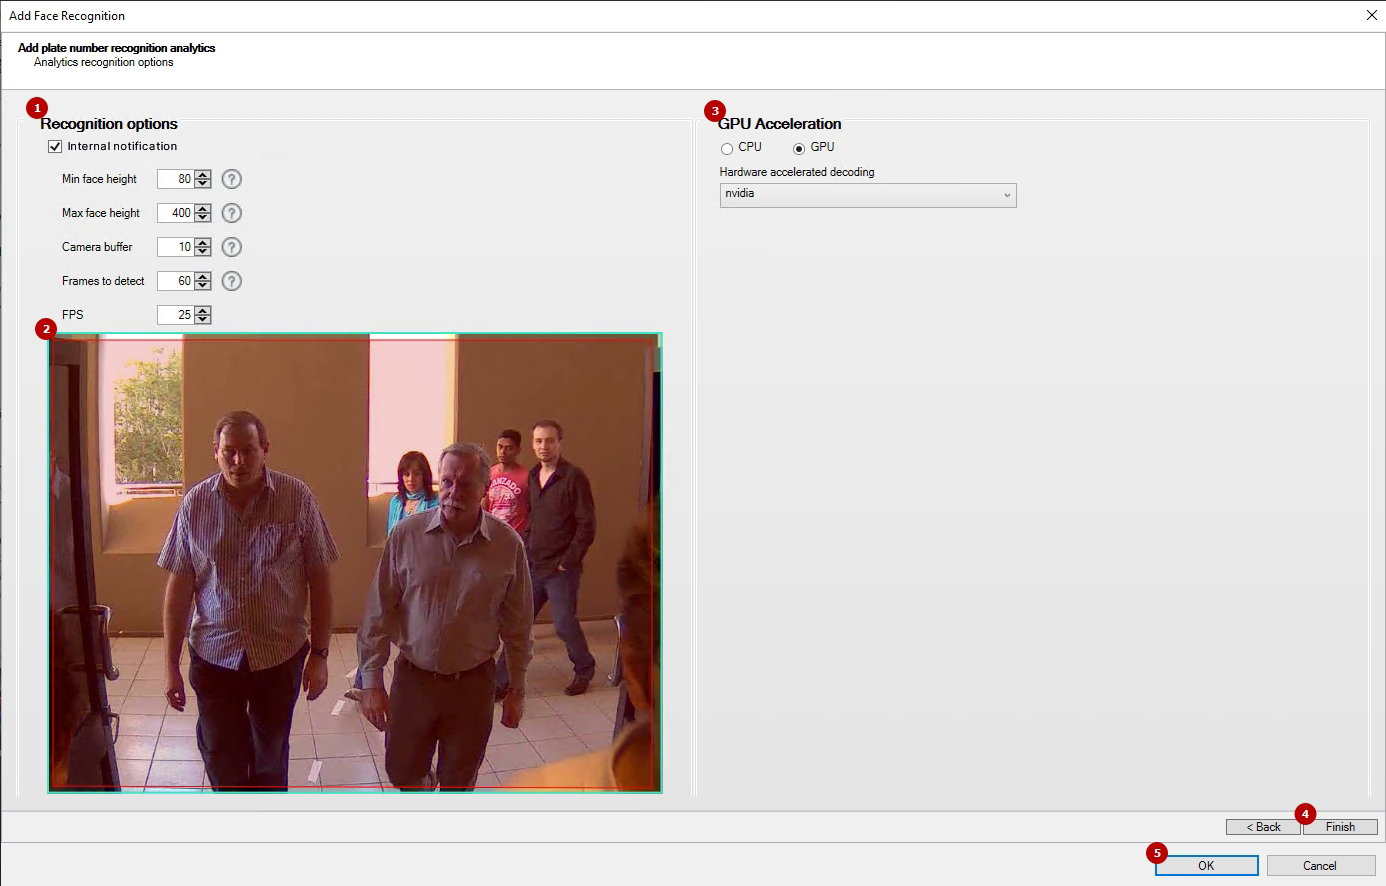
- Configure recognition options:
- Select the Internal Notification checkbox to send all event notifications to the Events item in the VEZHA system for all recognized faces, even if they do not belong to any list
- Set the minimum and maximum face height in pixels for detection
- Set the delay time in seconds before recognizing the same face again in the Camera Buffer parameter
- Set the number of frames for the sample from which the best frame is selected for face detection in the Frames to Detect parameter
- Specify the desired number of frames per second for analytics
- Set the detection zone:
- Left-click the frame in the desired place to set the first zone point
- Move the mouse across the frame and left-click again to set another zone point
- Repeat until all zone borders are set
- Right-click the frame to complete the detection zone and create a related new rule
- Hold and drag the area inside the zone to move the whole zone
- Set hardware parameters:
- Choose the CPU or GPU hardware acceleration
- Select the hardware decoder from the drop-down list:
- CPU
- Intel
- NVIDIA
- Click the Finish button to save the new analytics
- Wait once the analytics setup process is complete and click the Ok button to close the Add Face Recognition pop-up window
- The minimum value for the Min Face Height, px parameter is 20 pixels.
- The maximum value for the Max Face Height, px parameter is limited only by the height of the frame.
- The possible range for the Camera Buffer parameter is from 1 to 600 sec. The optimal value depends on the average duration of the expected face presence in the zone. The longer the face stays in the zone, the greater the value of the parameter should be to avoid re-recognition.
- The possible range for the Frames to Detect parameter is from 1 to 100 frames. The lower the value is set, the faster the sample is processing, but the quality of detection is lesser as well. The higher the value is set, the more accurate is the face detection, but it takes more hardware resources and time for choosing the best frame for detection.
- The detection zone is based on at least 3 points.
Edit Analytics
Once the new analytics is created, it appears in the main list of analytics. Click the desired analytics name to view its information:
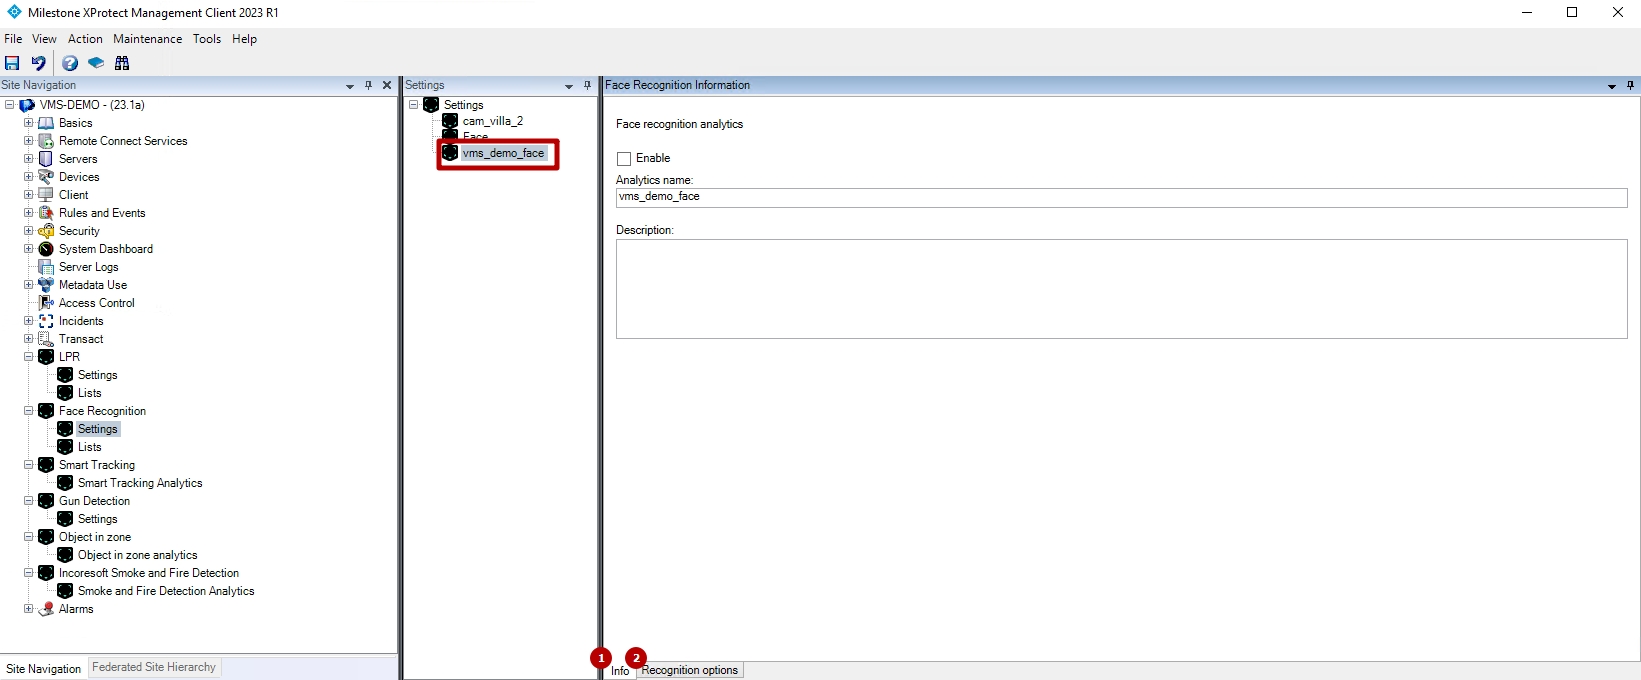
- In the Info tab:
- Select the Enabled checkbox to start the analytics
- Deselect the Enabled checkbox to stop the analytics
- Edit the analytics name
- Provide a brief description of the analytics
- In the Recognition Options tab edit the analytics parameters as required:
- Configure recognition options
- Set the detection zone
- Set hardware parameters
- Press Ctrl + S to apply changes
Delete Analytics
To delete the analytics:
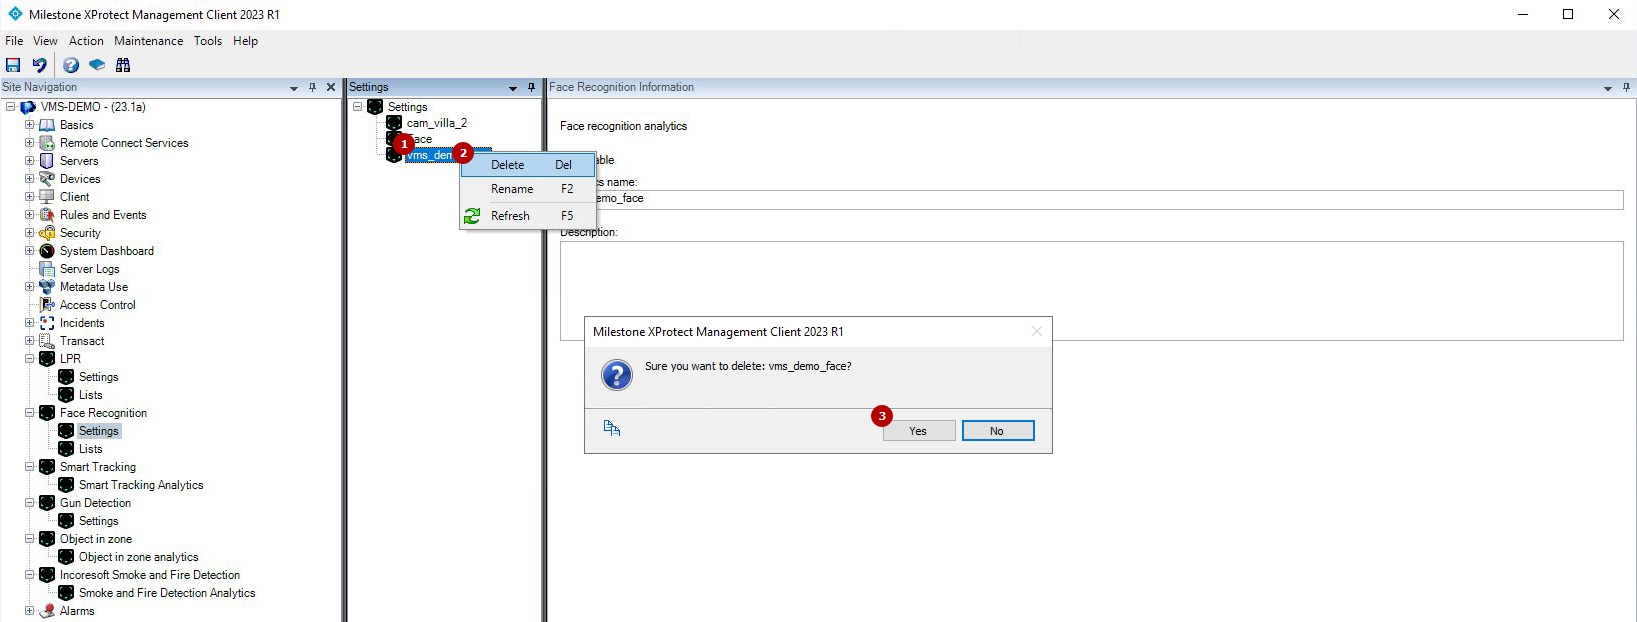
- Right-click the analytics name
- Select Delete from the drop-down menu (or press Del)
- Confirm the intention
Lists Configuration
To proceed with the Face Recognition lists configuration:
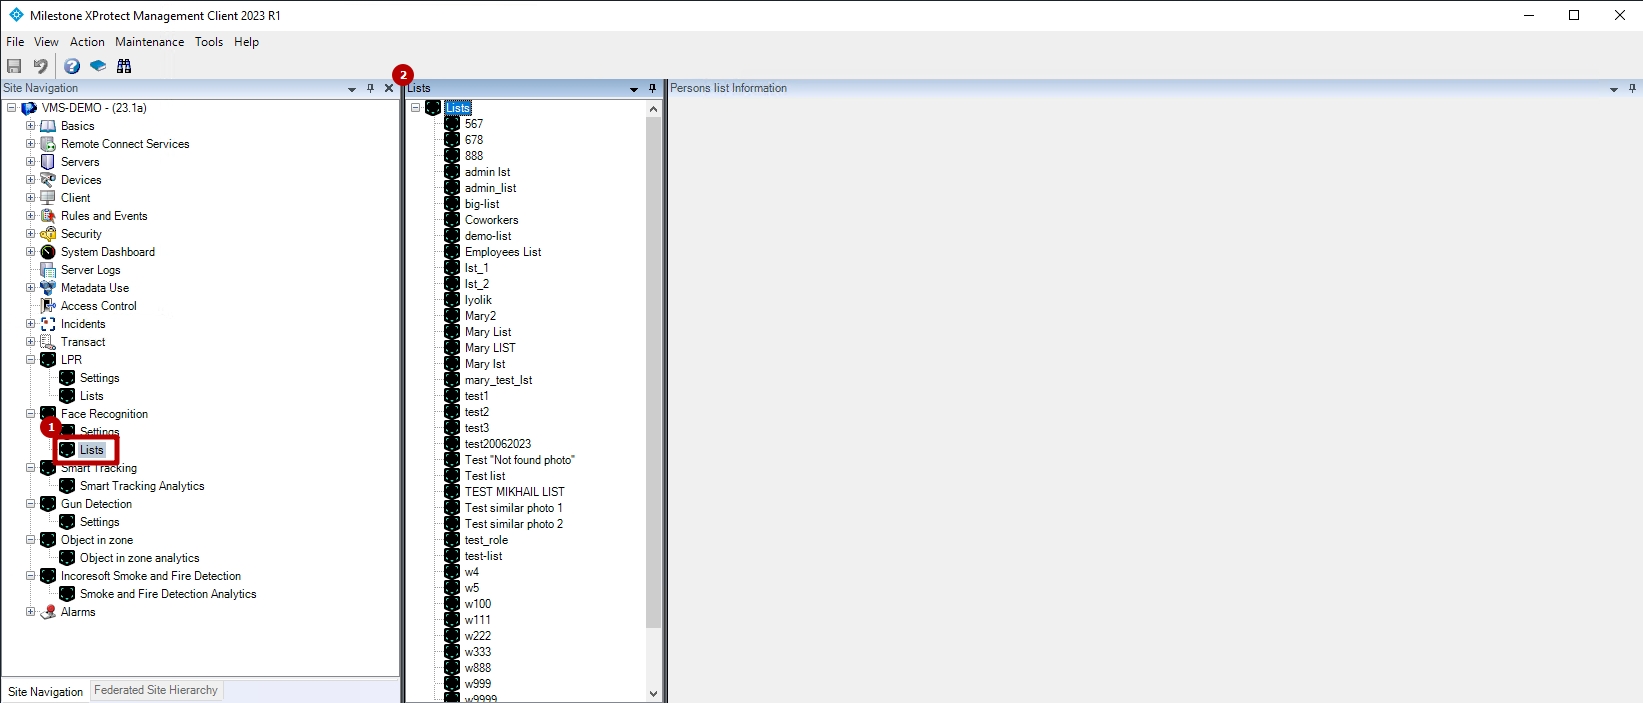
- Open the Face Recognition section and select the Lists item
- View the lists block
Add List
To add a new list:
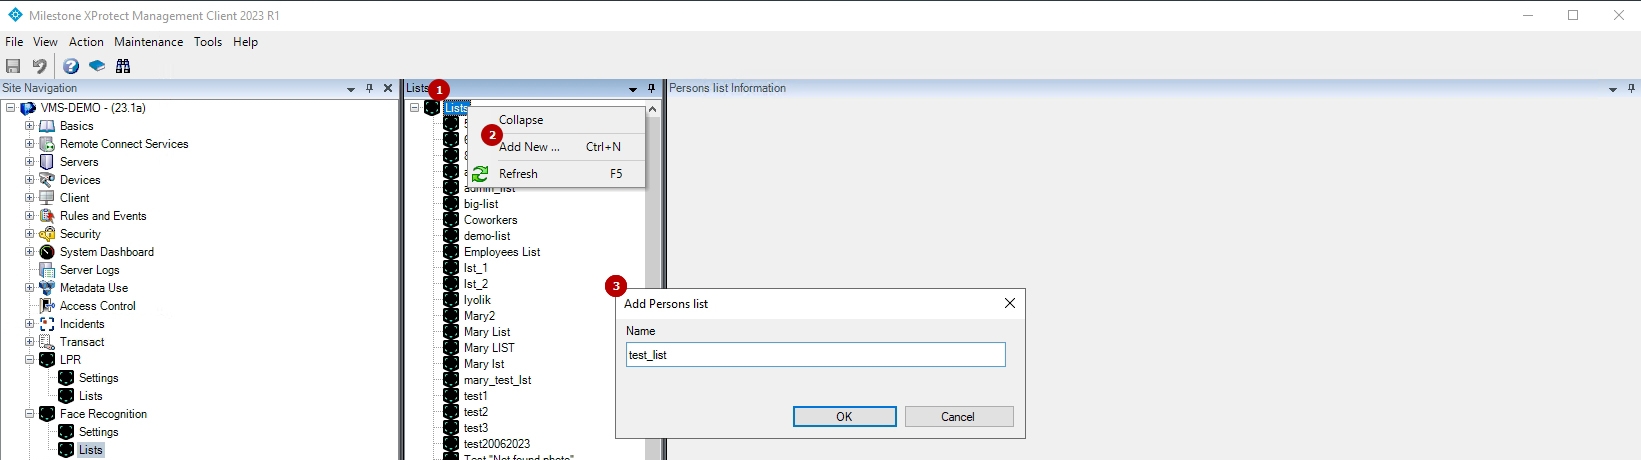
- Right-click Lists
- Select Add New from the drop-down menu (or press Ctrl + N)
- Enter the name of a new list and click the Ok button in the pop-up window
View List
Once the new list is created, it appears in the main lists block. Click the desired list name to view its information.
The Info tab allows to:

- Select the Enabled checkbox to enable face detection from the list
- Deselect the Enabled checkbox to disable face detection from the list
- Edit the list name
- Provide a brief description of the list
- Select a color of the list
- Select the Send as Analytics Event checkbox and choose the desired event from the drop-down list to send all event notifications to the Milestone Event Server
- Select the Send as Alarms checkbox to get alarms in the XProtect Smart Client (also requires the selected Send as Analytics Event checkbox with the specified event)
- Optionally, enter the instructions for the operator referring to the alarm
- Select multiple desired analytics from the Cameras drop-down list
- Set the confidence threshold in percentage
- Press Ctrl + S to apply changes
The Person List Entries tab allows to:
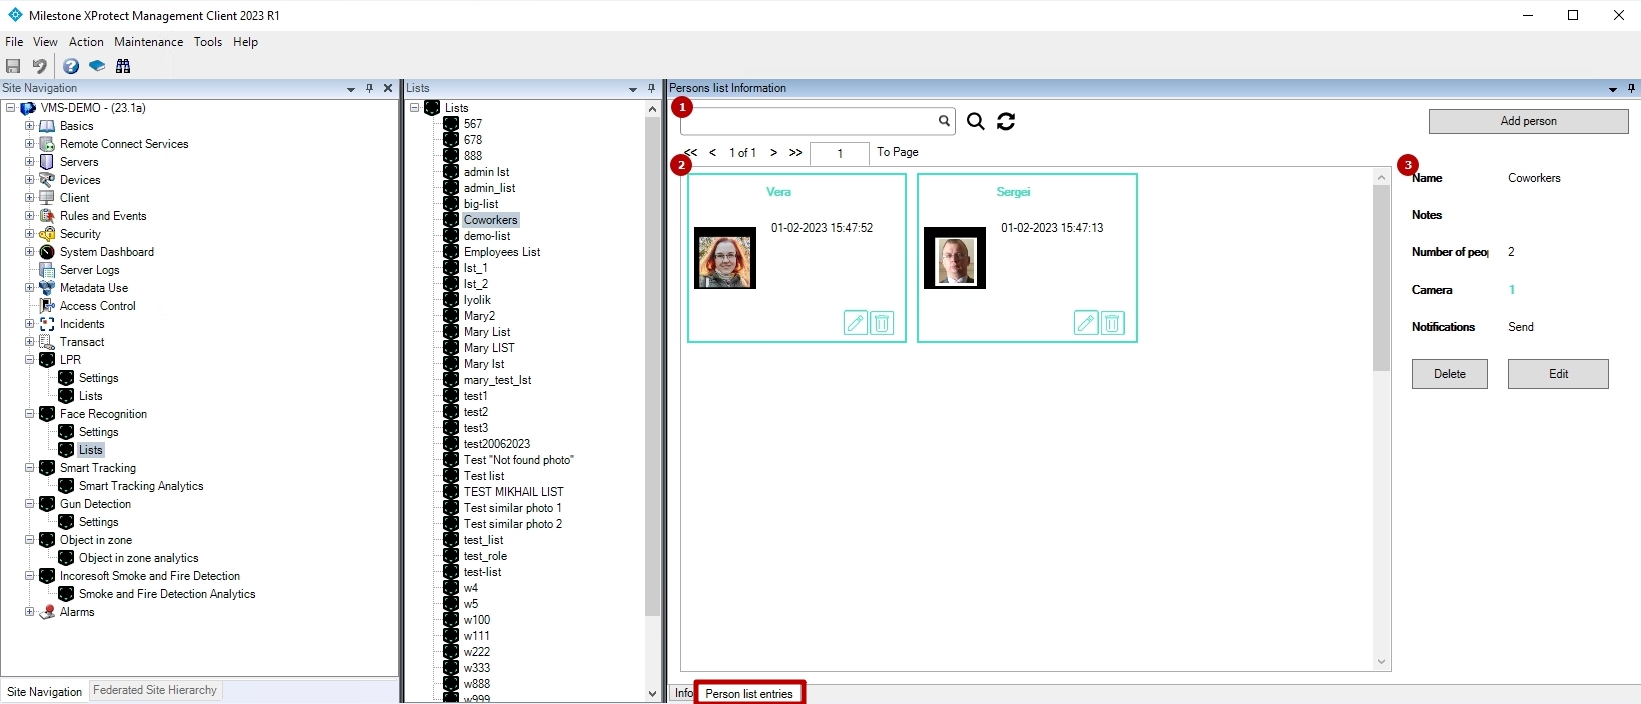
- Enter the person's full name or characters in the name to filter ID Cards
- View ID Cards in the list
- View list parameters
Edit List
To edit the list parameters, select the Edit button:

In the Edit list pop-up window:
- Set the parameters as required:
- Edit the list name
- Provide a brief description of the list
- Select multiple desired analytics from the Cameras drop-down list
- Select the Send Notifications if a Recognized Person is Listed checkbox to receive internal notifications in the VEZHA system
- Set the confidence threshold in percentage
- Change the color of the list
- Manage the event from Event Manager settings and additional parameters
- Press Ctrl + S to apply changes
Delete List
To delete the list:
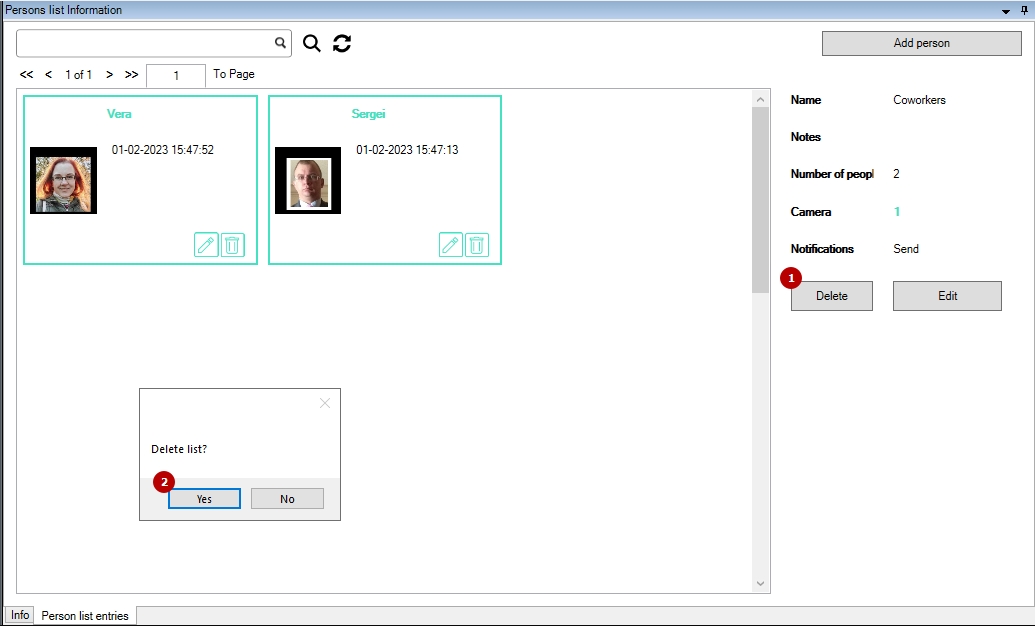
- Click the Delete button
- Confirm the intention
Add ID Card
To add a new ID Card to the list, click the Add Person button:

In the Add Person pop-up window:
- Enter the person's full name
- Type a comment about the person in the Comment field
- Upload multiple photos with a person for comparison and identification by clicking the Upload Photo button
- Click the Save button
- Before adding a photo to the ID Card, ensure that:
- The face occupies no more than 70-80% of the overall photo dimensions.
- The selected photo has a minimum resolution of 150x150 pixels in both width and height.
- To create the ID Card, select at least one photo.
Edit ID Card
To edit the ID Card, select the Edit icon:
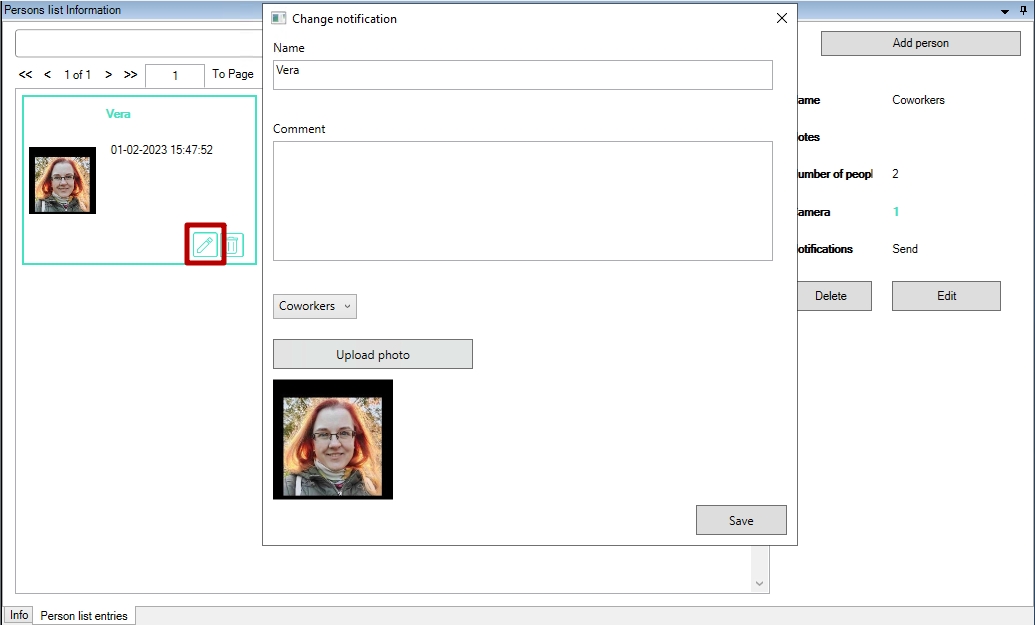
In the Change Notification pop-up window:
- Change the person's full name
- Type a comment about the person in the Comment field
- Select another list from the drop-down list to move the ID Card to another list
- Upload multiple photos with a person for comparison and identification by clicking the Upload Photo button
- Click the Save button to apply changes
Delete ID Card
To delete the ID Card:
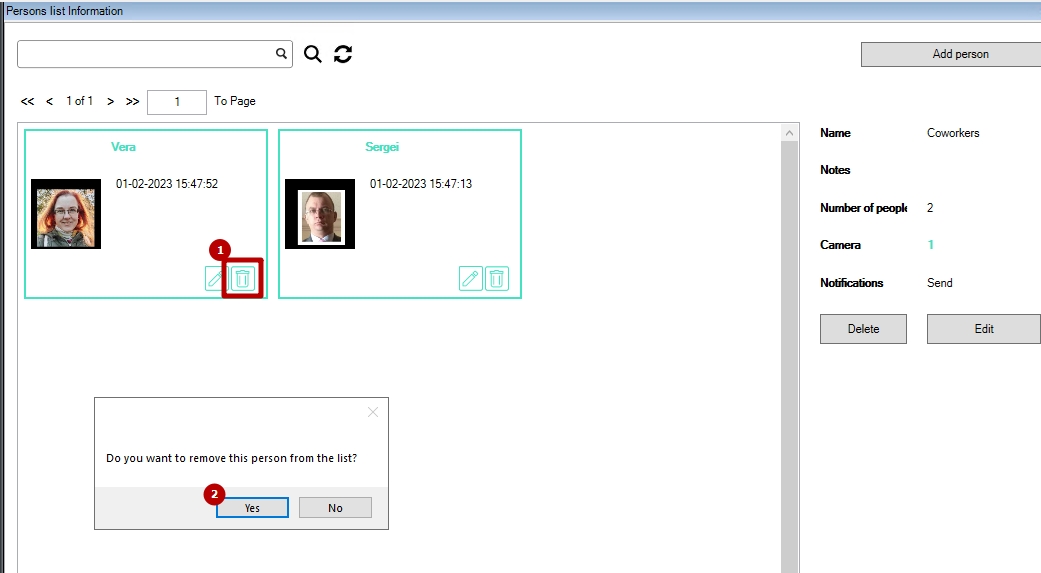
- Select the Delete icon
- Confirm the intention