Video Cameras Installation
Installing the camera is often a critical step as it can be difficult to remodel later. You should spend some time understanding the possible tradeoffs before proceeding with the installation of your video camera.
Video Camera Position
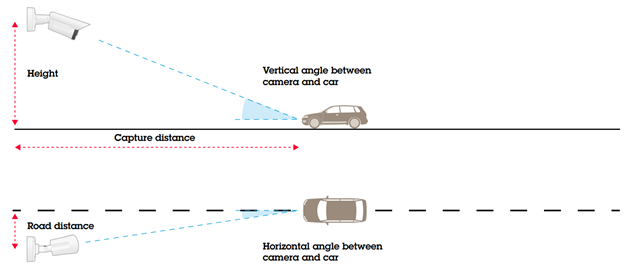
The main parameters of the video camera position are:
- Height of installation above the track surface.
- Vertical angle between the optical axis of the video camera and the average vehicle speed vector.
- Horizontal angle between the optical axis of the video camera and the average vehicle speed vector.
- Angle of the video camera image raster to the track surface.
The mounting height and distance from the center of the road determine the angle between the camera and the direction of vehicle motion:
Tilting cameras have specific requirements that should be taken into consideration:
Proper angle adjustment: The camera should be tilted at an appropriate angle to capture the desired field of view and maximize the visibility of license plates.
Avoid extreme tilting: Excessive tilting can distort the perspective and make it challenging to accurately capture license plates. It is important to find the right balance to ensure optimal image quality.
Consider height and distance: The height and distance of the camera from the target area play a crucial role in determining the required tilt. These factors affect the camera's perspective and coverage area.
Account for vehicle speed: The speed of the vehicles passing through the camera's field of view should also be considered when setting the tilt angle. Faster-moving vehicles may require a different tilt angle compared to slower ones to ensure clear and accurate license plate capture.
Test and adjust: It is recommended to test the camera's tilt angle in real-world conditions and make necessary adjustments to achieve the best results.
It is advisable to minimize the angle between the camera and the vehicle's direction of movement for optimal results. Ideally, the camera should be positioned directly above the vehicles at a moderate height. However, to prevent the camera from being dazzled by strong lights, it is recommended to place it above the headlights. The recommended suspension height for the camera is between 1.5 and 2 meters above the road surface.
To determine the total angle between the camera and the vehicle's direction of movement, refer to the tables provided in the tables below. It is recommended to keep the total angle below 30° for optimal performance.
Camera angles at road distance 0:
Capture Distance: Height: | 5 m (⁓ 16 ft) | 10 m (⁓ 33 ft) | 30 m (⁓ 98 ft) | 50 m (⁓ 164 ft) | 80 m (⁓ 262 ft) |
|---|---|---|---|---|---|
1.5 m (⁓ 5 ft) | 17⁰ | 8.5⁰ | 2.9⁰ | 1.7⁰ | 1.1⁰ |
3 m (⁓ 10 ft) | 31⁰ | 17⁰ | 5.7⁰ | 3.4⁰ | 2.1⁰ |
5 m (⁓ 16 ft) | 45⁰ | 27⁰ | 9.5⁰ | 5.7⁰ | 3.6⁰ |
7 m (⁓ 23 ft) | 54⁰ | 35⁰ | 13⁰ | 8.0⁰ | 5.0⁰ |
10 m (⁓ 33 ft) | 63⁰ | 45⁰ | 18⁰ | 11⁰ | 7.1⁰ |
Camera angles at road distance 2m (⁓ 7 ft):
Capture Distance: Height: | 5 m (⁓ 16 ft) | 10 m (⁓ 33 ft) | 30 m (⁓ 98 ft) | 50 m (⁓ 164 ft) | 80 m (⁓ 262 ft) |
|---|---|---|---|---|---|
1.5 m (⁓ 5 ft) | 27⁰ | 14⁰ | 4.8⁰ | 2.9⁰ | 1.8⁰ |
3 m (⁓ 10 ft) | 36⁰ | 20⁰ | 6.9⁰ | 4.1⁰ | 2.6⁰ |
5 m (⁓ 16 ft) | 47⁰ | 28⁰ | 10⁰ | 6.1⁰ | 3.9⁰ |
7 m (⁓ 23 ft) | 56⁰ | 36⁰ | 14⁰ | 8.3⁰ | 5.2⁰ |
10 m (⁓ 33 ft) | 64⁰ | 46⁰ | 19⁰ | 12⁰ | 7.3⁰ |
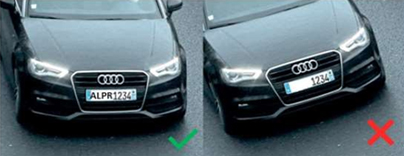
Examples of correct camera installation:
Consider the following recommendations for proper video camera installation:
Ensure Stability: Install the camera on a stationary structure that remains stable and free from swinging or vibration.
Minimize Vibration: Check the reaction of roadside posts to heavy vehicles passing by and choose a location with minimal vibration to ensure optimal license plate recognition.
Avoid bright light sources: Position the camera in such a way that it is not directly facing bright light sources like street lamps. These sources can interfere with the camera's auto-exposure function and cause glare and reflections, hindering the clarity of captured images.
Minimize changing light sources: It is preferable to avoid having light sources within the camera's field of view that slowly change their position. Such sources can introduce variations in lighting conditions, which may affect the quality of license plate recognition.
Eliminate interference: Ensure that there are no static or dynamic obstructions within the camera's observation cone. Trees, large signage, utility poles, or other objects can obstruct the view and interfere with license plate recognition. It is important to have a clear line of sight to the desired area of surveillance.
Camera Alignment
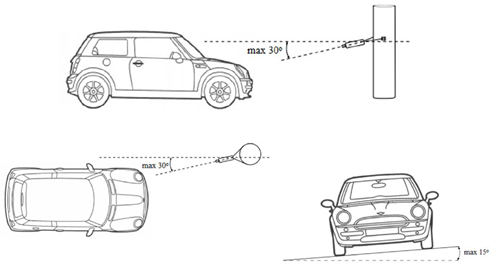
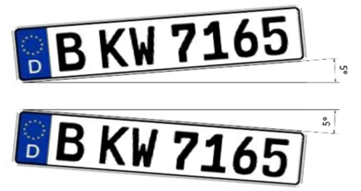
The camera should be aimed at the road in a way that positions the corresponding lanes in the center of the image. The field of view should be adjusted to cover the desired number of lanes, without exceeding that range. Additionally, the camera's rotation angle should be adjusted to ensure that the license plate appears parallel to the edges of the image:
The allowable maximum swing angle deviation is illustrated in the picture below:
Depth of Field
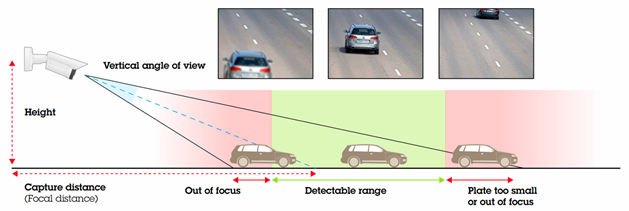
The camera must be properly focused to ensure clear and legible license plate images. However, it is important for the image to remain clear not only at a specific distance but also within a range of distances around the focal plane, as depicted in the picture below:
The extent of this range is referred to as the depth of field (DOF). Typically, the DOF is greater for longer capture distances. To increase the DOF, one can reduce the aperture size. However, this adjustment is primarily necessary for short capture distances, specifically those below 10 meters, where the DOF tends to be shallow. It is important to exercise caution when reducing the aperture, as it can limit the camera's performance in low-light conditions.
Detectable Range
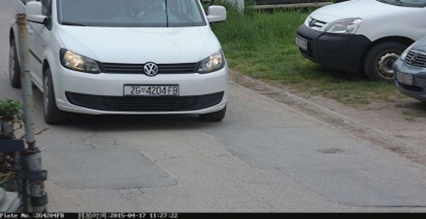
The detectable range refers to the range of distances along the road where the license plate is visible and readable in the camera's image. Ideally, the detectable range encompasses the full field of view of the camera, but this may not always be achievable. The depth of field of the camera can impose limitations on the detectable range, and vehicles that are located far away may appear too small to be distinctly recognized:
Weather conditions, including snow, rain, and fog, can significantly impair visibility over long capture ranges, thereby restricting the detection range.
During daylight hours and favorable weather conditions, the detection range expands as the capture range increases. When dealing with high-speed vehicles, it is necessary to employ a longer capture distance to allow sufficient time for reading the license plate before the vehicle moves out of view.
Recommended Capture Distance
Recommended minimum capture distances for various vehicle speeds are provided in the reference table. These distances are based on an assumed detection time of 0.2 seconds, allowing the license plate recognition (LPR) software to analyze five frames per second. It's important to note that the number of frames analyzed per second may vary depending on the LPR software, processor capabilities, and image resolution. The table below serves as a general guideline:
Vehicle Speed | Recommended Minimum Capture Distance |
|---|---|
30 km/h (⁓ 19 mph) | 7 m (⁓ 23 ft) |
50 km/h (⁓ 31 mph) | 11 m (⁓ 36 ft) |
80 km/h (⁓ 50 mph) | 24 m (⁓ 79 ft) |
100 km/h (⁓ 62 mph) | 27 m (⁓ 89 ft) |
130 km/h (⁓ 81 mph) | 30 m (⁓ 98 ft) |
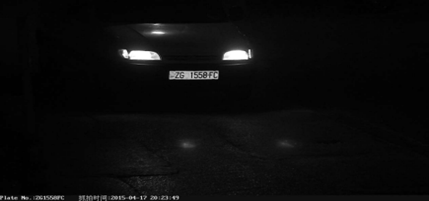
When operating in low-light conditions, the maximum achievable capture distance is often constrained by the limited reach of infrared (IR) illumination. To extend the IR range, the utilization of more powerful external IR sources can be considered.
