LPR - User Guide
Sections Description
ALPR plugin consists of the following sections:
SECTION NAME | DESCRIPTION |
Events | It is intended for viewing of video from the camera in real-time and information on the last 10 notices |
Search | It is intended for viewing the full history of notices with the set parameters |
Lists | It is intended for the creation of the database of the resolved license plate numbers of the CU |
Controller | It is intended for the integration of a plug-in into the network door controller |
Relay module | It is intended for the integration of a plug-in with a network relay module of input-output |
Push events | It is intended for the creation of own event (event) on sending notices for external resources |
Settings | It is intended for change of settings of analytics |
Events
To pass into this section click the Events tab in the menu of the page.
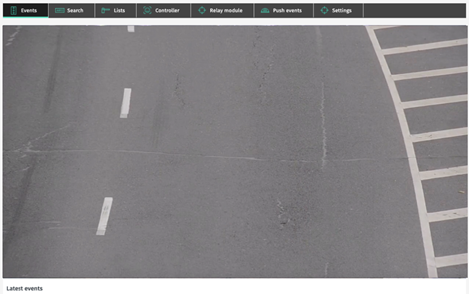
10 last notices are presented in this section. Records are updated automatically.
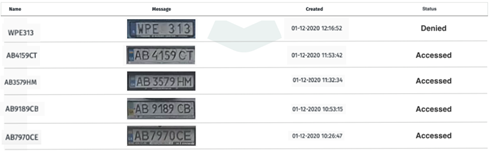
Search
To pass into this section click the Search tab in the menu of the page.

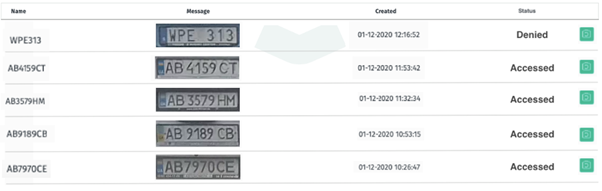
This section is intended for viewing of history of notices.
To find records for a certain period, use a search box:
| SEARCH FIELD | PARAMETERS |
Date | Select the time period for which it is necessary to make a search. |
License plate | Enter into vehicle field number |
Status | Select the status of the vehicle |
Click Search to display search results.
To browse a frame from the record click a frame icon in the right part of the record.
Lists
To create a database of the approved license plate numbers of the CU, select the Lists tab in the menu.
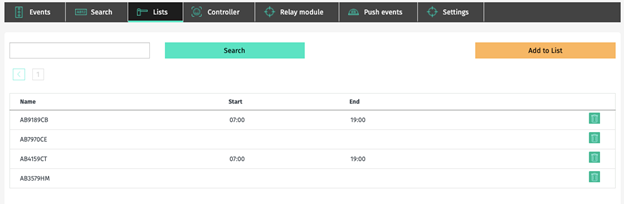
To add a new record, click Add to list in the screen upper right corner.
In the opened window enter the registration number of the CU and press Add button.
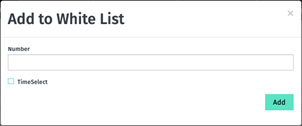
If it is necessary to add time frames of permission of stay of the vehicle note a checkbox Time Select and set values of the time.

To find the license plate number of the CU in the list, use a search box.
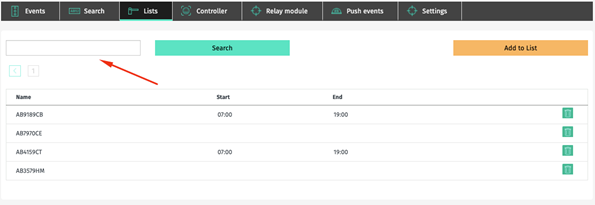
Enter the license plate number of the CU into a field and click Search.
Controller
To pass into this section open the Controller tab in the menu of the page.

This section is intended for the interface of the camera to the network door controller.
When detecting the license plate number of the CU from the list of the allowed numbers the camera gives control instructions on the network door controller.
More details with work of network door controller examine in the corresponding documentation.
For connection fill fields that are presented on the page and click Save.
FIELD NAME | DESCRIPTION |
IP Address | Device IP address. By default 192.168.0.90 |
User name | Device user name. By default for the account, the root user name is set. |
Password | A password of access to the device. By default for the account, it is set the password pass. If the password for the root user is lost, it is necessary to make the reset of parameters of the device to factory installations. |
Network Door Controller name | Name of the device |
Relay Module
To pass into this section open the Relay module tab in the menu of the page.

This section is intended to interface to the relay module of input-output. Bol in detail examines work with the relay module of input-output in the corresponding documentation.
For connection fill fields that are presented on the page and click Save.
FIELD NAME | DESCRIPTION |
IP Address | Device IP address. By default 192.168.0.125 |
User name | User name. By default for the account, the root user name is set. |
Password | A password of access to the device. If the password for the root user is lost, it is necessary to make the reset of parameters of the device to factory installations. |
Push Events
To pass into this section open the Push events tab in the menu of the page.
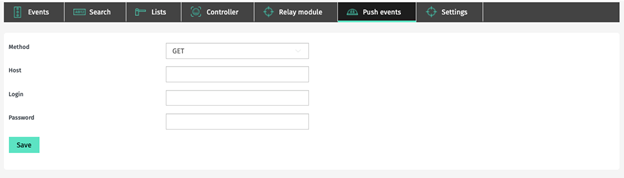
This section is intended for the creation of events on sending notices.
For this purpose to create an event in the field of Method select a method of sending an event. In total three methods are presented: Get, Post, Milestone. When choosing the Get and Post methods the following fields are available:
PARAMETER | PARAMETER DESCRIPTION | VALUE |
Host | Enter Host | |
Login | Enter the login | Name |
Password | Enter the password | ******* |
For a method of sending Milestone the set of fields:
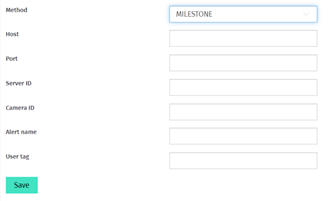
PARAMETER | PARAMETER DESCRIPTION | VALUE |
Host | Enter HOST | |
Port | Enter port | 9090 |
Server ID | Enter server Id | Server Id |
Camera ID | Enter camera Id | Object Id |
Alert Name | Enter a notice name | Name |
User tag | Add the tag | #tag |
Settings
To open this section open a tab Settings in the menu of the page.
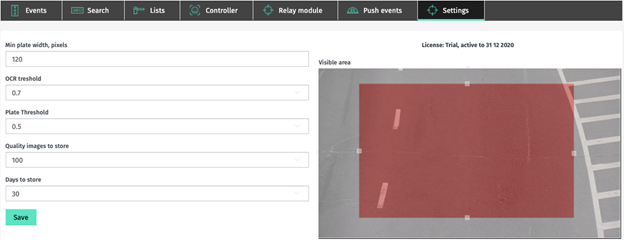
This section is intended for the change of settings of analytics of a plug-in on the camera.
You can change such fields:
PARAMETER | PARAMETER DESCRIPTION |
Min plate width, pixels | Minimum the size of the license plate number of the CU in pixels. By default 120 pixels. |
OCR Threshold | The threshold value of the probability of the correct conversion of the graphics image of the license plate number to the text. Changes ranging from 0.5 up to 0.9. By default 0.7. |
Plate Threshold | The threshold value of the probability of the correct interpretation of an object as the license plate number. Changes ranging from 0.5 up to 0.9. By default 0.5. |
Quality images to store | Quality of the saved images as a percentage. Changes ranging from 30 up to 100. By default 100. |
Days to store | The number of days of storage of records. Changes ranging from 1 up to 30. By default 30. |
Change an area of interests
Using tools at the edges of the area, reduce and you will expose the area in the necessary situation.
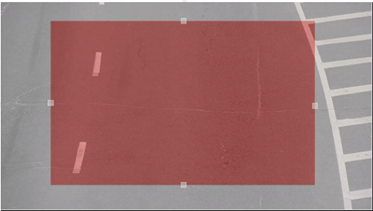
In the exposed area there will take place recognition of license plate numbers.
Click on the Save button to save changes.