Milestone: LPR Plugin Utilization
Introduction
Open the XProtect Smart Client application and sign in by performing the following steps in the login dialog:
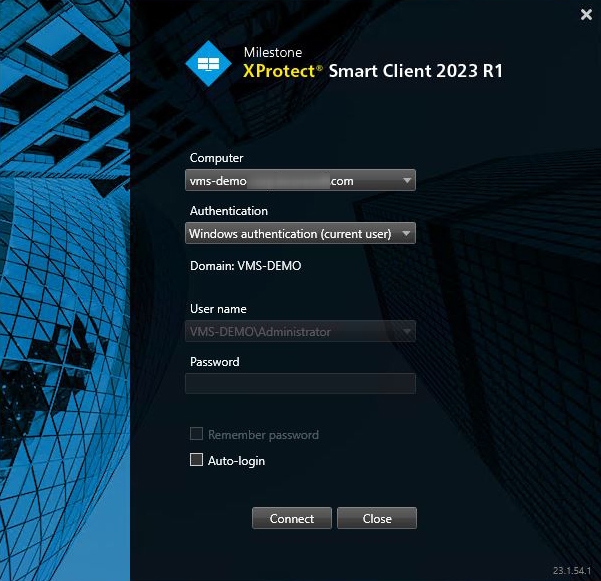
- Specify the hostname or the IP address of the Management Server in the Computer field
- Select the desired authentication method
- Enter the username and password
- Click the Connect button
Overview
To view the LPR search and event data, navigate to the LPR section in the main menu. It comprises 4 items:

- Search
- Lists
- Events
- Statistics
Search
To view the search results, click the Search item. The Search functional menu allows to:

- Enter the license plate number to filter vehicles
- Select the required time frame
- Select multiple required cameras from the drop-down list
- Select from the drop-down lists the desired vehicle's:
- Country of registration
- Color
- Make
- Model
- Direction of movement
- Click the Search icon to start filtering
- Click the Reset icon to clear all applied filters
- Switch between search result pages by clicking the navigation arrows
Once selected and filtered, in the search results:
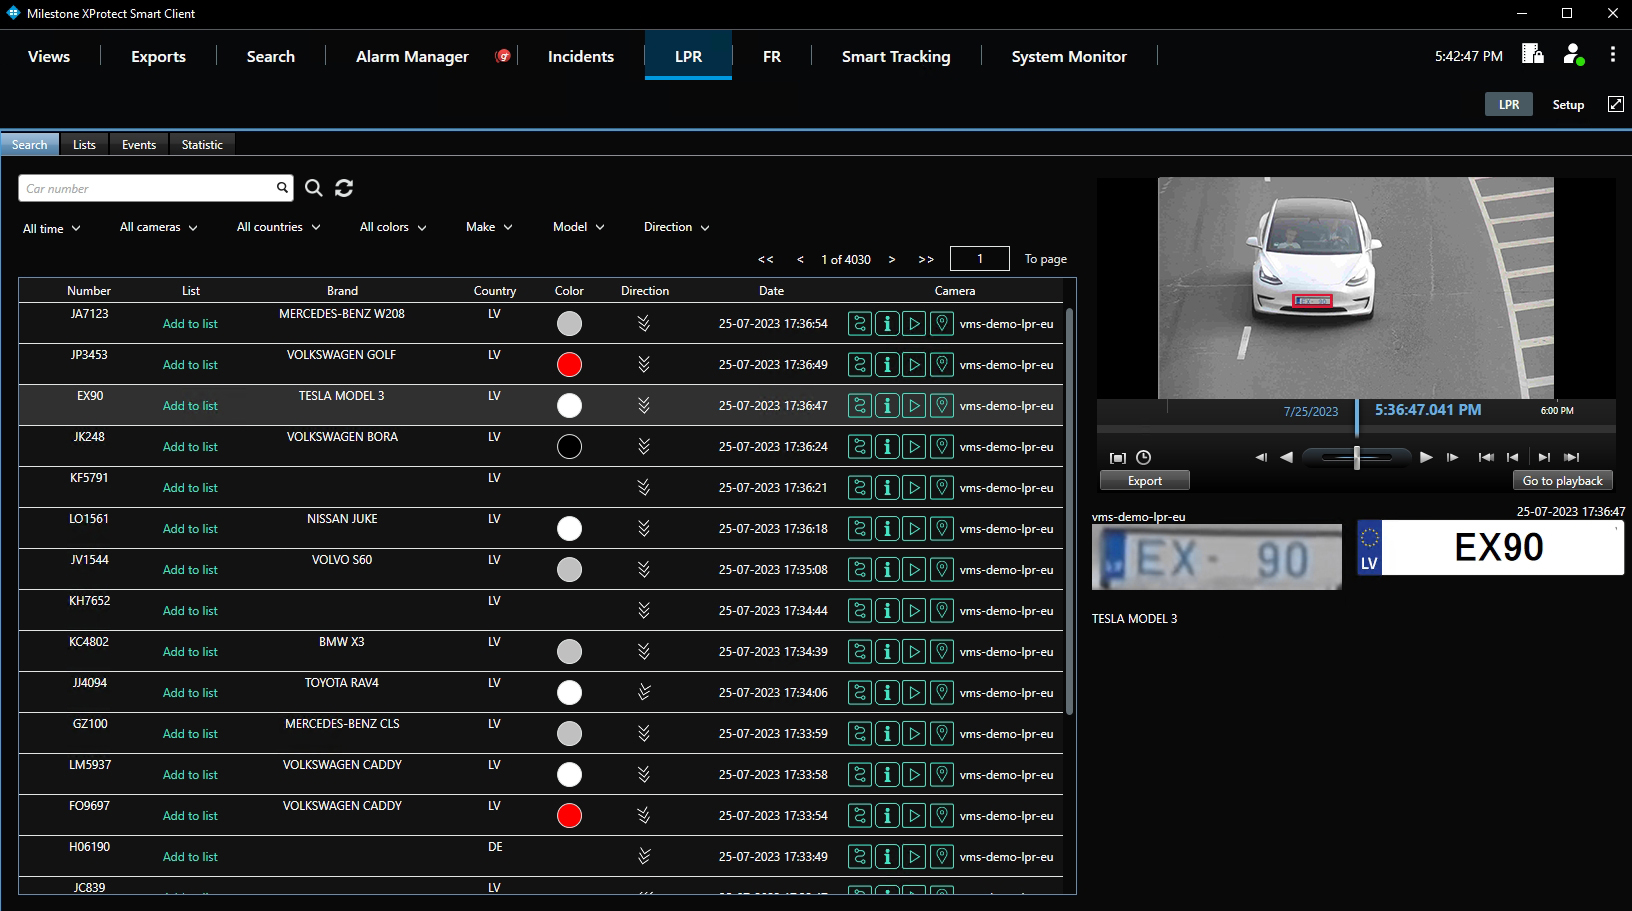
- View recognized vehicle data, date and time the license plate number has been recognized by the selected analytics
- View recognized vehicle attributes:
- Make and model
- Country of registration
- Color of the vehicle
- Direction of movement
- Click the list name to open the List View item or add a vehicle to the required list by clicking the Add to List button. In the Add License Plate pop-up window:
- Write a comment about the vehicle
- Select a required list
- Click the Save button
- Select the Info icon to view the additional information. In the pop-up window:
- See the extended vehicle data
- Save the image in the full-size
- View the vehicle route and camera location on the map by clicking the corresponding icons in the Camera column
- Click the row in the table with the desired license plate number to see the frame with a vehicle preview
Lists
To view the lists, click the Lists item. The Lists functional menu allows to:

- Enter the list name or characters in the name to filter lists
- Select the Search icon to start filtering by list name
- Select the Reset icon to clear the filter
- Enter the license plate number to filter lists containing this number
- Select the Search button to start filtering by license plate number
See the filtered lists in the table below. It contains:
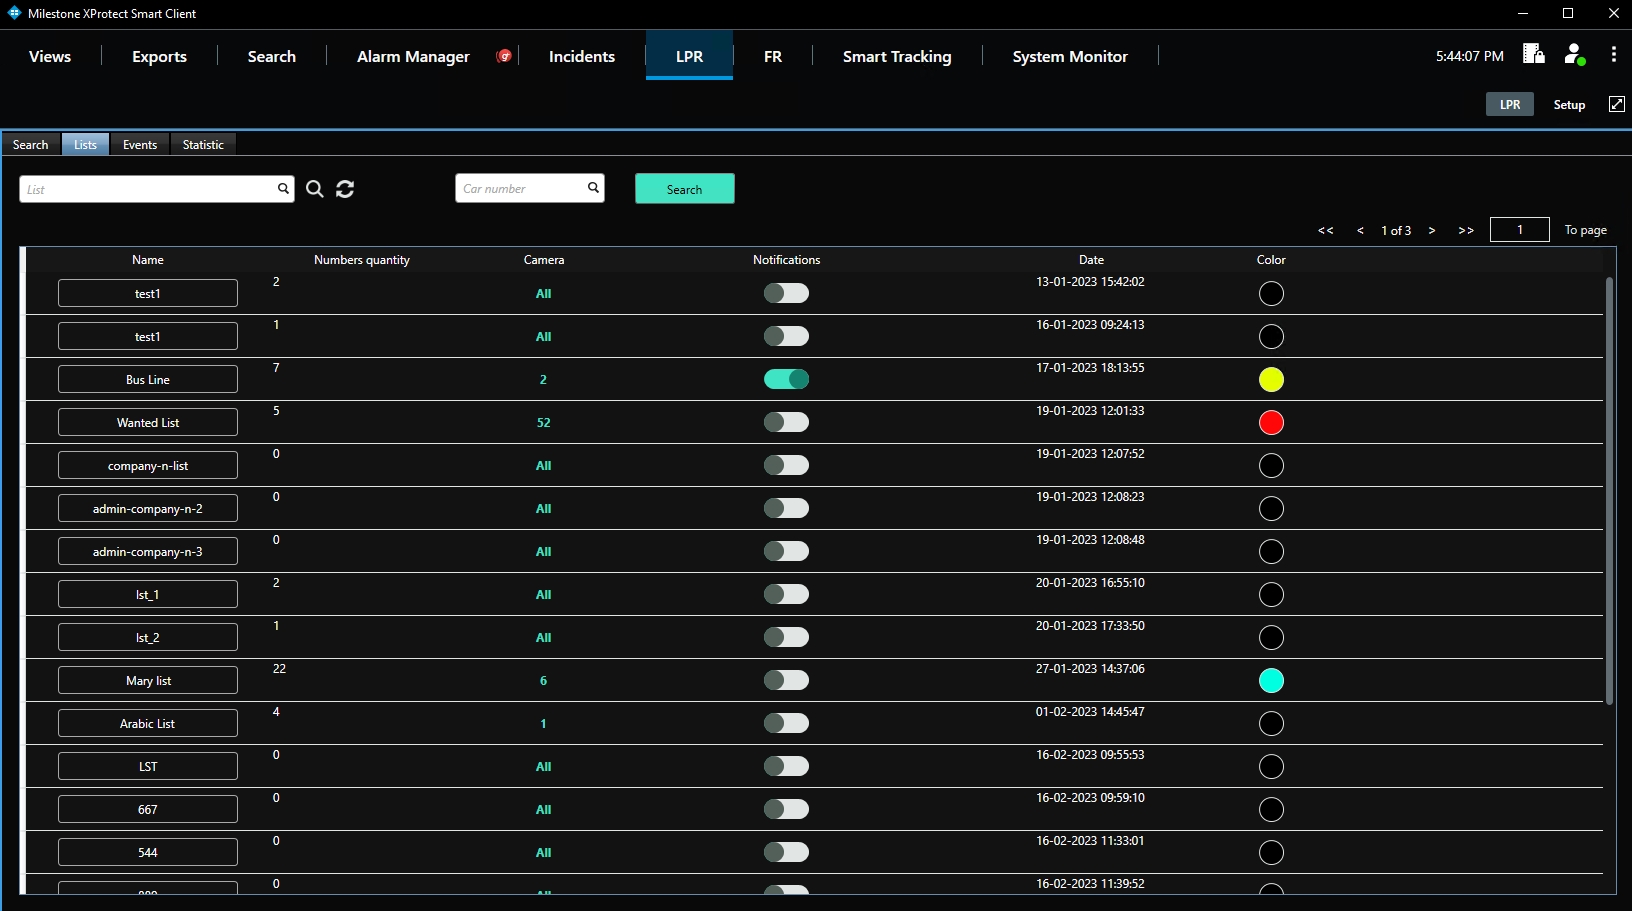
- List name
- Number of vehicles included in the list
- Total number of video streams involved in the list
- Notifications toggle
- List creation date and time
- List color
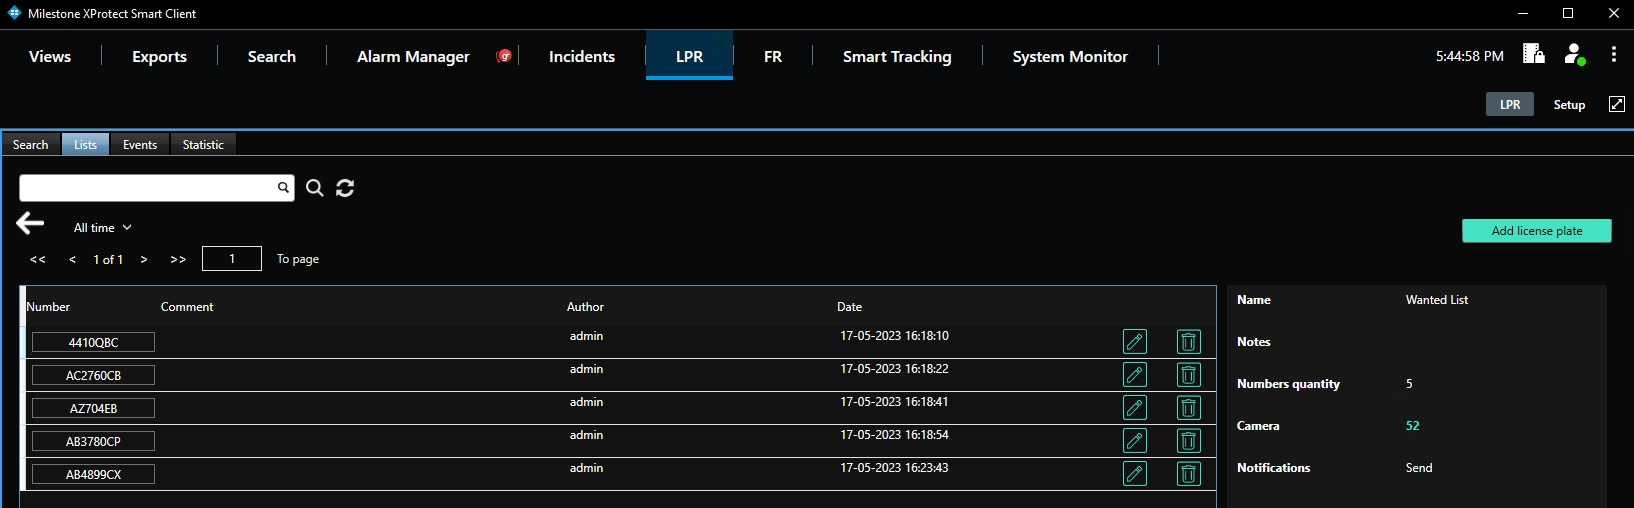
To view the list, select the list name. The List View item allows to:
- Filter items in the list:
- Enter the license plate number to filter vehicle cards
- Select the Search icon to start filtering
- Select the Reset icon to clear the filter
- Select the time frame the number was added to the list
- Switch between list pages by clicking the navigation arrows
- Add a new vehicle card to the list by clicking the Add License Plate button
- Manage vehicle cards:
- Click the license plate number in the row to open the pop-up window with vehicle information and events with a required vehicle
- Edit the vehicle card
- Delete the vehicle card
Events
To view the events, click the Events item. The Events functional menu allows to:

- Enter the license plate number to filter events
- Select the required time frame
- Select a necessary list name, the All Lists or Off the List option from the drop-down list
- Select the name of the user that has accepted the event notification
- Click the Search icon to start filtering
- Click the Reset icon to clear all applied filters
Once selected and filtered, in the event notifications:

- View recognized vehicle data, date and time license plate numbers have been detected
- Click the license plate number to open the vehicle card
- Click the list name to open the List View item or add a vehicle to the required list by clicking the Add to List button. In the Add License Plate pop-up window:
- Write a comment about the vehicle
- Select a required list
- Click the Save button
- View recognized vehicle attributes:
- Make and model
- Country of registration
- Click the Frame button to view the additional information. In the pop-up window:
- See the extended vehicle data
- Save the image in the full-size
- Click the Play icon to open a short video playback with a detected vehicle
- View the vehicle route and camera location on the map by clicking the corresponding icons in the Camera column
Statistics
To view the statistics, click the Statistics item. The Statistics functional menu comprises:

- Filters to:
- Select multiple required cameras from the drop-down list
- Select the desired time frame to produce statistics
- Click the Search button to start preparing the statistics data
- Tabs to filter statistics data by:
- Camera
- Hourly
- Days
- Weeks
The Camera tab shows:

- Rectangular bars on the bar chart with lengths proportional to the vehicle quantity detected by selected cameras
- Slices on the donut chart with the amount of the vehicles in percentage found by selected cameras
- Table columns by selected cameras, detected vehicle number and model, as well as their total number detected by the desired camera or by all cameras in general
The Hourly tab shows:
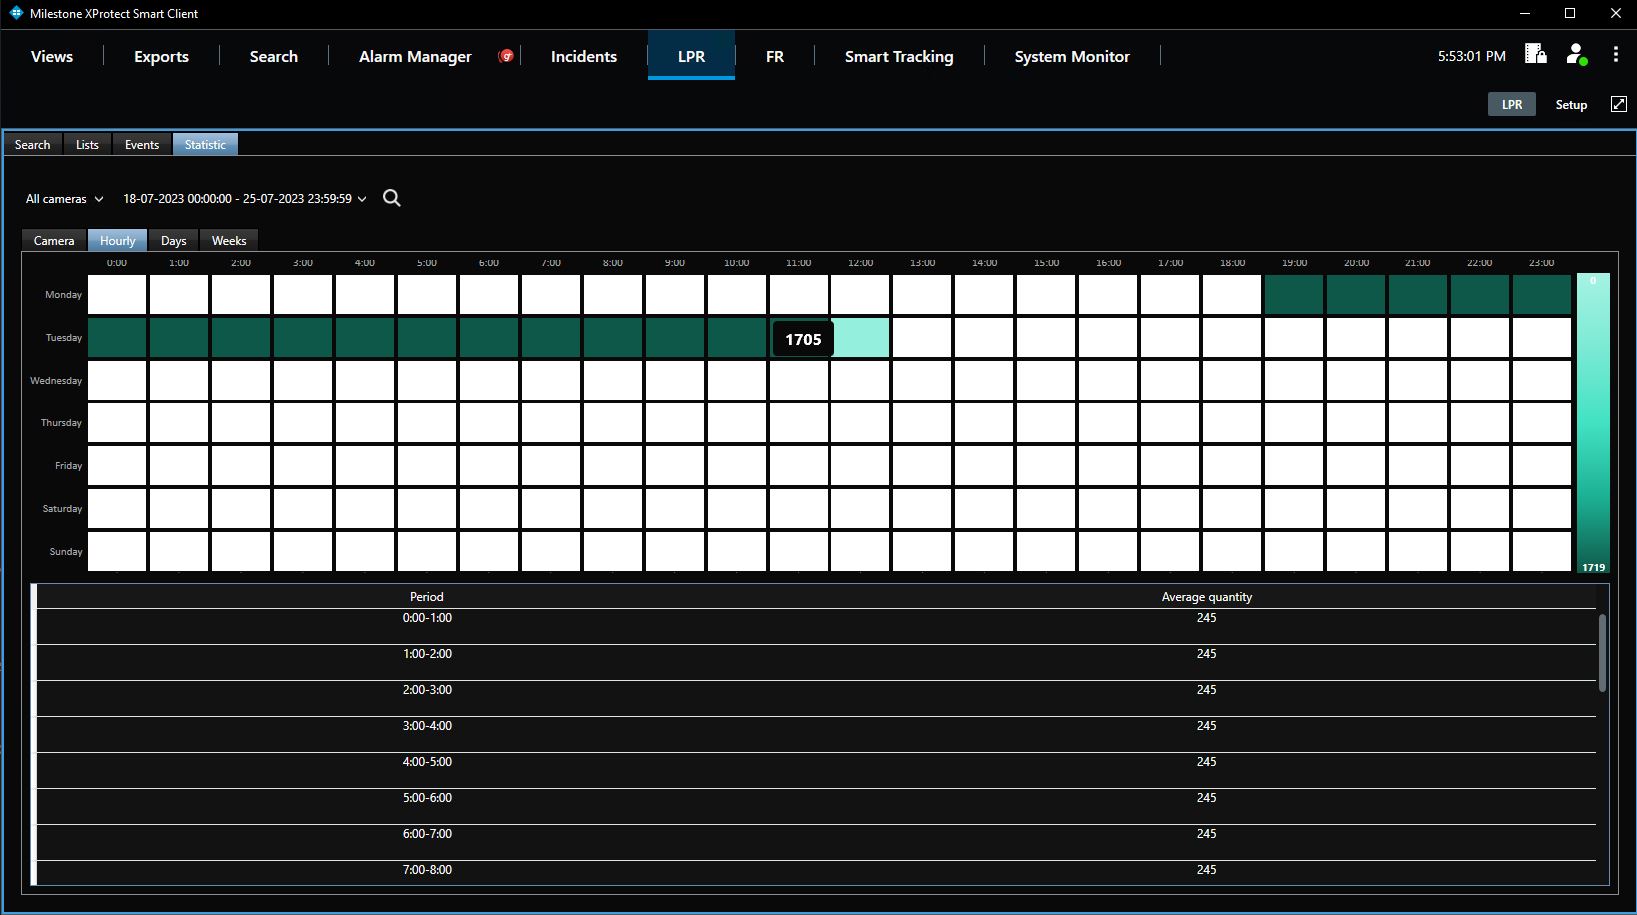
- Table chart with the number of vehicles by hours and days of a week
- Table with Time and Average Number columns
The Days tab shows:
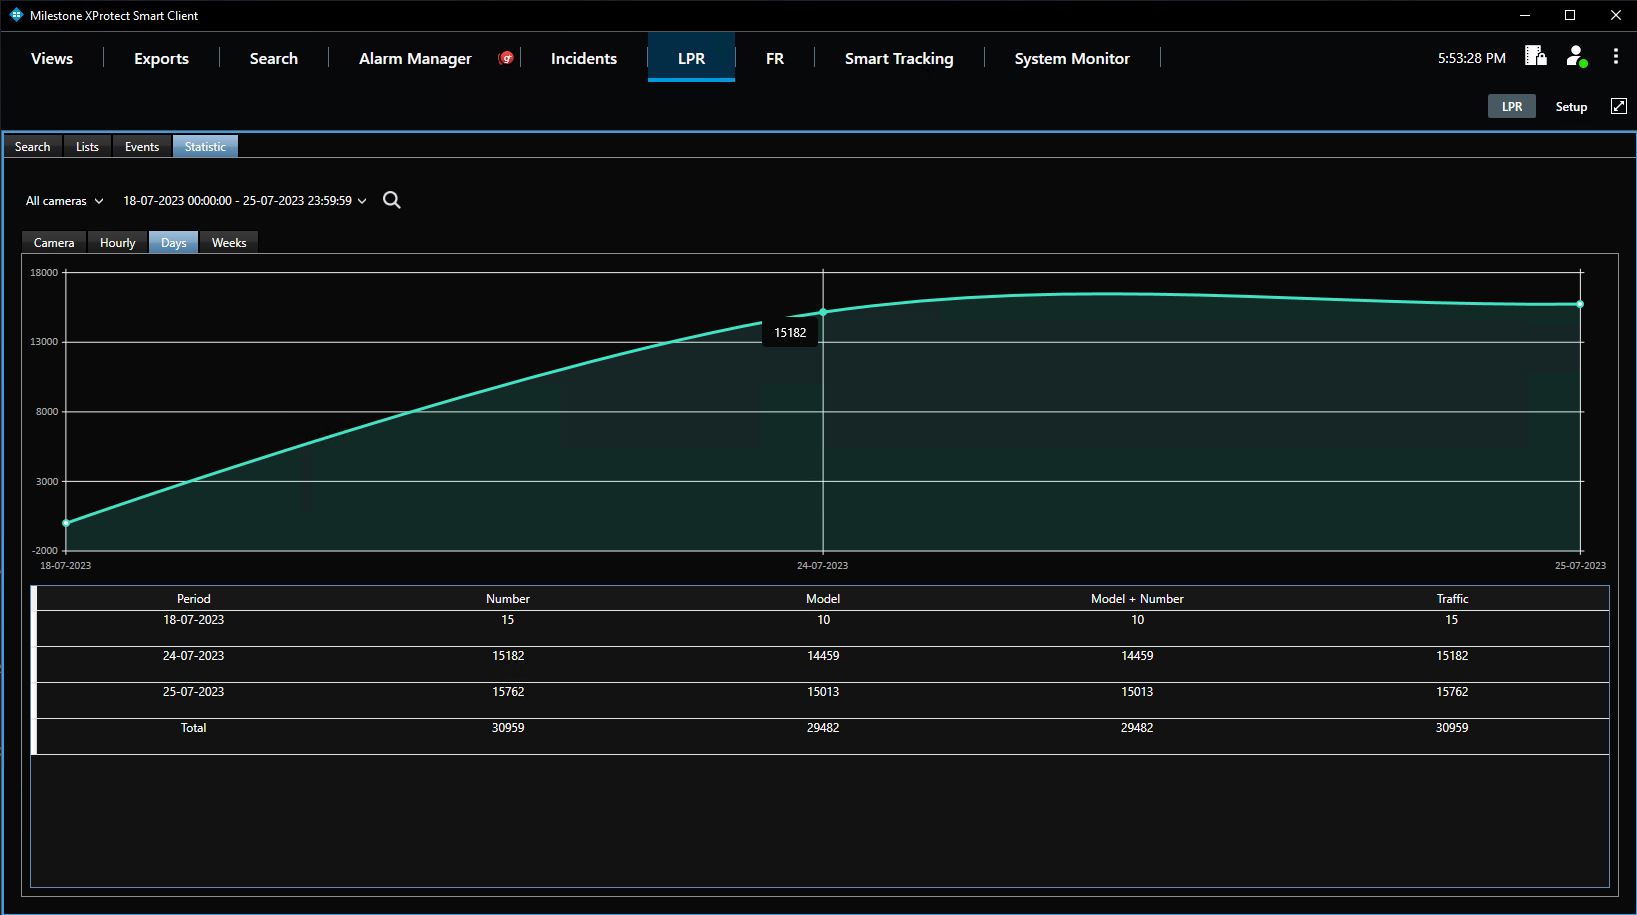
- Checkpoints on the area chart by found vehicle quantity and date
- Table columns by date, detected vehicle number and model, as well as their total number for a specific day or for a required time frame in general
The Weeks tab shows:
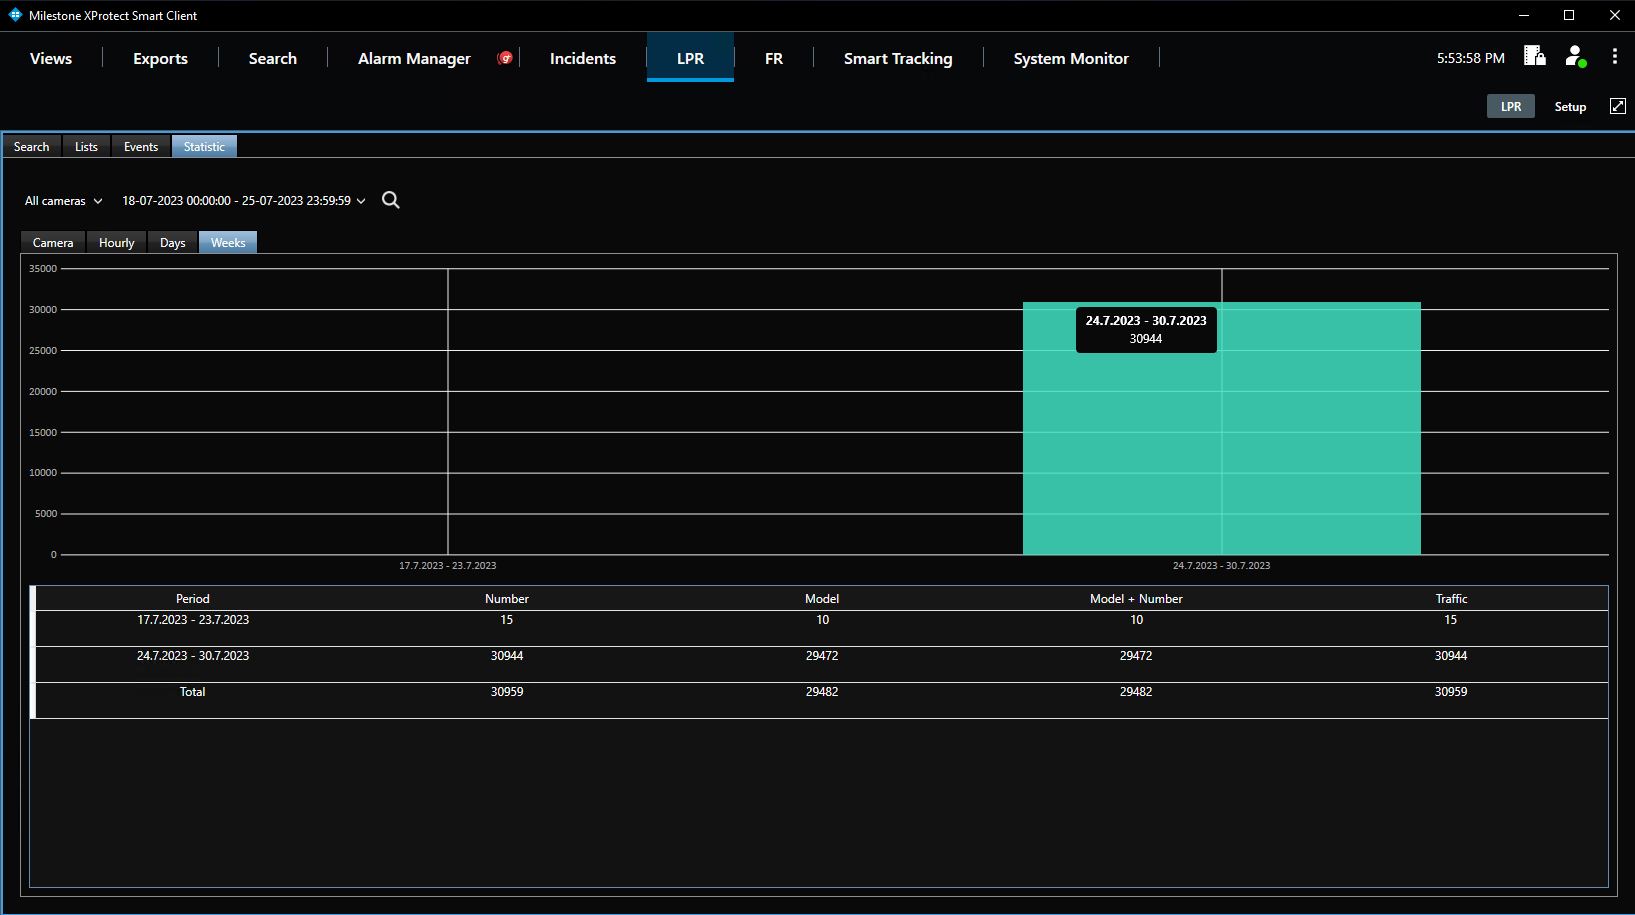
- Columns on the column chart with heights proportional to the vehicle quantity detected during the required weeks
- Table columns by weeks, detected vehicle number and model, as well as their total number for a specific week or for a required time frame in general
View Live Analytics
To watch the required analytic process in real-time, navigate to the Views section in the main menu and proceed with the following steps:
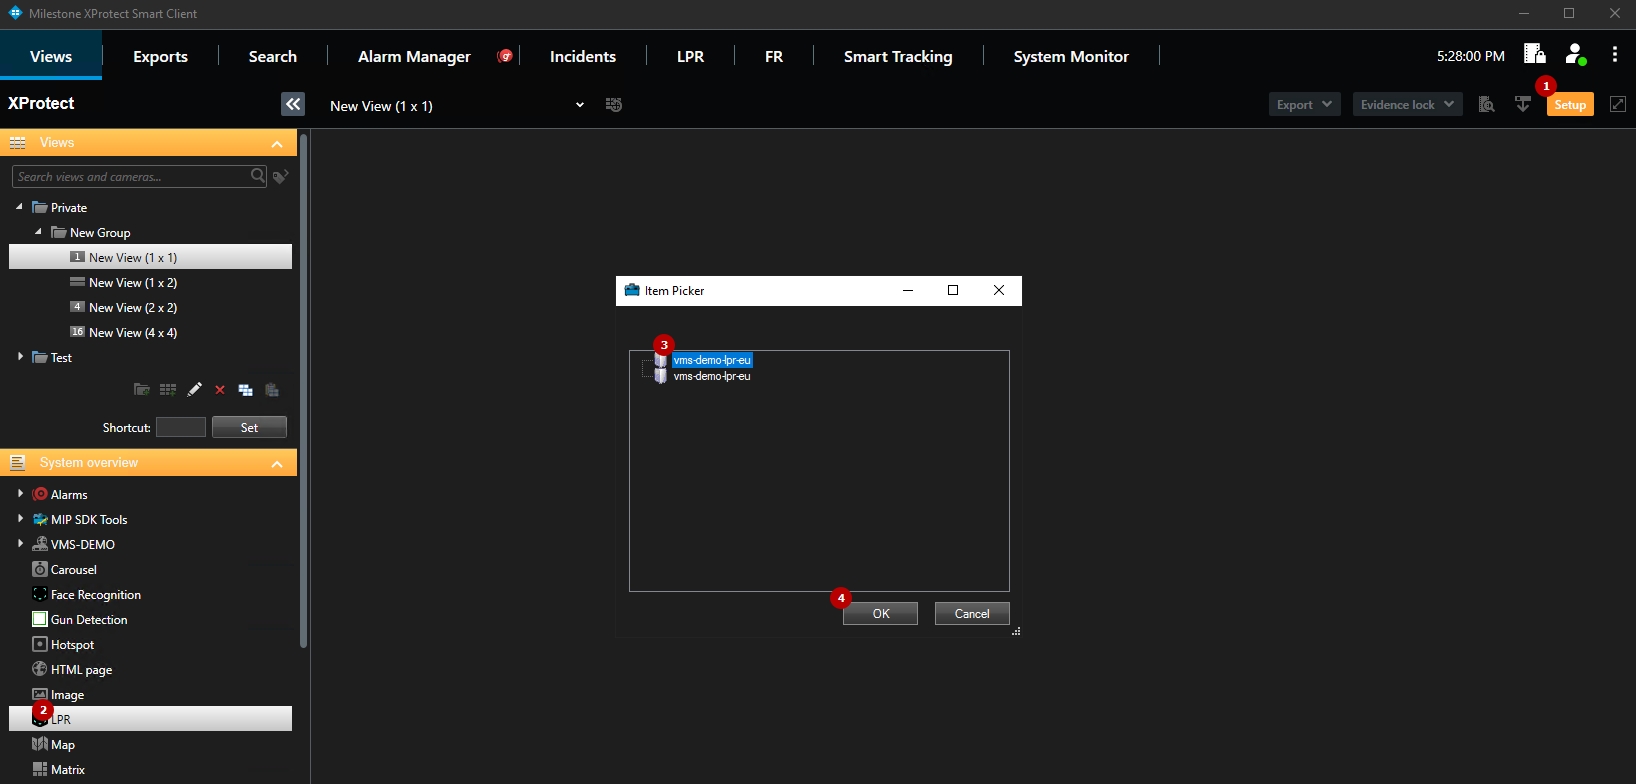
- Click the Setup button
- Select LPR in the System Overview block
- Select the required analytics in the Item Picker pop-up window
- Click the Ok button
Live view analytics mode allows to:
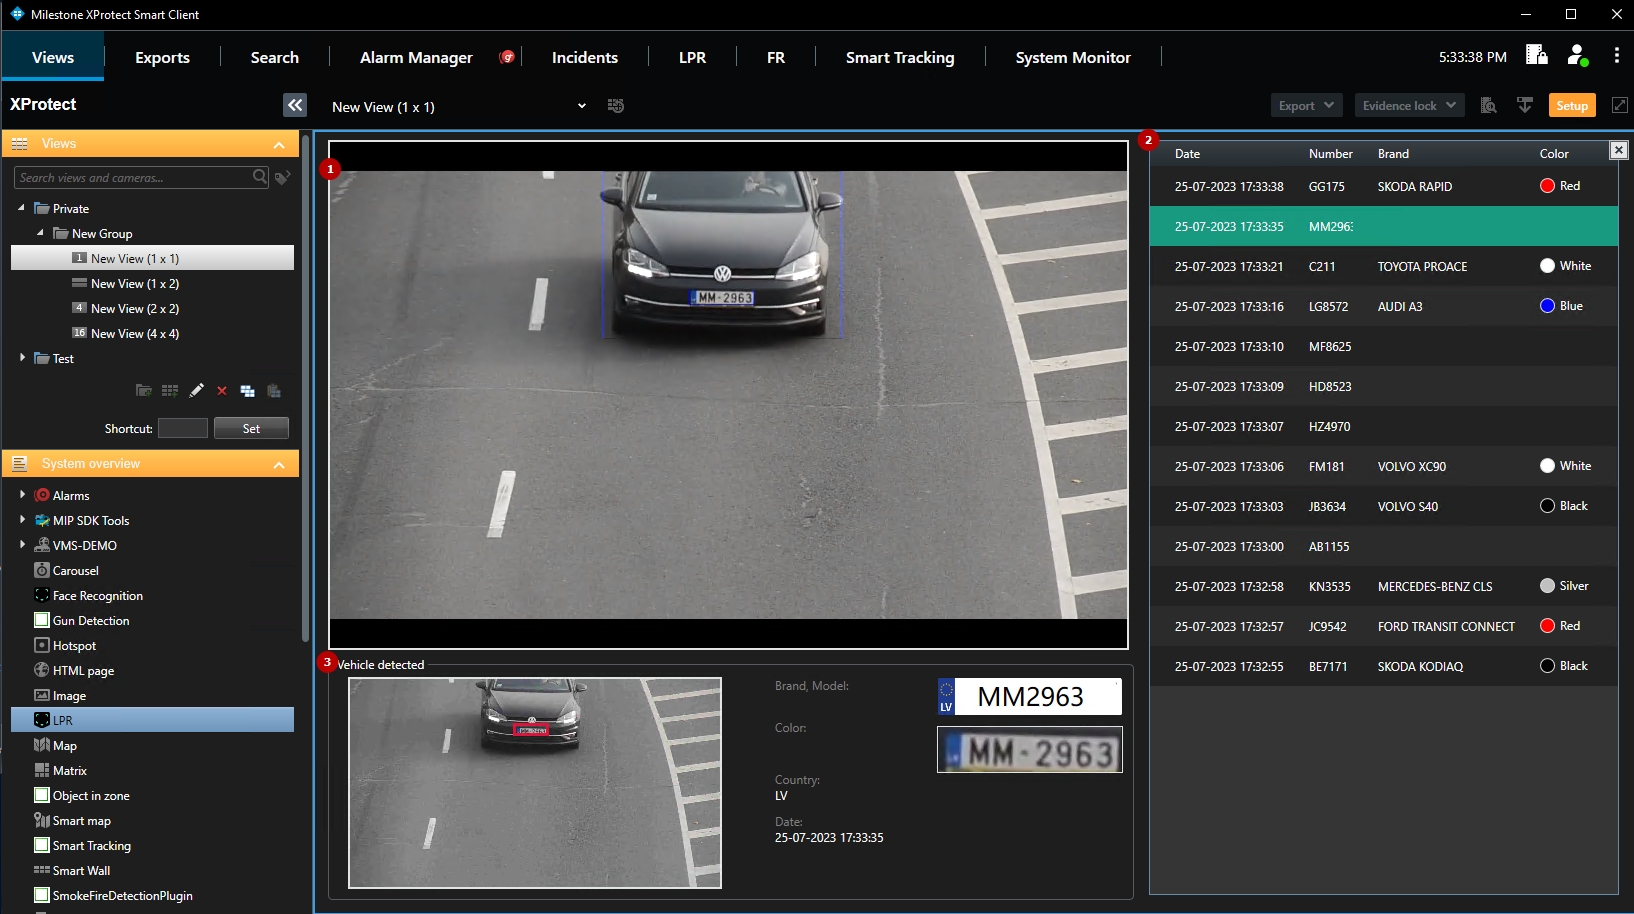
- View the video from the camera in real-time mode
- View the table with detected license plate numbers, including:
- Date and time of the event
- License plate number
- Make and model
- Color of the vehicle
- View the event frame preview with the detected vehicle
View Alarms
To view the analytics alarms, navigate to the Alarm Manager section in the main menu. It comprises:

- Geolocation block displaying the camera location on the map
- Video block with the analytics record playback
- Table with analytics alarms
- The map is displayed in the Geolocation block only if the Google Maps API services were configured.
- Double-click the required alarm to open the pop-up window with the extended alarm data and options to manage alarms.