Object Detection Camera Installation
1. Introduction
This document provides essential guidance for selecting, installing, and configuring cameras for accurate object detection. Proper camera installation is crucial to avoid unnecessary expenses and ensure optimal detection quality. We strongly recommend carefully reviewing these guidelines before initiating the camera installation process.
2. Camera Selection
When selecting a camera, it is highly recommended to prioritize the following specifications:
Settings | Requirements |
|---|---|
Image Resolution | From 2MPx (Full HD 1080p, 1920×1080 pixels, 16:9 aspect ratio) |
Tilt Angles | Recommended variation is within 30° from the horizontal plane (in some cases up to 45°) |
Lens Diaphragm | Adjustable, with the possibility for manual control |
Lens Aperture | At least 1:1.4 (for example, a 1:1.2 lens has a higher aperture than 1.4) |
Matrix Size | Not less than 1/2′′ |
Shutter Speed | No more than 1/100 sec (for example, a shutter speed of 1/25 sec may cause blurring of moving objects) |
Frame Rate | FPS at least 1 frame per second |
3. Camera Installation and Setup
Before installing the camera and configuring its settings, it is important to consider several key criteria:
Camera installation spot: Choose an appropriate location for installing the camera that provides optimal coverage of the desired area.
Lighting: Ensure proper lighting conditions in the surveillance area to achieve clear and accurate object detection.
Camera angle: Determine the ideal angle at which the camera should be positioned to capture the desired field of view.
Camera mount height: Install the camera at an appropriate height to cover the intended area effectively.
Tilt angle: Adjust the camera's tilt angle to ensure the desired coverage and minimize any blind spots.
Camera lens quality: Select a camera with a high-quality lens to ensure clear and accurate imaging.
Image quality: Consider the camera's image resolution and sensor capabilities to ensure optimal image quality for object detection.
3.1. Camera Installation Requirements
To ensure optimal object recognition, the installation height of the camera should be considered based on the distance to the object recognition area. Here are some recommendations:
For outdoor or large indoor areas, cameras should be mounted at a minimum height of 2.8 m (9 ft) relative to the horizon and ground plane.
To achieve optimal object classification, cameras can be tilted within a range of 30° from the horizontal.
Increasing the tilt angle beyond 30° can be beneficial for detecting targets that are approaching the camera directly.
However, it is recommended to avoid exceeding a tilt angle of 45° from the horizontal to maintain accurate object recognition.
It is important to mount cameras on a stable surface to minimize vibrations and movement that could affect the quality of detection.
When selecting a lens, mounting height, and tilt angle, consider capturing the required level of detail for object detection within the scene.
The recommended camera installation heights for different ranges to the detection zone are as follows:
Height | Range | ||
|---|---|---|---|
Meter | Feet | Meter | Feet |
3 | 9,8 | 10-15 | 32,8-49,2 |
5 | 16,4 | 15-30 | 49,2-98,4 |
7 | 22,9 | 30-50 | 98,4-164 |
10 | 32,8 | 50-80 | 164-262,4 |
To optimize object detection in the selected area, it is important to consider the capture of objects within the camera's field of view. Here are some recommendations:
Ensure that the camera's field of view is level with the horizon. This helps maintain accurate perspective and alignment of objects in the scene.
Objects moving within the field of view should ideally be in an upright position. This facilitates better object recognition and classification.
Objects moving parallel to the camera's field of view generally provide better detection results compared to objects moving towards or away from the camera.
Position the cameras in a way that allows them to capture moving objects within the field of view for at least 2 seconds. This duration enables sufficient analysis and identification of the objects.
If there is a possibility of fast-moving objects, especially vehicles moving laterally, consider using a wider field of view. This increases the available observation time, enhancing the accuracy of object detection.
3.2. Image Quality Requirements
When installing and configuring cameras for object detection, image quality plays a crucial role. The ability of a camera to provide high-quality images depends on several factors, including:
- Sensitivity of the sensor: Influences the camera's capability to capture clear and detailed images, especially in low-light conditions.
- Camera resolution: Determines the level of detail captured in an image. Higher resolutions generally result in sharper and more precise object detection.
- Camera shutter speed: Impacts the speed at which the sensor captures an image. A faster shutter speed can minimize motion blur and enhance the clarity of moving objects.
To ensure accurate object detection, specific minimum sizes (width and height) are recommended for different types of objects at a camera resolution of 2MPx. These sizes serve as guidelines for achieving reliable detection results:
- Person size for detection: Minimum is 25x40 px, recommended is 50x125 px
- Car size for detection: Minimum is 25x25 px, recommended is 150x100 px
- Bicycle size for detection: Minimum is 40x70 px, recommended is 90x100 px
- Motorcycle size for detection: Minimum is 25x30 px, recommended is 70x90 px
- Bus size for detection: Minimum is 90x75 px, recommended is 200x150 px
- Truck size for detection: Minimum is 80x70 px, recommended is 180x150 px
- Animal size for detection: Minimum is 30x40 px, recommended is 120x140 px
- Item size for detection: Minimum is 30x40 px, recommended is 100x150 px
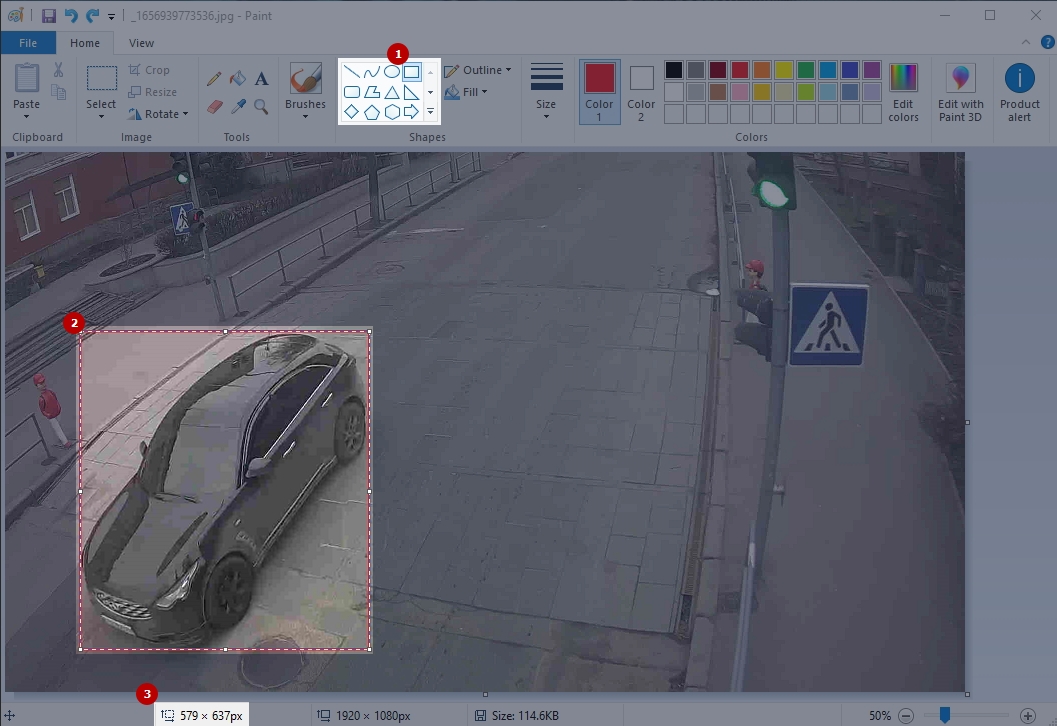
To determine the width and height of an object in pixels, save a frame from the video, open it in Paint, and follow these steps:
- Locate and select the Rectangle shape tool from the Shapes toolbox
- Use the rectangle tool to draw a rectangle around the object, ensuring that it encompasses the object's extreme points
- Once the rectangle is drawn, view the width and height of the selected rectangle in pixels to determine the object's dimensions
- Ensure that the dimensions of the objects to be monitored are at least 4-5% of the scene size.
- Avoid designating the object detection size as smaller or larger than its actual size.
- Avoid designating the ratio of the object's size to the whole image as too large or too small.
Types of person attributes:
Type | Options |
|---|---|
Hat | Presenсe, Absence |
Hair Lenght | Short, Long |
Top Color | Black, Darkblue, Yellow, White, Brown, Red, Green, Orange, Beige, Violet, Gray, Cyan, Pink, Undefined |
Top Lenght | Short, Long |
Bag | Absence, Bag, Backpack |
Bottom Color | Black, Darkblue, Yellow, White, Brown, Red, Green, Orange, Beige, Violet, Gray, Cyan, Pink, Undefined |
Bottom Lenght | Short, Long |
Bottom Clothes | Dress, Pants |
Age | Young, Teen, Adult, Old |
Gender | Male, Female |
3.2.1. Adjusting Camera Shutter Speed
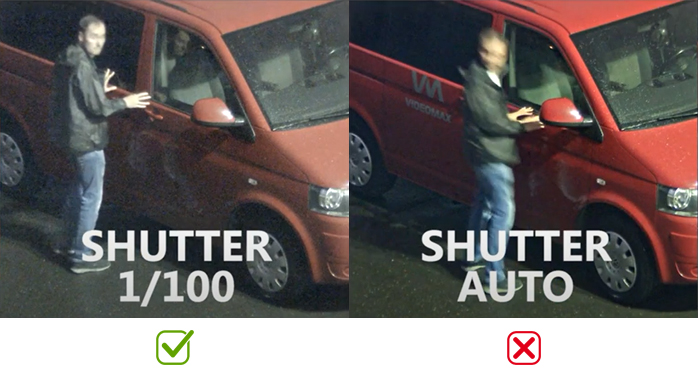
Efficient object detection while in motion is not possible if the image is blurry. The clarity of the image is affected by the sensor's shutter speed, which helps maintain an optimal image brightness even in changing lighting conditions.
To achieve a suitable shutter speed for the camera, follow these steps:
- Switch from Auto Shutter mode to Manual Shutter mode
- Adjust the Shutter setting to a value no higher than 1/100
This ensures a faster shutter speed, reducing the chances of motion blur and improving the clarity of captured images.
3.2.2. Adjusting Image Compression Settings
To achieve optimal object detection results, it is advisable to disable or minimize any compression options, ideally within the range of 0-10%. This helps to reduce noise and enhance the clarity of the captured images. It is not recommended to use compressions like zip streaming or VIQS for this purpose.
However, when using compression methods such as H264 or H265, it is acceptable to reduce the compression ratio while maintaining reasonable image quality.
The difference in compression application, using the same camera and resolution, can be observed as follows:
- 5MB bandwidth
- 10MB bandwidth
3.3. Lighting Requirements
Lighting plays a crucial role in the installation of cameras for object detection. To ensure optimal results, it is recommended to provide even lighting in the detection area, with a minimum of 150 lux. Additionally, careful consideration should be given to the camera's location as it directly impacts the quality of object detection.
Here are some key criteria to keep in mind:
Avoid direct light sources: Position the camera in a way that prevents direct sunlight, headlights, or other strong light sources from shining directly into the lens.
Consider lighting changes throughout the day: Avoid installing the camera in areas with significant fluctuations in lighting, such as indoor spaces with direct sunlight through skylights or large windows.
Be mindful of indirect light sources: Take into account reflections from built-in or external IR illuminators, as they can cause lens flares and affect image contrast. Minimize their impact on the camera's field of view.
- Avoid placing cameras in proximity to mirrors or highly reflective surfaces: Install the camera in areas where there are no mirrors or highly reflective surfaces like shiny floors and ceilings, as they can cause unwanted reflections and distortions in the captured image.
- Direct exposure to bright light sources can temporarily impair the camera's vision.
- Drastic variations in lighting conditions can lead to pronounced shadows and altered coloration, potentially affecting the accuracy of object detection.
- Reflections have the potential to introduce false detections, further emphasizing the importance of mitigating their impact.
3.4. Camera Positioning Requirements
To ensure precise object identification, it is crucial to maintain a clear scene:
- In outdoor settings, it is advisable to position the camera in a way that avoids obstructions such as foliage, terrain, or large objects that could obstruct the view of the desired subjects.
- In indoor environments, as long as the upper body, including the head and shoulders, is visible, people can be detected effectively.
When dealing with crowded areas, it is recommended to minimize the use of analytics, as overlapping individuals can block each other from the camera's field of view. This precaution helps prevent the system from potentially missing relevant results.
Improper camera installation can lead to false or failed detection. To ensure accurate object detection, it is important to consider the following conditions:
- Similar illumination or color between objects and the background can hinder detection.
- Random objects occluding different objects can create obstacles for detection.
- Multiple objects moving together may pose challenges for accurate identification.
Recommended requirements for people detection:
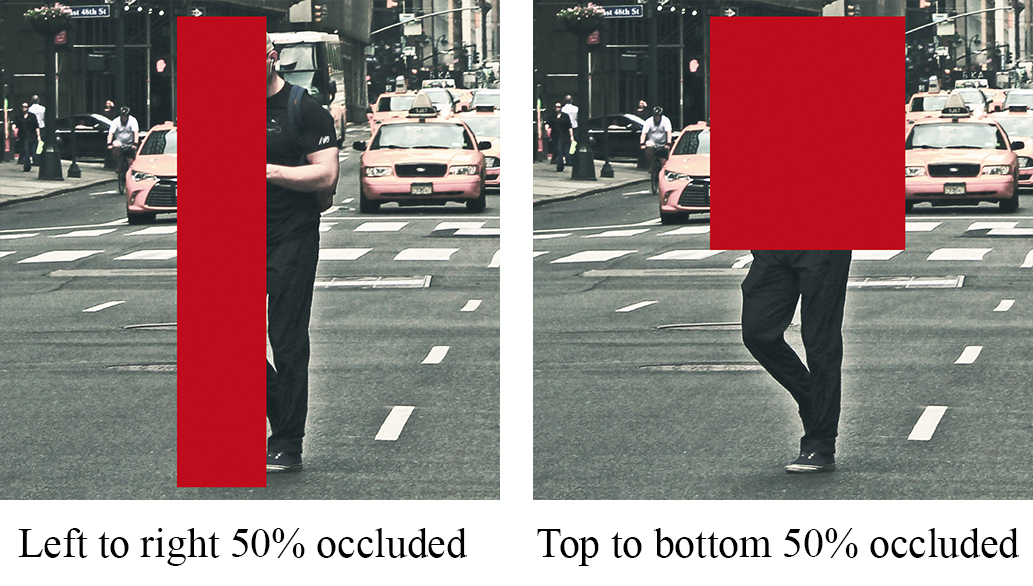
- Ensure that a full body (face/body/leg) is not occluded more than 50% from left to right.
- Avoid occluding the upper or lower body of a person more than 50%.
Recommended requirements for vehicle detection:
- Avoid occluding the front of a vehicle more than 75% from left to right.
- Ensure that the front of a vehicle is not occluded more than 50% from top to bottom.
- Avoid occluding the side of a vehicle more than 25% from left to right.
- Ensure that the side of a vehicle is not occluded more than 50% from top to bottom.
When selecting a coverage area, be cautious not to choose an area that is too large, as objects may become obscured by rain or fog even if there is sufficient lighting and contrast.
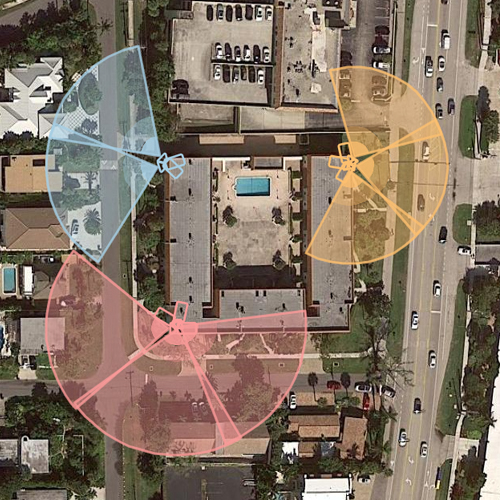
For perimeter installations:
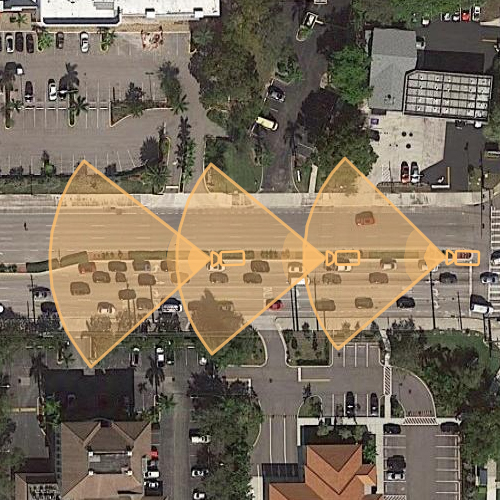
- Ensure that the cameras' fields of view overlap to provide sufficient coverage in the blind spot directly beneath each camera.
- Mount cameras on a central building or structure with a view towards the perimeter for optimal coverage.
Exceptions:
- In cases where extensive areas need to be covered, consider mounting cameras on the perimeter itself.
- If there are no suitable mounting locations or if important areas of the field of view are obstructed, avoid mounting cameras on the central building.
Make sure the indoor coverage area is not excessively small. Areas with low ceilings or confined spaces, such as man-trap areas between secured doors, may present challenges in setting up a scene that meets the recommended criteria. It is advisable to have a field of view that is at least 9 m (30 ft) wide, even if the specific region of interest is much smaller.
