Face Recognition Camera Installation
The reference photo of the face, which is added in the ID Card for subsequent comparison, plays an equally crucial role in successful face identification as the correct installation and configuration of the camera. Even when all the recommendations outlined below in this document are followed, we cannot guarantee a satisfactory identification result if an unsuitable photo was initially added in the ID Card for comparison. The key characteristics of the reference photo include:
- The face occupies no more than 70-80% of the overall photo dimensions.
- The selected photo has a minimum resolution of 150x150 pixels in both width and height.
- The selected photo meets quality standards comparable to official documents, including sharpness, color accuracy, lighting, background uniformity, size, focus, absence of artifacts, and appropriate pose and facial expression.

1. Introduction
This document provides essential guidance on camera selection, installation, and setup to ensure reliable face recognition. Proper camera installation is crucial to avoid additional expenses and ensure high-quality recognition. It is highly recommended to review these guidelines thoroughly before proceeding with the camera installation process.
2. Camera Selection
When selecting a camera, it is highly recommended to prioritize the following specifications:
Settings | Requirements |
|---|---|
Image Resolution | From 1 Megapixel (HD 720p, 1280×720 pixels, 16:9 aspect ratio) |
Tilt Angles | Recommended variation is not more than 15⁰ vertically and horizontally |
Lens Diaphragm | Adjustable, with the possibility for manual control |
Lens Aperture | At least 1:1.4 (for example, a 1:1.2 lens has a higher aperture than 1.4) |
Matrix Size | Not less than 1/3′′ |
Shutter Speed | No more than 1/100 sec. (for example, a shutter speed of 1/25 sec may cause blurring of moving people) |
Frame Rate | FPS at least 5 frames per second. The recommended value is 12 |
3. Camera Installation and Setup
Before installing the camera and configuring its settings, it is important to consider several basic criteria, including:
- Camera installation spot: Choose an optimal location that provides a clear view of the area to be monitored.
- Lighting: Ensure proper lighting conditions for accurate image capture and recognition. Avoid extreme lighting conditions, such as excessive brightness or darkness.
- Camera angle: Position the camera at an angle that effectively covers the desired area and minimizes blind spots.
- Camera mount height: Install the camera at an appropriate height to capture faces at eye level, which enhances recognition accuracy.
- Tilt angle: Maintain a recommended tilt angle of not more than 15 degrees vertically and horizontally to ensure proper alignment with the monitored area.
- Camera lens quality: Select a camera with a high-quality lens that provides clear and distortion-free images.
- Image quality: Configure the camera settings to capture high-resolution images with sufficient clarity for accurate face recognition.
3.1. Camera Installation Requirements
Typically, surveillance cameras are installed at a high position on ceilings, providing a "top-down" view. The primary reasons for this installation method are as follows:
- To ensure an unobstructed view of individuals at eye level, enabling clear facial identification
- To minimize the risk of unauthorized access to the cameras, maintaining security and integrity
- To prevent accidents or injuries caused by accidental collisions with the cameras
However, it's important to note that this camera placement approach has certain drawbacks and may not be optimal in all situations. Therefore, when setting up the cameras, it is crucial to consider factors such as distance, height, and angles to achieve the best results.
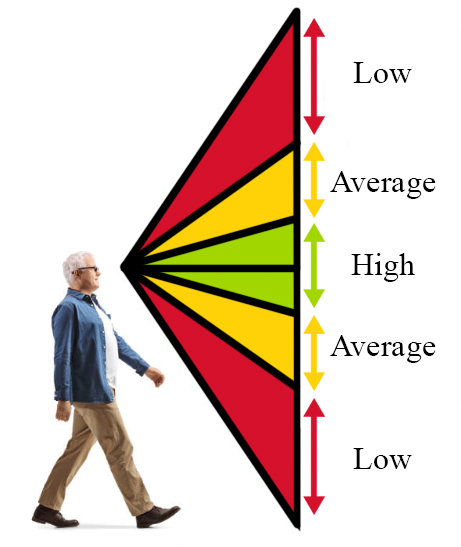
For optimal facial recognition performance, the following angles are recommended:
Area Color | Tilt Angle | Recognition Quality |
|---|---|---|
Red | 50⁰+ | Low |
Yellow | 15⁰ - 45⁰′ | Average |
Green | 0⁰ - 15⁰ | High |
The recommended camera installation heights for different ranges to the detection zone are as follows:
Height | Range | ||
|---|---|---|---|
Meter | Feet | Meter | Feet |
2 | 6.5 | 4~8 | 13~26 |
2.25 | 7.4 | 5~8 | 15~26 |
2.5 | 8.2 | 6~8 | 19~26 |
2.75 | 9 | 7~8 | 23~26 |
3 | 9.8 | 8~10 | 26~33 |
- Higher camera resolutions allow for greater distances between the camera and the face detection point.
- For optimal recognition of children's faces, position the camera at a height of 1.4 meters (4.6 feet) from the floor.
3.2. Image Quality Requirements
Image quality is an equally important consideration when installing and configuring cameras for face recognition. The camera's ability to capture high-quality images depends on several factors:
- Sensitivity of the sensor: Affects the camera's ability to capture clear and detailed images, especially in low-light conditions.
- Camera resolution: Determines the level of detail captured in an image. Higher resolutions generally result in sharper and more precise face recognition.
- Camera shutter speed: Affects the speed at which the sensor captures an image. A faster shutter speed can minimize motion blur and enhance the clarity of moving objects.
To evaluate image quality, follow these steps:
- Save a frame from the video camera and open it in any graphic editor
- Draw a line connecting one pupil to the other
- Estimate the distance between the pupils in pixels
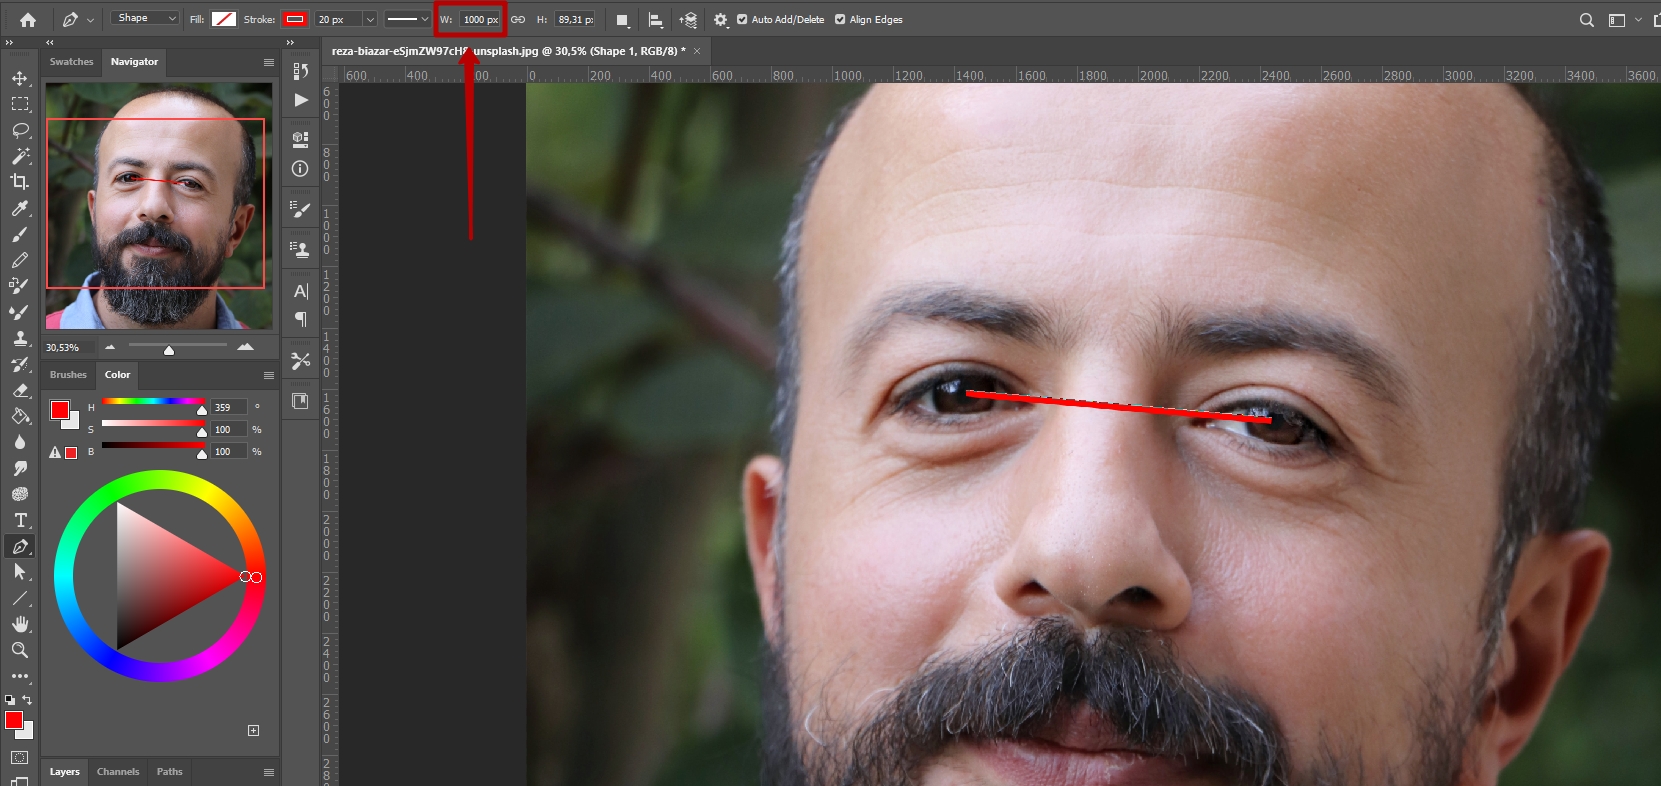
- The minimum interocular distance (IOD) in the frame for face detection is 10 pixels.
- The minimum interocular distance (IOD) in the frame for face recognition is 21 pixels. The recommended value is 40 pixels.
- If the IOD is less than 10 pixels, it is advisable to adjust the camera settings or placement to achieve optimal image quality.
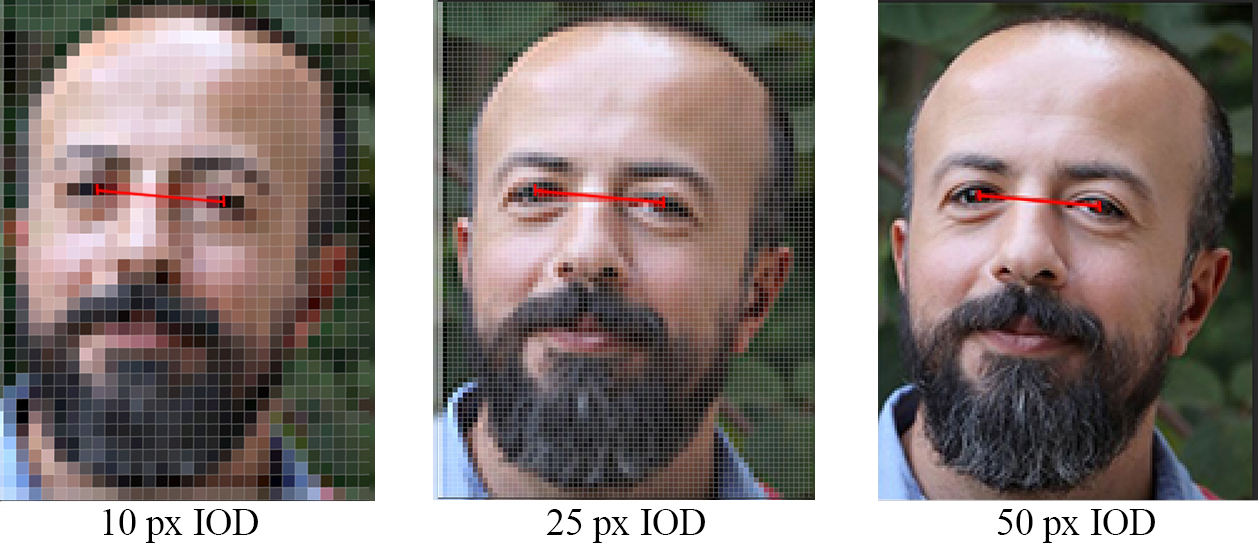
Here are examples of different image quality in the frame based on pixel density:
3.2.1. Adjusting Camera Shutter Speed
Efficient facial recognition of a moving person requires clear and sharp images. Blurry images can significantly affect the accuracy of the recognition process. One important factor influencing image clarity is the shutter speed of the camera sensor. The shutter speed helps maintain consistent image brightness, especially in changing lighting conditions.
To achieve a suitable shutter speed for the camera, follow these steps:
- Switch from Auto Shutter mode to Manual Shutter mode
- Adjust the Shutter setting to a value no higher than 1/100
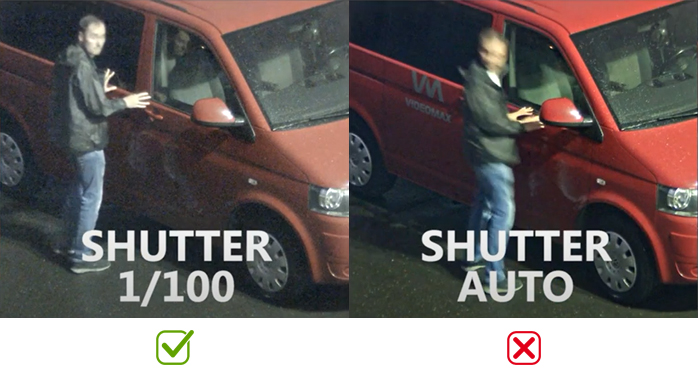
This ensures a faster shutter speed, reducing the chances of motion blur and improving the clarity of captured images.
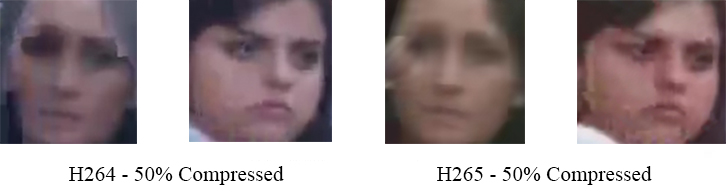
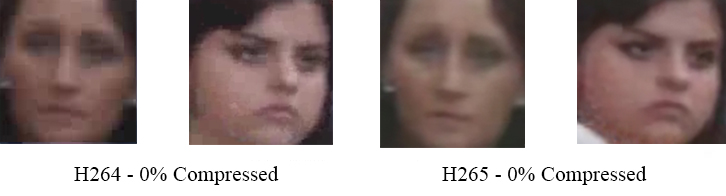
3.2.2. Adjusting Image Compression Settings
For optimal facial recognition results, it is recommended to disable or minimize compression options, ideally within the range of 0-10%, as higher compression levels can introduce noise and reduce the accuracy of recognition. It is advised to avoid using compressions like zip streaming or VIQS.
However, when using compression methods such as H264 or H265, it is acceptable to reduce the compression ratio while maintaining reasonable image quality.
To illustrate the impact of compression, let's consider an example using the same camera with the same resolution and an interocular distance (IOD) of 63 pixels:
- 5MB bandwidth
- 10MB bandwidth
3.3. Lighting Requirements
Lighting plays a crucial role in the installation of cameras for face recognition. To ensure optimal results, it is recommended to provide even lighting of at least 150 lux for faces in the detection area. Paying attention to the background is also important, as recognition performance is enhanced against well-lit and smooth walls or floors.
Considering the camera's location in relation to room lighting is essential, as it directly impacts the quality of face recognition.
The following criteria can be identified:
- For high-quality facial recognition, it is preferable to have high ceilings with overhead soft lighting. This setup ensures that the lighting angle remains consistent even when the object is in motion.
- Conversely, low ceilings with halogen spotlights can diminish the quality of face recognition. Challenging situations may arise in parking lots due to poor lighting conditions. However, the use of additional light sources can help address these issues.
- Placing cameras near doorways can pose challenges due to bright natural lighting. It is important to evaluate the camera's performance at different times of the day after installation. This evaluation allows for a review of the camera's location and potential improvements if necessary.
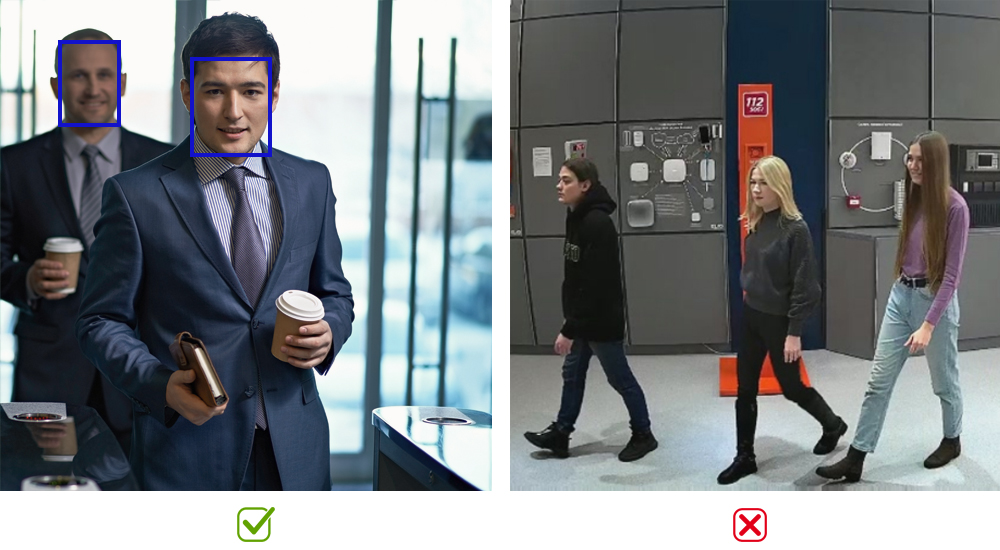
3.4. Camera Positioning Requirements
Since video processing takes some time (typically 0.2 to 1 second), it is recommended to install the camera at gates or in front of pedestrian crossings where the speed of passage naturally slows down. This helps avoid the risk of missing fast-passing individuals.
Cameras can also be installed in corridors where people are moving directly towards the camera. In such cases, it is sufficient for the face to be within the frame for 2-3 seconds, provided that the control zone has good-quality lighting.
Additionally, it is important to consider and minimize foreign noise that can impact the accuracy of face recognition. Examples of such noise include:
- Information racks or displays
- Supporting structures
- Landscape objects
- Passing traffic
- Dense human traffic
4. Camera Installation Examples
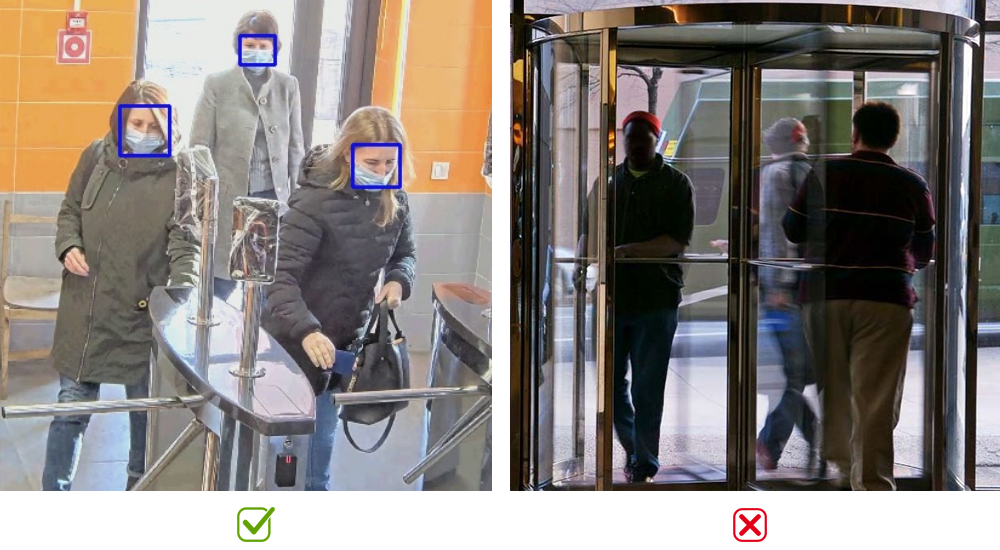
Ensure that people are moving towards the camera within the control zone:
Eliminate any external static or dynamic noise from the detection area:

Make sure the face in the frame has adequate contrast and is well-illuminated by a front-facing light source:
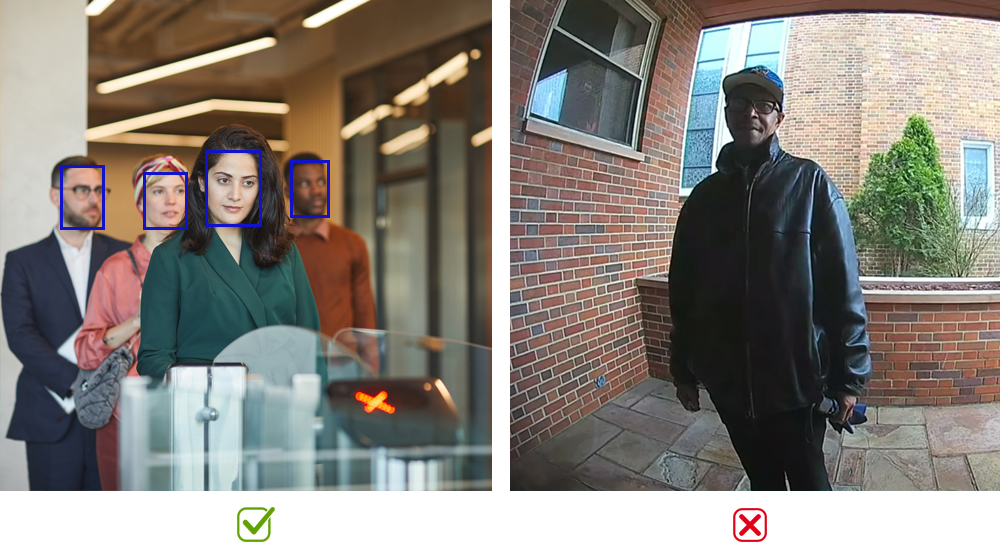
Avoid installing the camera directly in front of bright light sources as it may affect the automatic exposure function: